
Lawn
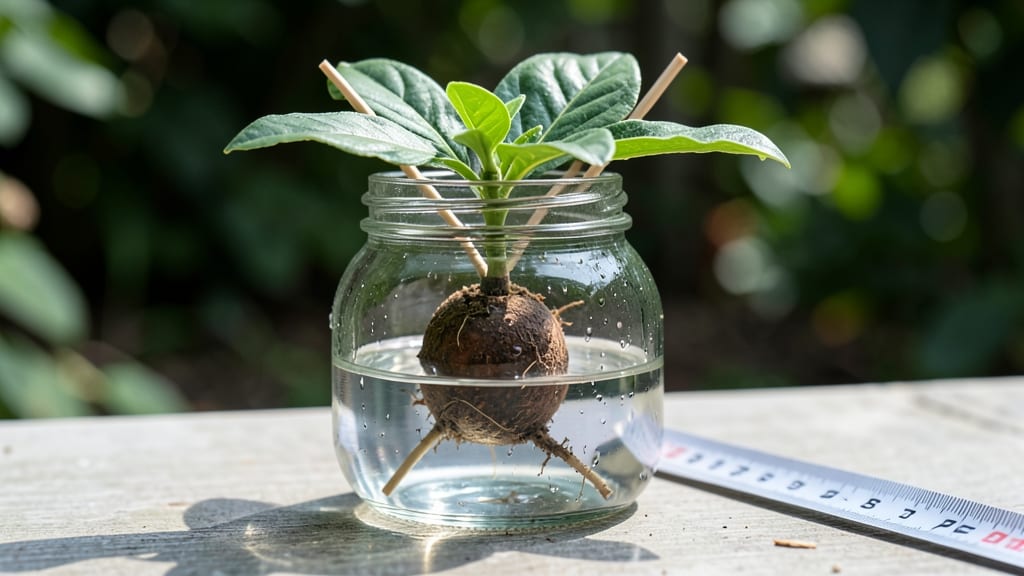
Sprouting an avocado seed in water is the easiest way to grow a plant that’ll give you lush green leaves year after year. 🌱 I’ve tried this method three times, and every time, I end up with a thriving houseplant that looks like it came from a nursery—not my kitchen counter.
The secret? Keeping the seed moist, patient, and free from those pesky toothpicks that cause rot.
All you need is a fresh avocado pit, a glass of water, and a little patience—no fancy tools or green thumbs required. Most seeds start sprouting roots within 2-4 weeks, and once you see those first roots reaching for the water, you’ll know you’re on the right track.
The best part? You can transfer the sprout to soil and watch it grow into a full-sized avocado plant, even if you never get fruit.
By the end of this process, you’ll have a 3-4 inch root system ready to plant, and the whole thing takes less than 30 minutes of active time. The key is consistency—check the water level daily and avoid overcrowding the jar.
If you notice mold or slow growth, don’t worry; a quick rinse and fresh water usually fixes the issue.
Once your avocado sprout has roots, it’s time to move it to soil and give it a forever home. Whether you’re a beginner or just love watching plants grow, this project is foolproof and endlessly rewarding. Let’s get those roots growing!
📚 In This Guide
- What you need
- Instructions
- Tips and common mistakes
- Wrapping up and next steps
What you need
- ● 1 fresh avocado pit – Choose a seed from a ripe, organic avocado (the fresher, the better!).
- ● 3–4 toothpicks or wooden skewers – For suspending the seed (avoid metal to prevent rust).
- ● 1 small glass or jar – At least 6–8 inches tall, with a wide enough opening to fit the seed (mason jars or clear cups work great!).
- ● Water – Filtered or tap water (let it sit out for 24 hours if using tap water to remove chlorine).
- ● Paper towels or a clean cloth – To keep the seed moist during the process.
- ● Pebbles or small stones – Place a layer at the bottom of the glass for drainage (1–2 inches).
- ● Hair tie or rubber band – To secure the toothpicks if they’re wobbly.
- ● Planting pot or soil – For transplanting once roots and sprouts appear (choose a pot with drainage holes).
- ● Plant food or compost – A tiny pinch can give your young plant a nutrient boost later.
- ● Grow light or sunny windowsill – If your space lacks natural light (6+ hours of indirect light is ideal).
Step-by-Step instructions for sprouting avocado seeds in water
Here's how I've sprouted dozens of avocado seeds—no messy twists, no failed attempts.
🌱 Step 1: Prepare the Seed for Germination
Start with a fresh avocado pit—one you've just eaten, not dried out. Rinse it gently under water to remove any fruit residue. You'll notice three distinct sides: the flat side (where the seed attached to the fruit), the rounded side (the top), and the pointed side (the bottom). The flat side is your reference point—this is where roots will emerge.
Use a clean knife to carefully slice the pit lengthwise, right down the middle. You want two equal halves with a clean cut. I like to place the pit on a cutting board and make my first cut shallow, then deepen it gradually to avoid cracking. The goal is a straight split—no jagged edges that could trap moisture and rot.
Once split, you'll see the thick, brown seed coat inside. Use a spoon to gently scrape away the outer layer until you expose the shiny, green seed inside. This is your actual seed—what will grow into a plant. Leave it whole for now; you don't need to separate the two halves further. Just keep the exposed seed facing up.
💧 Step 2: Set Up the Water Germination Station
Fill a glass jar or container with about 2 inches of water. The jar should be wide enough to hold the avocado pit securely but not so large that the seed floats. I use a small mason jar—just enough to submerge about 1 inch of the seed without fully drowning it. The pointed end (bottom) should point downward, while the flat side rests against the jar's edge.
Place the seed in the water so that only the bottom 1 inch is submerged. The rest should stay dry. This keeps the seed stable and prevents rot. You'll notice the seed floats slightly—this is normal. If it tilts too much, gently nudge it with a spoon until it sits upright. The key is balance: the seed needs moisture but not enough to drown.
Change the water every 2-3 days to prevent bacteria buildup. I set a reminder on my phone so I don't forget—stagnant water turns cloudy and smells funky, which means your seed is in danger. Fresh water keeps things clean and speeds up germination. Place the jar in a warm spot, like near a sunny window or on top of the fridge, where the temperature stays around 70-75°F.
☀️ Step 3: Wait for Roots to Emerge
Within 2-4 weeks, you'll see the first signs of life—a small white root pushing out from the pointed end. This is your first checkpoint. Don't be alarmed if it takes a little longer, especially if your home runs cooler. The root will grow slowly at first, then speed up as it gets stronger. You'll know it's working when you see the root reach about 2 inches long.
Here's where it gets interesting: once the root is 2-3 inches long, you'll notice tiny buds forming at the top of the seed. These are the first signs of the stem and leaves. This is your signal to prepare for the next phase. The seed will start to feel heavier as it absorbs more water and prepares to grow upward. If the root grows too long before the stem starts, it may topple over—so keep an eye on it.
During this time, avoid moving the jar. Even slight vibrations can stress the delicate root. If you notice brown spots or a foul smell, it's a sign of rot—remove the seed immediately and start fresh. Healthy roots should be white or light tan, firm to the touch, and growing steadily. If yours looks mushy or smells off, you've waited too long to change the water.
🌿 Step 4: Transition to Soil and Light
Once the root reaches 2-3 inches and you see the first signs of a stem (a small bump or sprout at the top), it's time to plant. Fill a small pot—about 4-6 inches wide—with well-draining potting mix. Make a hole in the center about 1 inch deep and gently place the seed in, root-first. The top half of the seed should sit just below the soil surface, with the sprout pointing upward.
Press the soil lightly around the seed to secure it, but don't pack it down too tightly. The goal is to hold the seed in place without crushing the delicate root. Water the soil gently until it's moist but not soggy. You'll know it's right when water runs out the drainage hole but doesn't pool at the bottom. Place the pot in a bright, indirect light spot—like a windowsill that gets morning sun—to encourage the sprout to grow toward the light.
Keep the soil consistently moist but never waterlogged. Stick your finger 1 inch into the soil—if it feels dry, it's time to water. Overwatering is the biggest mistake here; it causes the seed to rot before it has a chance to grow. Within a few weeks, you'll see the first true leaves emerge, and your avocado seed will officially become a seedling.
⏰ Step 5: Maintain Growth and Encourage Strength
As your avocado seedling grows, it will need more space. When it reaches about 6 inches tall and shows 4-5 leaves, it's time to transplant it into a larger pot—around 8-10 inches wide. Use the same well-draining potting mix and a pot with drainage holes. Gently remove the seedling from its small pot, keeping the root ball intact, and place it in the center of the new pot. Fill in around the roots with soil and water lightly.
Avocado seedlings love bright, indirect light. If you notice the leaves turning yellow or the stem stretching too tall (a sign of legginess), it's not getting enough light. Rotate the pot a quarter turn weekly so the seedling grows straight and sturdy. You'll also want to fertilize lightly every 2-3 months with a balanced, diluted fertilizer to encourage healthy growth. Avoid over-fertilizing—avocados are sensitive to too much salt in the soil.
Patience is key here. It can take 1-2 years for an avocado seedling to mature enough to produce fruit, but the journey is worth it. Watch for signs of pests like spider mites or aphids—wipe the leaves gently with a damp cloth if you spot any. With the right care, your seedling will grow into a lush, green plant that might just surprise you with avocados someday.
Tips & tricks for perfect avocado seed germination
Here's what nobody tells you about growing avocado seeds—these tricks saved my first three attempts!
Seed Selection Tip: The fresher the avocado, the better your chances. I always use pits from organic avocados because they're less likely to have been treated with preservatives that can inhibit germination. Look for a pit that feels heavy for its size—this means it's dense and full of stored energy for growth. If your pit feels light or hollow when tapped, it's probably too dried out to sprout.
Cutting Technique That Changed Everything: When slicing the pit in Step 1, I learned the hard way that a clean cut matters. Use a sharp knife and make your first cut shallow—this prevents the pit from cracking or splitting unevenly. If you see jagged edges after cutting, gently sand them with fine-grit sandpaper. Smooth edges help prevent moisture buildup that leads to rot. The goal is two perfectly matched halves that fit together like puzzle pieces.
Water Balance Secret: The 2 inches of water in Step 2 isn't just about depth—it's about creating the perfect balance. Too little water and the root won't get enough moisture to start growing; too much and the seed will rot before it even sprouts. I've found that using a mason jar with a wide enough mouth to hold the seed securely (but not so wide the seed floats) is ideal. The seed should sit at a slight angle—this prevents it from tipping over while still allowing the root to grow downward naturally.
Temperature and Light Strategy: While the instructions mention 70-75°F, I've noticed that seeds germinate fastest when placed near a warm spot that gets indirect sunlight. The top of a fridge or near a sunny window works perfectly because it combines warmth with gentle light stimulation. Avoid placing the jar in direct sunlight—this can cause the water to evaporate too quickly and create an unstable environment for the delicate root. A small fan on low setting near the jar can actually help by circulating air without disturbing the seed.
Pro Tips for Sprout An Avocado Seed In Water
- Here's what nobody tells you about growing avocado seeds—these tricks saved my first three attempts!
- Seed Selection Tip: The fresher the avocado, the better your chances.
- Cutting Technique That Changed Everything: When slicing the pit in Step 1, I learned the hard way that a clean cut matters.
Frequently asked questions
Got questions about sprouting your avocado seed? You’re not alone—this fun (but finicky!) process sparks curiosity! Below, we tackle the most common queries to help you avoid pitfalls and celebrate tiny victories along the way.
How long does it take for an avocado seed to sprout in water?
Patience is key! Most avocado seeds sprout roots within 2–6 weeks, depending on temperature (ideal: 70–85°F) and humidity. Tiny root hairs appear first, followed by a 1–2 inch root in 3–4 weeks. If nothing happens after 6 weeks, try adjusting light or warmth—your seed might just need a nudge.
Do I need to change the water daily?
Yes! Refresh the water every 2–3 days to prevent bacteria or mold (yuck!). Use room-temperature water and avoid overfilling the glass—just enough to cover the bottom third of the seed. Stagnant water = sad sprouts, so keep it fresh!
What if my avocado seed isn’t sprouting at all?
Don’t panic! Try these fixes:
- Warmth: Place near a sunny window or use a heat mat (70°F+).
- Humidity: Cover the glass with plastic wrap or a damp paper towel.
- Patience: Some seeds take up to 8 weeks—check for life with a toothpick (gentle poke near the bottom).
Can I plant the seed in soil before roots are 2+ inches long?
Technically yes, but wait until roots hit 2–3 inches for stability. If you plant too soon, the seed may topple or rot. When ready, bury 1/3 of the seed in moist soil, leaving the top exposed. Keep soil damp (not soggy) and place in bright, indirect light.
What if I don’t have toothpicks—can I use something else?
Swap toothpicks for:
- Bamboo skewers (gentler on the seed).
- Plastic wrap secured with a rubber band (no toothpicks needed!).
- Even a clean pencil in a pinch—just avoid metal (rust risk).
Wrapping up and next steps
Sprouting an avocado seed in water is a simple, rewarding project that brings a touch of green to your space—without the mess or fuss!
With just a few supplies and patience, you’ll watch roots and stems emerge in just a few weeks, proving that nature’s magic is always within reach. Once your seedling is thriving, consider planting it in soil to grow a full avocado tree—your future kitchen garden awaits! 🌱✨
Ready to take the next step? Share your progress with fellow plant lovers or explore creative ways to display your sprout as a desk companion or gift. Happy growing!