Picking
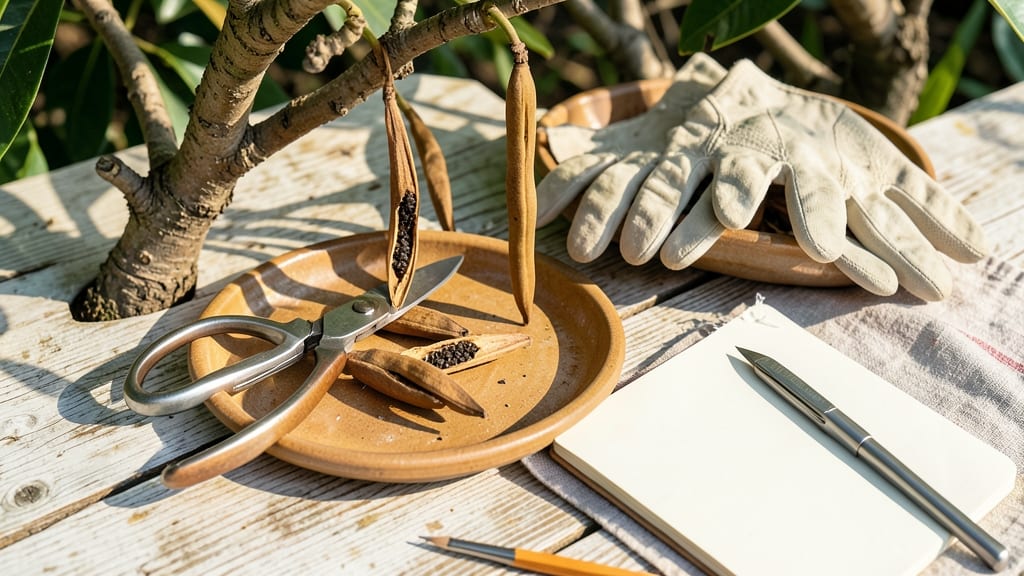
Harvesting plumeria seed pods at the right moment means the difference between viable seeds and dust. 🌺 The pods turn from green to brown and papery—this is your cue, usually between late summer and early fall when they’re fully dry but haven’t split open yet.
One wrong move, and you’ll lose seeds to wind or pests, so timing is everything.
You’ll need pruning shears, a paper bag for collecting pods, and thick gloves—those pods can be stubborn and sharp when dry. The key is patience: twist the pod gently until it releases with a soft pop, then crack it open carefully to avoid damaging the seeds inside.
I’ve learned the hard way that forcing it too soon leads to empty pods.
Once you’ve extracted the seeds, let them dry in a shady, well-ventilated spot for 1-2 weeks before storing them in an airtight container. Properly dried seeds stay viable for 6-12 months, and the first sprouts appear within 2-4 weeks if kept warm and moist.
There’s nothing like watching those tiny green shoots push through the soil after months of waiting.
Watch for aphids or ants on the pods—they’ll chew through seeds faster than you can harvest. If pods split open too soon, cover them with a breathable mesh bag to protect the seeds until you’re ready. Share your progress: what’s worked (or failed) in your plumeria seed journey?
📚 In This Guide
- What you need
- Instructions
- Tips and common mistakes
- Wrapping up and next steps
What you need
- ● Mature plumeria seed pods: Choose pods that are fully brown, dry, and slightly papery (usually 3–6 months after flowering). Avoid green or soft pods—they won’t yield viable seeds!
- ● Sharp pruning shears or garden scissors: A clean, sterilized pair (alcohol wipe recommended) to snip pods from the plant without damaging stems.
- ○ Disposable gloves (optional but recommended): Protect your hands from latex sap (can irritate skin) and keep things tidy.
- ● Paper towels or newspaper: Lay them out on a flat surface to dry and separate seeds after extraction.
- ● Small bowl or container: For collecting seeds (a glass or ceramic dish works best to avoid static cling).
- ○ Fine-mesh strainer (optional but helpful): Sifts out debris if seeds are extracted near dusty areas.
- ● Plastic zip-top bags: Store seeds in a cool, dry place (label with date!) for up to 6 months.
- ● Hair dryer (low heat setting): Speeds up drying if pods are slightly damp.
- ● Magnifying glass: Helps spot tiny seeds in fibrous pods.
- ● Seed-starting mix: If you’re ready to plant right away, have a well-draining mix (like cactus/succulent soil) on hand.
Step-by-Step instructions for harvesting plumeria seed pods
Here's how to collect ripe plumeria seed pods without damaging the plant or losing viable seeds.
🌿 Step 1: Identify Ripe Seed Pods
Plumeria seed pods mature over 6-8 weeks after flowering, turning from green to a dry, papery brown when ready. Gently squeeze the pod—it should feel firm but slightly brittle, like a crisp autumn leaf. Avoid harvesting pods that are still green or have begun splitting open naturally, as the seeds inside will be immature or already dispersed.
Look for pods that have dried uniformly along their entire length. Sometimes only a portion of the pod ripens first, so check each flower cluster individually. The best time to harvest is on a dry, sunny morning when the pods are fully firm but haven't yet opened on their own. This ensures maximum seed viability and makes extraction easier.
✂️ Step 2: Cut Pods at the Right Time
Use clean, sharp pruning shears to snip the pod from the stem at a 45-degree angle, leaving about ½ inch of stem attached. This prevents sap from bleeding excessively and reduces the risk of fungal infection. Work quickly—once you begin harvesting, aim to finish within 15-20 minutes to avoid unnecessary stress on the plant.
Place the harvested pods in a paper bag (not plastic) to allow airflow while preventing seed loss. Label the bag with the harvest date and the plumeria variety if known. Storing them in a cool, dry place (around 65-70°F) for 1-2 weeks before opening helps ensure seeds are fully mature and ready for extraction.
🌱 Step 3: Extract Seeds Without Twisting
Once the pods are fully dry, lay one on a clean cutting board and gently press along the seam with your thumb. The pod should split open naturally—if it resists, it may not be fully mature. Avoid using tools like knives or screwdrivers, as they can damage the delicate seed coat or crush the seeds inside.
Inside, you'll find flat, winged seeds embedded in a woody, fibrous material. Use your fingers to tease apart the fibers and separate the seeds. Discard any seeds that appear shriveled, discolored, or hollow-sounding when tapped gently. Healthy seeds should feel firm and slightly waxy, with intact wings for dispersal.
💧 Step 4: Clean and Store Seeds Properly
Spread the extracted seeds on a paper towel in a single layer and let them air-dry for 24-48 hours in a shady, well-ventilated area. This prevents mold growth and ensures they’re completely dry before storage. Avoid direct sunlight, which can overheat the seeds and reduce germination rates.
Once dry, transfer the seeds to an airtight container lined with a silica gel packet to absorb excess moisture. Store the container in a cool, dark place (around 50-60°F) for up to 6 months. Test a few seeds for germination every 2-3 months by planting them in moist potting mix—viable seeds should sprout within 2-4 weeks under warm, humid conditions.
⏰ Step 5: Prepare for Germination
Before planting, soak the seeds in warm water for 12-24 hours to soften the hard outer coating. This step mimics natural rainfall and significantly improves germination rates. After soaking, plant the seeds ¼ inch deep in a well-draining seed-starting mix, keeping it consistently moist but never soggy.
Place the container in a warm, humid environment (around 75-80°F) with bright, indirect light. Germination can take 4-8 weeks, so patience is key. Once seedlings emerge, provide gentle airflow to strengthen stems and prevent damping-off disease. Transplant them outdoors only after the last frost and when they’ve developed 3-4 true leaves.
Tips & tricks for harvesting plumeria seed pods
Here's what I've learned after years of working with plumeria—these details make all the difference between viable seeds and wasted effort.
Timing is Everything: In Step 1, that 6-8 week maturation period is non-negotiable. I've learned the hard way that harvesting too early means immature seeds, while waiting too long means natural dispersal. Mark your calendar when flowers appear to track this window precisely. The dry, papery brown color is your best indicator—it should feel firm but brittle, like autumn leaves. If you're unsure, do the squeeze test: a ripe pod will crackle slightly under gentle pressure.
Tool Selection Matters: For Step 2, I can't stress enough how important those clean, sharp pruning shears are. Dull blades crush stems and cause sap bleeding, while dirty tools introduce pathogens. I keep a dedicated pair just for plumeria harvesting and sterilize them with rubbing alcohol between uses. That 45-degree angle cut isn't just decorative—it prevents sap from pooling and creating entry points for fungal infections. And remember: finish within 15-20 minutes to minimize plant stress.
Seed Viability Check: During Step 3, when you're separating seeds, pay close attention to their condition. Healthy seeds should feel firm and slightly waxy with intact wings. I've found that tapping them gently against my palm—good seeds make a solid, resonant sound, while hollow ones produce a dull thud. Discard any that appear shriveled or discolored immediately. The winged structure isn't just for show; it indicates the seed's natural dispersal mechanism is intact, which correlates strongly with germination success.
Storage Environment: When you reach Step 4, creating the right conditions for that 24-48 hour drying period is crucial. I use a mesh screen in a shaded area with good airflow to prevent mold while allowing complete drying. The 50-60°F storage temperature is ideal—any warmer and you risk accelerating seed deterioration. I've had excellent results using small glass jars with silica gel packets, which maintain the perfect humidity level. Don't forget to test germination every 2-3 months—this gives you real-time feedback on seed viability.
Pro Tips for Harvest Plumeria Seed Pods
- Here's what I've learned after years of working with plumeria—these details make all the difference between viable seeds and wasted effort.
- Timing is Everything: In Step 1, that 6-8 week maturation period is non-negotiable.
- Tool Selection Matters: For Step 2, I can't stress enough how important those clean, sharp pruning shears are.
Frequently asked questions
Got questions about harvesting plumeria seed pods? You’re not alone! Here are some common concerns—and their solutions—to help you succeed.
When is the best time to harvest plumeria seed pods?
The ideal time is when the pods turn brown and papery (usually 6–8 weeks after flowering). Harvest them before they split open naturally—this ensures the seeds stay viable. Avoid harvesting green or overly dry pods, as they may contain immature or non-viable seeds.
How long does it take for plumeria seeds to germinate?
Germination can take anywhere from 2 weeks to 6 months, depending on conditions like temperature, humidity, and seed freshness. Most seeds sprout within 4–12 weeks if kept in a warm, moist environment (70–85°F). Patience is key—don’t give up too soon!
What if my seed pods won’t open naturally?
If pods stay stubbornly closed, try these tricks:
- Soak them in warm water for 24–48 hours to soften the fibers.
- Gently twist the pod with gloved hands or pliers (avoid crushing seeds).
- Freeze them overnight to expand the pod slightly for easier extraction.
Can I grow plumeria from cuttings instead of seeds?
Cuttings are often faster and more reliable than seeds. Take 4–6 inch semi-hardwood cuttings in spring/summer, let them callus for a day, then root in perlite or water. Plumerias grown from cuttings retain the parent plant’s traits, while seeds may produce unexpected colors or sizes.
What should I do if my seeds mold or rot?
Mold or rot usually means too much moisture or poor airflow. If you notice fuzzy growth or a foul smell:
- Discard affected seeds immediately.
- Wash containers with a 10% bleach solution to sterilize.
- Use fresh, well-draining soil (like a 50/50 mix of perlite and coconut coir).
Wrapping up and next steps
Harvesting plumeria seed pods may seem tricky, but with the right tools and patience, you’ll unlock a world of fragrant blooms and lush foliage!
Remember, timing is key—wait for pods to turn brown and split naturally, then gently twist and extract seeds while keeping them clean and dry. You’ve got this! Once you’ve secured your seeds, the next logical step is planting them—whether in soil or water—to grow your very own plumeria plants.
Happy gardening! 🌱✨