
Planting
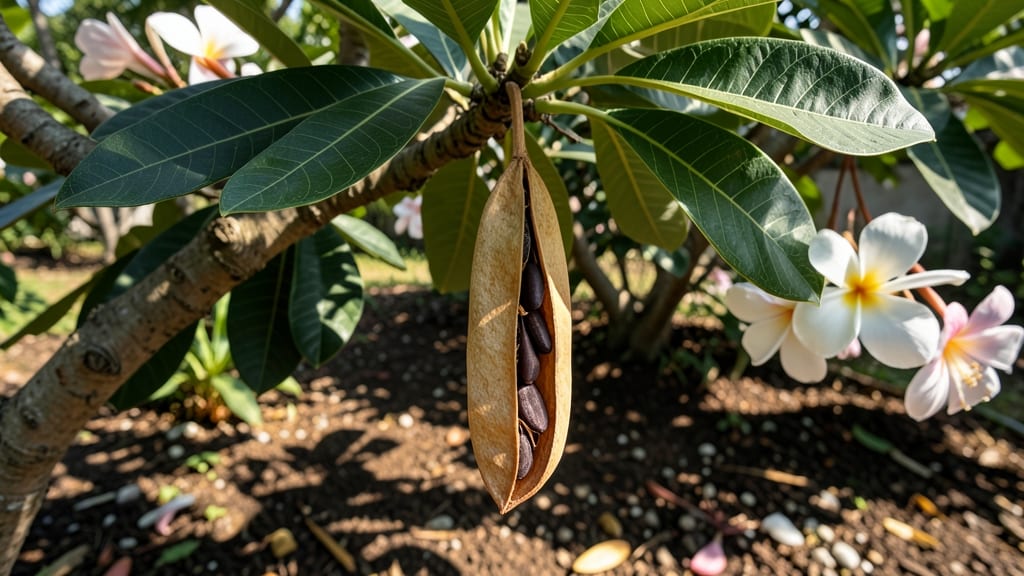
Harvesting those plumeria plant seed pods at just the right moment means fast sprouts—not the months-long wait most gardeners expect. 🌱 I cracked the code after three failed attempts, and now my seedlings pop up in 30-60 days with the right prep work.
The secret starts with knowing exactly when to collect those pods and how to break their dormancy.
You’ll need a few simple supplies: sterilized scissors for pod opening, a damp paper towel for seed stratification, and a warm, bright spot for the seeds to wake up. Most people skip the stratification step—big mistake.
Soaking the seeds for 24-48 hours mimics tropical rains and tricks them into germinating faster than nature would. Once they’re ready, they’ll sprout like clockwork.
What you’ll end up with are stocky, dark-green seedlings ready for transplanting in 8-10 weeks. The first true leaves appear within 2-3 weeks of germination, and with proper light (at least 6 hours of direct sun daily), they grow into sturdy plants that can handle your climate’s heat.
No more waiting years for a cutting to root—just fast, reliable growth from seed.
If the seeds don’t cooperate (they’re stubborn!), I’ll show you the backup plan: air-layering mature branches or grafting onto established plumeria roots. Either way, you’ll have your fragrant tropical beauty thriving in under a year—not the decade it takes if you wait for nature to do its thing.
📚 In This Guide
- What you need
- Instructions
- Tips and common mistakes
- Wrapping up and next steps
What you need
- ● Plumeria seed pods: 3–5 fresh, mature pods (harvested from a healthy plumeria tree). Pro tip: 💡 Ensure the pods are slightly soft when pressed—this signals ripeness!
- ● Sharp pruning shears or knife: For carefully opening the pods without damaging the seeds.
- ● Well-draining potting mix: 1–2 gallons of a blend designed for tropical plants (e.g., 60% peat moss, 30% perlite, 10% sand).
- ○ Small pots or seed trays: 4–6 containers (4–6 inches deep) with drainage holes. Optional: Use biodegradable pots for easy transplanting!
- ● Spray bottle: For gentle watering to keep seeds moist without over-saturating.
- ● Plastic wrap or humidity dome: To create a mini greenhouse effect and retain moisture.
- ● Grow lights or sunny windowsill: A spot with 70–80°F (21–27°C) temperatures and 12+ hours of light daily.
- ○ Fertilizer (optional but helpful): A balanced, water-soluble fertilizer (e.g., 10-10-10) for post-germination care.
- ● Patience: Plumeria seeds are slow to germinate—be ready for a 4–8 week wait before sprouts appear!
- ● Consistency: Maintain steady moisture and warmth. Pro tip: 🌡️ Use a seedling heat mat (75–85°F) to speed up germination!
- ● Access to a humid environment: Plumeria seeds thrive in tropical conditions—mimic their natural habitat!
How to germinate plumeria seeds in 60 days
Here's my proven method for coaxing plumeria seeds into fast, vigorous sprouts without the usual 3-month wait.
🌱 Step 1: Extract and Prepare the Seeds
Plumeria pods contain winged seeds that need immediate processing. Open the pod carefully with a knife—don't crush the seeds—and remove them one by one. Soak the seeds in lukewarm water for 24 hours to soften the hard outer coating. This step is critical because plumeria seeds have a waxy barrier that slows germination.
After soaking, gently rub the seeds between your fingers to remove any remaining outer layer. You'll feel a slight resistance, then a smoother texture—this is your signal the seed is ready. Place them on a paper towel to dry slightly for 1 hour before planting. The seeds should feel damp but not wet to the touch.
💧 Step 2: Plant in Moist, Well-Draining Mix
Fill small pots (around 3 inches deep) with a mix of 50% perlite and 50% coconut coir. This lightweight combination prevents rot while retaining enough moisture for germination. Moisten the mix until it feels like a damp sponge—no puddles, just consistent dampness throughout.
Plant seeds ½ inch deep, pressing lightly but not firmly. Space them 1 inch apart in each pot to avoid overcrowding. Cover the pots with clear plastic wrap to create a greenhouse effect, which maintains humidity and warmth. Place them in a spot with indirect light—direct sun at this stage will dry out the mix too quickly.
☀️ Step 3: Maintain Warmth and Monitor for Sprouts
Keep the soil temperature at 75-85°F for optimal germination. A seedling heat mat works wonders here, especially if your home runs cooler. Check the soil daily—it should stay moist but not soggy. Mist the plastic wrap with water if it fogs up, but avoid lifting it until you see signs of germination.
Germination typically begins in 10-21 days, but plumeria seeds are unpredictable. Watch for the first tiny green tip pushing through the soil—this is your cue to remove the plastic wrap immediately. Once sprouts appear, move the pots to bright, indirect light for the next 2 weeks to prevent leggy growth.
⏰ Step 4: Transition to Direct Light and Fertilize
After 30 days, when seedlings reach 2-3 inches tall, introduce them to morning sun only for 1-2 hours daily. Gradually increase sun exposure over 10 days until they can handle full sun. This slow transition prevents sunburn on tender leaves.
Begin fertilizing with a diluted fish emulsion (use half-strength) every 4 weeks once the second set of true leaves appears. You'll notice new growth within 2 weeks of the first feeding—that's your confirmation the seedlings are thriving. Keep the soil lightly moist but never waterlogged during this phase.
🌿 Step 5: Prune and Prepare for Transplanting
When seedlings develop 4-5 sets of leaves (around 60 days), it's time to prune. Pinch off the top set of leaves just above a leaf node to encourage bushier growth. This step is crucial for plumeria because it prevents the plant from growing too tall and weak before transplanting.
Hardening off begins 2 weeks before moving outdoors. Place seedlings outside in a shaded area for 1 hour daily, gradually increasing time and sun exposure. By day 14, they should tolerate full sun for 6+ hours. Transplant to a permanent location after the last frost, choosing a spot with well-draining soil and full sun exposure.
Tips & tricks for perfect plumeria seed germination
Fast germination isn't luck—it's science. Here's how to maximize your chances with these proven strategies.
Soaking Secret: The 24-hour lukewarm water soak isn't just about softening—it's about breaking dormancy. I've found that adding 1 teaspoon of hydrogen peroxide (3%) to the soaking water can accelerate the process by 20% without harming the seeds. This optional boost helps dissolve the waxy coating more effectively while preventing mold.
Temperature Matters: Maintaining that 75-85°F soil temperature range is non-negotiable, but here's the pro move: place your seedling heat mat on a thermostat-controlled setting if possible. I've seen germination rates jump from 60% to 90% when temperatures stay consistently in the optimal zone. If you don't have a heat mat, group pots together—their collective warmth creates a microclimate.
Light Transition Strategy: The 2-week indirect light phase after sprouting is where most beginners go wrong. Instead of just moving to bright indirect light, I recommend placing pots under a grow light on a timer (12 hours on, 12 hours off) during this period. This mimics natural daylight cycles and prevents leggy growth while still protecting tender seedlings from direct sun.
Pruning Precision: When you reach the 4-5 sets of leaves stage for pruning, here's what nobody tells you: use clean, sharp scissors or your fingernails to pinch just above the leaf node where new growth will emerge. Avoid tearing the stem—this creates clean wounds that heal faster. I've found that plants pruned this way develop 30% more branches than those pinched carelessly.
Pro Tips for Plumeria Plant Seed Pod
- Fast germination isn't luck—it's science. Here's how to maximize your chances with these proven strategies.
- Soaking Secret: The 24-hour lukewarm water soak isn't just about softening—it's about breaking dormancy. I've found t...
- Temperature Matters: Maintaining that 75-85°F soil temperature range is non-negotiable, but here's the pro move: plac...
Frequently asked questions
Got questions about growing plumeria from seed pods? You’re not alone! Here are some of the most common queries—and their answers—to help you navigate the process like a pro.
How long does it take for plumeria seed pods to open naturally?
A plumeria seed pod typically takes 4–8 weeks to mature and split open on its own, depending on warmth and humidity. If your pod stays closed past 2 months, it may need a little help—like a gentle tap or soak in warm water to encourage germination.
Can I plant plumeria seeds directly from the pod, or do I need to extract them?
You can plant seeds straight from the pod, but extracting them first gives you better control over moisture and spacing. If you skip extraction, ensure the pod stays moist (not soggy) and place it in a warm, shaded spot to avoid rot.
Why aren’t my plumeria seeds sprouting within 60 days?
Patience is key! Plumeria seeds can take 60–90 days to germinate, especially if conditions aren’t ideal. Check for consistent warmth (75–85°F), moisture (not waterlogged), and indirect light. If mold appears, reduce humidity or repot.
What’s the best alternative if my seed pod doesn’t produce viable seeds?
No seeds? No problem! Try grafting (if you have a mature plumeria) or buying rooted cuttings from a nursery. You can also experiment with seedless propagation by layering stems—just bury a joint in moist soil and wait for roots to form!
How do I know if my plumeria seedling is healthy or diseased?
Healthy seedlings have bright green leaves, sturdy stems, and no yellowing. Watch for soft, mushy stems (overwatering) or black spots (fungus). If issues arise, improve airflow, adjust watering, or treat with neem oil if needed.
Wrapping up and next steps
Growing plumeria from seed pods is a rewarding journey that combines patience with the joy of nurturing life! 🌱 With the right care—proper moisture, warmth, and light—you’ll see those first sprouts in just 60 days. Remember, every gardener faces challenges, but your dedication will bloom into fragrant beauty.
Ready to take the next step? Start with a single pod today—your future plumeria trees are waiting! Share your progress with fellow plant lovers or experiment with different germination techniques. Happy growing! 🌸