Size
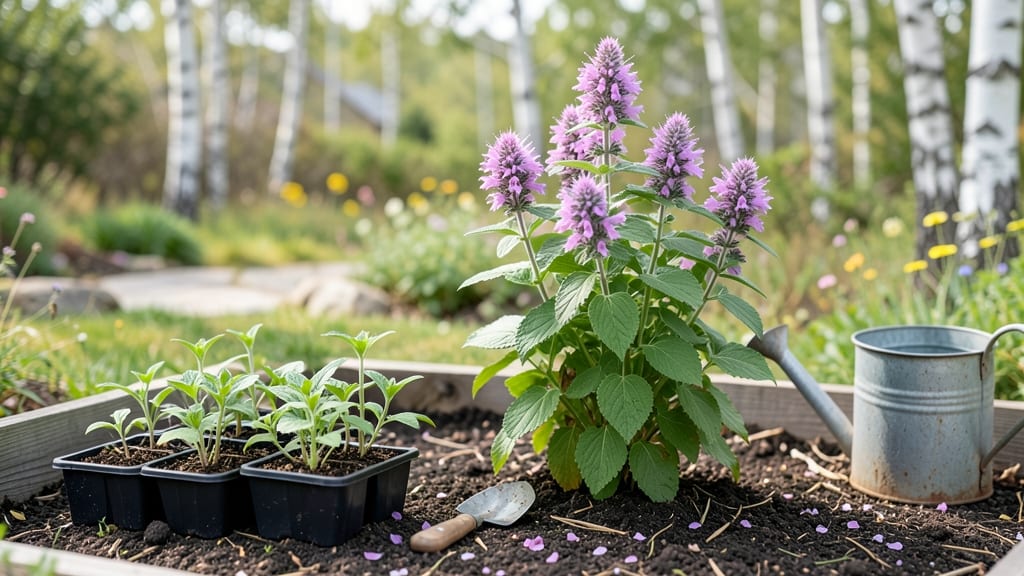
Growing bee balm seed in a garden gives you vibrant blooms that hummingbirds and bees can't resist—if you crack the cold-stratification code. 🌱 I learned the hard way that skipping this step means waiting months for germination, but with the right timing and technique, you'll see those first purple spikes in just 60 days.
The secret lies in mimicking nature's winter chill, and it's simpler than you think.
Start with fresh seeds and a mix of potting soil and perlite to keep roots happy. Plant them 1/8-inch deep in small pots, then refrigerate for 30-60 days—this mimics winter's cold snap.
Once they've been chilled, move them to a sunny windowsill or under grow lights, keeping the soil consistently moist but never soggy. Most seeds sprout within 10-20 days after this cold treatment.
By early summer, your seedlings will be ready for the garden, where they'll spread into 2-3 foot clumps with striking red, pink, or purple flowers. The best part? These plants attract pollinators like crazy, turning your garden into a buzzing paradise.
Just give them full sun to partial shade and well-draining soil, and they'll thrive for years with minimal care.
Here's the thing—bee balm multiplies easily, so you'll soon have extras to share. If your seedlings get leggy, simply transplant them deeper into the soil to encourage stronger stems.
With this method, you'll avoid the common pitfalls of slow germination and weak starts, and end up with a garden that's alive with color and activity.
📚 In This Guide
- What you need
- Instructions
- Tips and common mistakes
- Wrapping up and next steps
What you need
- ● Bee balm seeds: 1–2 packets (500–1,000 seeds per packet; choose cold-hardy varieties like Monarda didyma or Monarda fistulosa for best results).
- ● Cold-stratification supplies: Plastic storage bag or damp paper towels
- ● Sealable container (e.g., Ziploc bag or small Tupperware)
- ● Potting mix: 1–2 bags of seed-starting mix (sterile, well-draining blend).
- ● Containers: 2–4 biodegradable pots (3–4 inches deep) or a seed tray with cells.
- ● Grow lights or sunny windowsill: South-facing window or LED grow lights (12–16 hours/day).
- ● Watering can or spray bottle: With a gentle misting nozzle.
- ● Fertilizer: Balanced liquid fertilizer (5-5-5 or 10-10-10, diluted to half-strength).
- ○ Seedling heat mat (optional, for faster germination in cool climates).
- ● Humidity dome or plastic wrap (to retain moisture during stratification).
- ● Garden twine or labels (for organizing seedlings).
- ● Outdoor garden space (partial sun to full sun, 6+ hours/day).
- ● Mulch (straw or shredded leaves, to retain soil moisture post-transplant).
Step-by-step instructions for growing bee balm from seed
Cold-stratification unlocks bee balm's natural vigor—here's how to coax those vibrant blooms in just two months.
🌱 Step 1: Cold-Stratify Seeds for Maximum Germination
Bee balm seeds need 60-90 days of cold stratification to break dormancy. Place seeds in a sealed plastic bag with slightly damp peat moss or vermiculite—enough moisture to keep it damp but not soggy. Seal the bag and refrigerate for 8-12 weeks at 35-40°F. Check weekly and mist if the mix dries out.
This mimics winter conditions in nature, fooling seeds into thinking spring has arrived. I like to label the bag with the date—I've forgotten and planted too early, only to watch seeds fail to sprout. After stratification, you'll see tiny cracks in the seed coats, signaling they're ready for planting.
🪴 Step 2: Sow in Well-Draining Soil with Light Cover
Fill 4-inch pots with a mix of 50% potting soil and 50% perlite to ensure excellent drainage—bee balm hates soggy roots. Plant seeds ¼ inch deep, spacing them 1 inch apart in each pot. Cover lightly with additional mix, just enough to obscure the seeds but not bury them deeply.
Water gently until the soil surface looks uniformly damp but not wet. Too much water at this stage can cause seeds to rot before they germinate. Place pots in a warm location (65-75°F) with indirect light. A seedling heat mat helps maintain consistent warmth, which speeds up germination.
☀️ Step 3: Provide Bright Light and Gradual Hardening
Once seedlings emerge—typically in 14-21 days—move them to a south-facing window or under grow lights for 12+ hours of light daily. Bee balm seedlings grow quickly but need strong light to prevent leggy, weak stems. You'll know they're getting enough light when leaves are dark green and compact.
After 4-6 weeks, when seedlings have 3-4 sets of true leaves, begin hardening them off. Start with 1 hour outside in partial shade, then gradually increase exposure over 7-10 days. This prepares them for transplanting and prevents shock. Watch for wilting—if it happens, they're not ready yet.
🌿 Step 4: Transplant to Garden with Proper Spacing
Choose a location with full sun to partial shade and well-draining soil. Bee balm thrives in USDA zones 3-9 and spreads aggressively, so space plants 18-24 inches apart. Dig holes slightly larger than the root ball and amend the soil with compost to improve fertility.
Transplant on a cool, overcast day to reduce stress. Water deeply after planting to settle the soil and encourage root growth. Mulch around the base with 2-3 inches of organic mulch to retain moisture and suppress weeds. Avoid overwatering—bee balm is drought-tolerant once established.
✂️ Step 5: Maintain and Encourage Blooms
Deadhead spent blooms regularly to encourage continuous flowering from early summer through fall. Pinch back leggy stems in early spring to promote bushier growth. Bee balm is hardy and low-maintenance, but it rewards attentive care with vibrant blooms that attract pollinators.
Fertilize lightly in spring with a balanced 10-10-10 fertilizer to support healthy growth. Avoid heavy feeding, as it can lead to excessive foliage at the expense of flowers. Watch for powdery mildew in humid conditions—improve airflow by spacing plants properly and avoid overhead watering.
Tips & tricks for perfect bee balm growth
Here's what nobody tells you about getting those vibrant blooms—these insider tricks make all the difference.
Cold Stratification Precision: The 60-90 days of cold stratification is non-negotiable, but here's the secret: use a thermometer in your fridge to confirm the 35-40°F range. Many home fridges run cooler—adjust shelf placement if needed. I've seen seeds fail when kept too warm during stratification. Also, place a damp paper towel in the bag with your seeds to maintain consistent moisture without over-saturating the peat moss or vermiculite.
Seedling Light Strategy: Once your seedlings emerge in 14-21 days, don't rush them to full sun. Start with 4-6 hours of morning sun and gradually increase exposure over 3-4 days. Bee balm seedlings are particularly sensitive to sunburn when young. I've lost entire batches by moving them too quickly—watch for pale or crispy leaves as your warning sign.
Transplanting Timing: The 7-10 day hardening process is crucial, but don't skip the initial 1 hour in partial shade. This first exposure helps acclimate their delicate leaves without overwhelming them. I recommend doing this in the late afternoon when temperatures are cooler. Also, avoid transplanting when daytime temps exceed 85°F—bee balm struggles to establish roots in extreme heat.
Soil Mix Substitution: While the 50/50 potting soil to perlite mix is ideal, you can substitute perlite with coarse sand or even coconut coir if you're in a pinch. The key is maintaining that excellent drainage—bee balm roots rot quickly in soggy conditions. For container growing, add a handful of horticultural charcoal to your mix to prevent fungal issues, especially in humid climates.
Pro Tips for Bee Balm Seed Grow A Garden
- Here's what nobody tells you about getting those vibrant blooms—these insider tricks make all the difference.
- Cold Stratification Precision: The 60-90 days of cold stratification is non-negotiable, but here's the secret: use a thermometer in your fridge to confirm the 35-40°F range.
- Seedling Light Strategy: Once your seedlings emerge in 14-21 days, don't rush them to full sun.
Frequently asked questions
Got questions about growing bee balm from seed?
You’re not alone! Here are the most common queries—plus quick, actionable answers to keep your garden thriving.
Do bee balm seeds really need cold stratification?
Yes! Bee balm seeds require cold stratification (60 days in the fridge) to break dormancy. Skip this step, and your seeds may never sprout. Pro tip: Mix seeds with damp sand or peat moss in a sealed bag before refrigerating for best results.
How long does it take for bee balm seeds to germinate?
With proper cold stratification, germination typically takes 14–30 days after planting. Keep soil consistently moist (not soggy) and place trays in indirect light until sprouts appear. Patience pays off—those first leaves are worth the wait!
Can I grow bee balm from seed indoors, or should I start outside?
Both work! Start seeds indoors 10–12 weeks before your last frost for an early jumpstart. Use biodegradable pots to avoid transplant shock. Alternatively, direct-sow in spring after soil warms (60°F+), but expect slower growth. Warning: Bee balm hates transplanting—handle seedlings gently!
Why aren’t my bee balm plants flowering?
Common culprits:
- Overcrowding—thin seedlings to 12–18" apart for airflow.
- Poor light—bee balm craves 6+ hours of sun daily.
- Deadheading delay—snip spent blooms to encourage more flowers.
What’s a good alternative if bee balm seeds fail to germinate?
Try these easy, bee-friendly swaps:
- Monarda fistulosa (wild bergamot)—drought-tolerant and self-seeding.
- Salvia nemorosa (perennial sage)—low-maintenance and pollinator-magnet.
- Coneflower (Echinacea)—hardy and attracts butterflies too!
Wrapping up and next steps
Growing bee balm from seed is a rewarding journey that brings vibrant blooms and buzzing pollinators to your garden in just 60 days—with the right prep! Whether you're drawn to its striking colors or its ability to attract bees, this hardy perennial is a must-have for any gardener.
Cold-stratifying your seeds is the secret to unlocking fast, healthy growth, so don’t skip this step.
Now that you’re armed with the know-how, roll up your sleeves and get planting! 🌱 Start with a small batch, experiment with placement, and soon you’ll be enjoying a garden teeming with life.
Next up? Share your progress with fellow gardeners or explore advanced tips for maximizing your bee balm’s potential.