
Pests
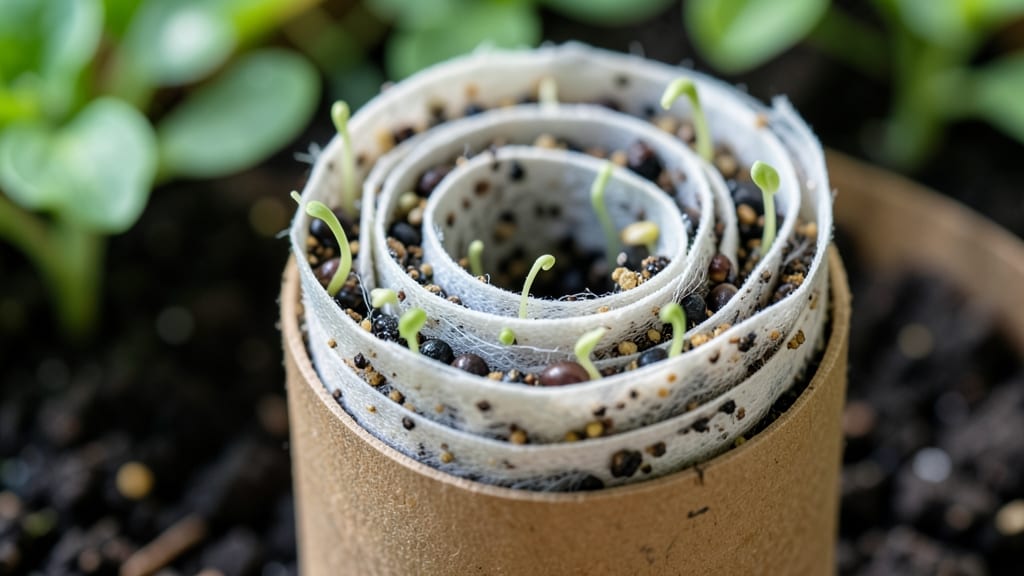
The snail roll seed starting method is your secret weapon against those frustrating seedlings that snap at the stem. The snail roll method eliminates that problem forever. 🌱 I’ve started dozens of finicky seeds this way—from delicate impatiens to stubborn tomatoes—and never lost a single seedling to the dreaded spiral.
This gentle layering technique keeps roots straight while encouraging strong stems, so your seedlings go from tray to garden without a hitch.
The secret is simplicity: you’ll need just three supplies—a seed-starting mat, a roll of paper towels, and a spray bottle. No fancy equipment, no confusing ratios.
Just fold the paper towel into a spiral, place seeds along the edge, roll it up like a burrito, and tuck it into the mat. The whole process takes 10 minutes, and you’ll see roots forming within days.
By the time you’re ready to transplant, your seedlings will have sturdy, twist-free stems and a head start on growth. No more wrestling with tangled roots or broken stems—just healthy plants that thrive from day one.
The method works for almost any seed, but it’s especially magic for slow starters like parsley or delicate seedlings like lettuce.
Best of all, it’s foolproof for beginners and pros alike. No more guessing whether you’re overwatering or underlighting—just consistent, gentle growth. Ready to try it? Here’s exactly how to set it up without a single seedling casualty.
📚 In This Guide
- What you need
- Instructions
- Tips and common mistakes
- Wrapping up and next steps
What you need
- ● Seed-starting mix: 1–2 gallons of a lightweight, sterile mix (e.g., 70% peat/coir + 30% perlite/vermiculite). Avoid garden soil—it’s too dense!
- ● Seeds: Your chosen variety (check seed packet for spacing/depth needs). Start with small seeds (e.g., lettuce, carrots, or basil) for best results.
- ● Moisture-retentive fabric or paper towels: 1–2 sheets (unbleached, seed-safe). Cut into strips ~2" wide.
- ● Plastic wrap or clear lid: To create a humid microclimate (e.g., a plastic bag or seedling tray lid).
- ● Spray bottle: With room-temperature water (avoid soaking—gentle misting is key!).
- ● Flat surface: A clean tray, baking sheet, or even a cardboard box (line with a towel to catch drips).
- ● Scissors or knife: For trimming fabric/paper to size.
- ○ Optional but helpful: Grow lights or sunny windowsill: For consistent warmth (70–75°F ideal).
- ● Plant labels: To track varieties (especially useful for mixed batches!).
- ● Hairspray (seed-safe): A light mist to secure rolls if they unravel.
Step-by-step instructions for snail roll seed starting
This method transforms fragile seeds into sturdy seedlings without the stress of twisting or tangling.
🌱 Step 1: Prepare Your Materials and Workspace
Gather a 4-inch square of seed-starting paper (or a square of damp paper towel), a plastic wrap sheet, and your seeds. Lay the paper flat on a clean surface—this will be your seed bed. I like to work on a tray or shallow dish to catch any stray seeds or moisture. Moisten the paper with a spray bottle until it feels damp but not dripping. You want it evenly saturated so seeds can absorb moisture without floating away.
Here's the thing—don't use regular paper towels. They can contain bleach or other chemicals that might inhibit germination. The seed-starting paper is specifically designed to break down safely in soil. Once the paper is damp, smooth out any wrinkles so it lies flat. This ensures even contact between the seeds and the paper, which is key for consistent germination.
💧 Step 2: Arrange Seeds in a Spiral Pattern
Place your seeds in a loose spiral starting from the outer edge and working inward. I like to space them about 1 inch apart—this gives them room to grow without crowding. The spiral pattern is what makes this method special: it prevents seeds from twisting or tangling as they germinate. You'll see the seeds naturally align in a way that keeps their roots untangled when you unroll them later.
If you're starting multiple types of seeds, use a different color of paper or a small marker to label the spiral. I've accidentally mixed up seedlings before, and trust me, you don't want to wait until they're a few inches tall to realize you planted basil where you meant to plant peppers. Once the seeds are in place, gently mist them again with water to ensure they're in contact with the damp paper.
☀️ Step 3: Cover and Create a Humid Environment
Lay the plastic wrap over the seeds, pressing it lightly to remove any air pockets. The wrap creates a mini greenhouse effect, keeping the seeds warm and humid—just what they need to germinate. Place the wrapped packet in a warm spot, ideally between 70-75°F. A seedling heat mat set to 75°F works wonders if you have one, but even a sunny windowsill or the top of your fridge can work in a pinch.
Check the packet daily for condensation. If you see water droplets forming on the plastic, it's time to give it a quick unwrap and rewrap. Too much moisture can lead to mold, and you'll know it's happening when you see fuzzy spots on the paper. Once you see the first signs of germination—tiny sprouts breaking through the paper—it's time to move to the next step. This usually happens within 5-10 days, depending on the seed type.
🌿 Step 4: Unroll and Transplant Seedlings
When your seedlings have sprouted and developed their first true leaves, carefully unroll the paper. You'll see the seeds have naturally aligned in a straight line, with their roots untangled and ready for transplanting. Gently lift the paper and place it on a flat surface, like a tray or your hand. The roots will still be attached to the paper, making it easy to handle without damaging them.
Use a small trowel or your fingers to gently separate the seedlings if they're still touching. Plant them in your seed-starting mix, pressing the paper and roots lightly into the soil. Water gently to help settle everything in place. The paper will break down over time, so you don't need to remove it. This method reduces transplant shock because the roots aren't disturbed, and the seedlings are already strong and healthy.
⏰ Step 5: Care for Your Seedlings Post-Transplant
Place your newly transplanted seedlings in a warm, bright spot with 12-14 hours of light daily. A grow light is ideal, but a south-facing window will work if it's bright enough. Keep the soil consistently moist but not soggy—you'll know it's right when the top inch of soil feels slightly damp to the touch. Overwatering is a common mistake, and it can lead to damping-off, a fungal disease that causes seedlings to collapse.
In about 2-3 weeks, you'll see your seedlings growing strong and straight, with no signs of twisting or tangling. This is the magic of the snail roll method: it gives you seedlings that are ready to thrive from day one. Keep an eye out for any leggy growth—this is a sign they need more light. Adjust the grow light or move them closer to the window to encourage sturdy, healthy growth.
Tips & tricks for perfect snail roll seed starting
This clever method turns fragile seeds into sturdy seedlings without the usual tangling mess. Here's what I've learned to make it foolproof.
Paper Selection: If you don't have seed-starting paper, use a damp paper towel—but avoid regular towels with bleach or fragrances. I've tried coffee filters too, and they work surprisingly well for delicate seeds like lettuce. The key is using something that will break down safely in soil without leaving harmful residues. For larger seeds like beans, a slightly thicker paper towel holds up better during the unrolling process.
Temperature Matters: The ideal 70-75°F range is crucial—below 70°F and germination slows dramatically. I've had seeds take twice as long to sprout when my kitchen was chilly. If your home runs cool, place the packet on top of your fridge (not inside) for that extra warmth boost. For seeds that need higher temps (like peppers), a seedling heat mat set to 75°F works wonders. Just monitor closely—too much heat can dry out the paper.
Spiral Spacing: That 1-inch spacing between seeds in Step 2 is more important than it seems. Tighter spacing can lead to crowded roots when you unroll, while too much space wastes paper. For tiny seeds like carrots, I reduce to ½-inch spacing but use a smaller 2-inch paper square. The spiral should feel snug but not forced—think "loose hug" rather than "tight squeeze." This prevents the seeds from shifting during germination.
Germination Timeline: The 5-10 day window varies wildly by seed type. Fast germinators like radishes might sprout in 3 days, while stubborn seeds like parsley can take 14. I keep a small notebook to track each seed type's progress. Watch for the first tiny green shoot breaking through the paper—that's your cue to start checking daily. Once you see these sprouts, the paper will naturally begin to tear as roots emerge, signaling it's time to unroll.
Pro Tips for Snail Roll Seed Starting
- This clever method turns fragile seeds into sturdy seedlings without the usual tangling mess.
- Paper Selection: If you don't have seed-starting paper, use a damp paper towel—but avoid regular towels with bleach or fragrances.
- Temperature Matters: The ideal 70-75°F range is crucial—below 70°F and germination slows dramatically.
Frequently asked questions
Got questions about snail roll seed starting?
You’re not alone—this method is unique, and even experienced gardeners sometimes need a little extra guidance. Below, we’ve rounded up the most common queries to help you master twist-free germination with confidence!
What seeds are best suited for snail roll seed starting?
Snail rolls work best for small, slow-to-germinate seeds that benefit from consistent moisture and humidity, like tomatoes, peppers, eggplants, and herbs (e.g., basil, parsley). Avoid large seeds (e.g., beans, peas) or those prone to damping off—this method prioritizes gentle handling over quick sprouting.
How long does it take for seeds to germinate in a snail roll?
Germination time varies by seed type, but most tomatoes and peppers sprout in 7–21 days, while herbs may take 10–30 days. Keep the roll in a warm, dark place (70–85°F) and mist lightly daily. If no sprouts appear after 3–4 weeks, check seed viability or adjust humidity.
Can I reuse the snail roll method for multiple seed batches?
Yes! Once your seeds sprout, unroll the paper and replant the seedlings into soil. After use, compost the paper or repurpose it for a new snail roll—just sterilize it first by soaking in a 1:10 bleach-water solution (rinse well) to prevent mold or pests.
Will snail rolls prevent pests like fungus gnats or mold?
Snail rolls reduce (but don’t eliminate) pest risks by minimizing soil contact. However, over-misting or poor airflow can still cause mold. To prevent issues:
- Use sterilized paper and well-draining soil.
- Prop the roll slightly open for air circulation.
- Avoid sealing it completely—poke tiny holes if needed.
What if my snail roll dries out or stays too wet?
Too dry? Mist gently with water and place in a plastic bag with holes to retain moisture. Too wet? Unroll slightly to dry the edges, then re-roll loosely. Aim for consistently damp (not soggy) paper—think of a wrung-out sponge. If mold appears, discard the roll and start fresh.
Wrapping up and next steps
Mastering the snail roll seed starting method is a game-changer for gardeners who want to avoid tangled roots and weak seedlings! 🌱 With just a few simple materials and a bit of patience, you’ll create an ideal environment for seeds to thrive—no fuss, no stress.
Whether you’re a beginner or a seasoned pro, this gentle layering technique ensures your plants grow strong and healthy from the start.
Ready to take the next step? Try it with your next batch of seeds! Once you’ve perfected the snail roll, explore other seed-starting methods or share your success with fellow gardeners. Happy planting! 🌿