Lawn
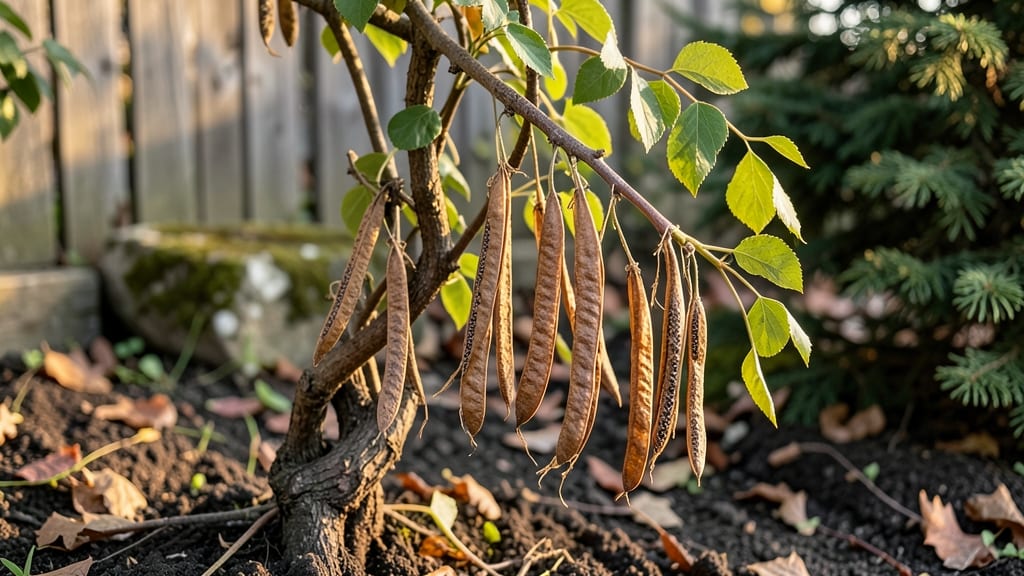
Opening wisteria seed pods feels like unlocking nature's secret to growing these stunning vines. 🌿 The key is patience and precision—those tough pods hide seeds that can start your own wisteria, but only if you crack them right.
I've struggled with stubborn pods that refused to release seeds, but I've learned the exact techniques that work every time.
You'll need just a few simple tools: a sharp knife, rubber gloves, and a bowl for collecting seeds. The best time to harvest pods is late summer or early fall when they've turned brown and papery.
Wisteria pods need 30-60 days of cold stratification to break dormancy, so plan ahead if you want spring planting.
Once you've opened the pods, you'll see flat, brown seeds that look almost too delicate to survive. With proper care—soaking overnight before planting—they'll sprout into strong seedlings that can climb and bloom in just a few years. The first year is slow, but the payoff is worth it.
These tricks work for both American and Chinese wisteria varieties, though Chinese types may need slightly longer stratification. Whether you're starting from scratch or trying to propagate a favorite vine, this method gives you control over the process. Let's get those seeds growing!
📚 In This Guide
- What you need
- Instructions
- Tips and common mistakes
- Wrapping up and next steps
What you need
- ● Mature wisteria seed pods: Harvest 10–20 pods (ensure they’re fully brown and dry—no green or soft spots!).
- ● Sharp pruning shears or scissors: A pair of bypass pruners (for clean cuts) or small scissors (for precision).
- ● Rubbing alcohol (70% isopropyl): 1–2 oz for sterilizing tools and pods.
- ● Paper towels or coffee filters: 2–3 sheets for drying seeds.
- ● Small bowls or containers: 2–3 shallow dishes (for soaking/separating seeds).
- ● Plastic bag with zipper: 1 gallon-sized bag for seed stratification.
- ● Potting soil or seed-starting mix: 1–2 gallons (sterile, peat-based for best results).
- ● Small pots or seed trays: 4–6 (3–4" deep) with drainage holes.
- ● Spray bottle: For misting seeds during germination.
- ● Patience (and a warm spot!) 🌡️: Wisteria seeds need time—think 2–3 months for stratification!
- ● Sandpaper or fine-grit file: Lightly scratch seed coats to speed up germination.
- ● Hydrogen peroxide (3% solution): 1 tbsp per cup of water to prevent fungal issues during soaking.
- ● Heating mat: For consistent warmth (70–80°F) during stratification.
- ● Label markers: To track seed varieties and planting dates.
- ● Gloves: Protect your hands—wisteria pods can be sticky and messy! 🧤
Step-by-Step guide to extracting wisteria seeds from pods
Here's how to safely open those tough seed pods and prepare wisteria seeds for planting.
🪴 Step 1: Harvest Pods at Peak Ripeness
Wait until the pods turn a deep brown color and begin to split open naturally—this usually happens in late fall or early winter. You'll know they're ready when the outer shell starts cracking along the seams. I always harvest them by hand, wearing gloves since the pods can be sticky and the seeds inside have a mild irritant.
Gently twist the pods to open them without damaging the seeds. If they're still too tough, place them in a paper bag and store in your refrigerator for a few weeks. The cold helps soften the pod walls, making them easier to crack open. Never force open unripe pods—the seeds won't germinate properly.
✂️ Step 2: Extract and Clean the Seeds
Once the pod opens, you'll see several flat, brown seeds inside. Carefully remove them with tweezers or your fingers, being gentle to avoid breaking the seed coat. Place the seeds in a bowl of cool water to separate them from any debris or chaff that might still cling to them.
Let them soak for about 12 hours—this softens the seed coat slightly and helps wash away any remaining pod residue. After soaking, drain the water and pat the seeds dry with a paper towel. This is also a good time to count your seeds—wisteria pods usually contain 3-5 seeds each, so you'll need several pods to get a good number of plants.
🌱 Step 3: Stratify Seeds for Germination
Wisteria seeds require a cold stratification period to break dormancy. Mix the cleaned seeds with a slightly damp potting mix in a sealed container. I use a small plastic bag with a few holes poked in the top for airflow, then place it in the refrigerator for 6-8 weeks.
Check the mix every few weeks to ensure it stays moist but not soggy. The cold treatment mimics winter conditions and signals the seeds that it's time to grow. After stratification, you'll see the seed coats soften slightly—this is your cue that they're ready for planting. Don't skip this step, or germination rates will be disappointingly low.
☀️ Step 4: Plant Stratified Seeds Indoors
Fill small pots with a well-draining seed-starting mix and plant the stratified seeds about ½ inch deep. Space them 2 inches apart since wisteria seedlings grow quickly. Water gently to settle the soil around the seeds, but avoid overwatering—this can cause the seeds to rot before they germinate.
Place the pots in a warm, bright spot with temperatures around 65-70°F. Germination can take 2-4 weeks, so be patient. You'll know it's working when you see the first tiny sprouts pushing through the soil. Keep the mix consistently moist but never waterlogged during this time.
🌿 Step 5: Transplant Seedlings Outdoors
Once the seedlings have developed 3-4 true leaves and are about 4-6 inches tall, they're ready to move outdoors. Choose a sunny location with well-draining soil—wisteria thrives in full sun and hates sitting in waterlogged roots.
Harden off the seedlings by gradually exposing them to outdoor conditions over 1-2 weeks. Start with a few hours in a sheltered spot, then slowly increase their time outside. Plant them in early spring, giving them plenty of time to establish roots before winter. Mulch around the base to protect the young plants and retain moisture.
Tips & tricks for perfect wisteria seed pod opening
These little-known tricks will help you crack open those stubborn pods without damaging the seeds inside.
Pod Softening Secret: If your pods feel rock-hard when you harvest them, don't force it! The refrigerator trick in Step 1 is your best friend here. Place them in a paper bag with a damp paper towel for 2-3 weeks—the moisture and cold will work wonders. I've opened pods that were completely unyielding after just 14 days in the fridge. This mimics nature's winter conditions and makes the pods nearly effortless to twist open.
Seed Extraction Technique: In Step 2, when you're removing those delicate seeds, I recommend using clean, sharp tweezers instead of fingers. The seed coats are surprisingly fragile, and even a small nick can prevent germination. If you don't have tweezers, wash your hands thoroughly first and work gently. Pro tip: Lay the opened pod on a white plate—this makes it easier to spot any tiny seeds that might get lost in the debris.
Stratification Shortcut: While the 6-8 week cold treatment in Step 3 is standard, you can speed things up slightly by using a seed stratification refrigerator mat. These mats maintain consistent moisture while keeping seeds at the ideal 40°F. If you don't have one, just check your seeds weekly—if they feel dry, mist them lightly with water. The goal is damp, not soggy.
Germination Timing: That 2-4 week germination window in Step 4 can feel like forever, but here's what to watch for: The first sign of success is a tiny white root breaking through the seed coat. This usually appears 1-2 weeks before the shoot emerges. If you don't see roots after 4 weeks, your seeds might need another 2-4 weeks of stratification—don't give up just yet!
Pro Tips for Seed Pods Wisteria
- These little-known tricks will help you crack open those stubborn pods without damaging the seeds inside.
- Pod Softening Secret: If your pods feel rock-hard when you harvest them, don't force it!
- Seed Extraction Technique: In Step 2, when you're removing those delicate seeds, I recommend using clean, sharp tweezers instead of fingers.
Frequently asked questions
Got questions about wisteria seed pods and germination? You’re not alone! Here are answers to the most common queries to help you navigate the process like a pro.
How do I know when wisteria seed pods are ready to harvest?
Wisteria seed pods turn from green to brown and begin to split open naturally when fully ripe—usually late summer to early fall. Harvest them just before they burst open to preserve seed viability. Avoid pods that are still firm or have already released seeds.
Can I germinate wisteria seeds without scarification?
Scarification (nick or sandpaper treatment) breaks seed dormancy, but you can try soaking seeds in warm water for 24–48 hours as an alternative. However, germination rates may be lower. For best results, combine soaking with a light scarification step for improved success.
How long does it take for wisteria seeds to germinate?
Patience is key! Wisteria seeds can take 4–12 weeks (or even longer) to sprout, depending on conditions like temperature (60–75°F) and moisture. Keep soil consistently damp and avoid overwatering, which can cause rot. A heating mat may speed up germination.
Why aren’t my wisteria seeds sprouting?
Common culprits include old seeds (wisteria seeds lose viability quickly), improper scarification, or poor soil conditions (too cold, dry, or compacted). Try refreshing your scarification method, using a seed-starting mix, or testing a new batch of seeds.
Are wisteria seed pods toxic to pets or humans?
While wisteria seeds and pods aren’t highly toxic, they can cause mild stomach upset if ingested. Symptoms may include vomiting or diarrhea. Keep pods out of reach of pets and children. If ingestion occurs, contact a vet or poison control center for guidance.
Can I grow wisteria from cuttings instead of seeds?
Cuttings are often easier and faster for wisteria propagation. Take 4–6 inch hardwood cuttings in late winter/early spring, dip in rooting hormone, and plant in moist soil. They typically root in 6–8 weeks, giving you a head start over seeds.
Wrapping up and next steps
Wisteria seed pods may seem tricky, but with the right techniques—like stratification, soaking, and patience—you can unlock their germination potential! 🌱 Whether you’re dealing with stubborn seed coats or waiting for the perfect conditions, each step brings you closer to nurturing these stunning climbers.
Now that you’re armed with pod-opening tricks, why not give it a try? Start with a few pods, experiment with the methods that work best, and soon you’ll be watching tiny wisteria sprouts reach for the sky. Happy gardening—your future vineyard awaits! 🌿