
Lawn
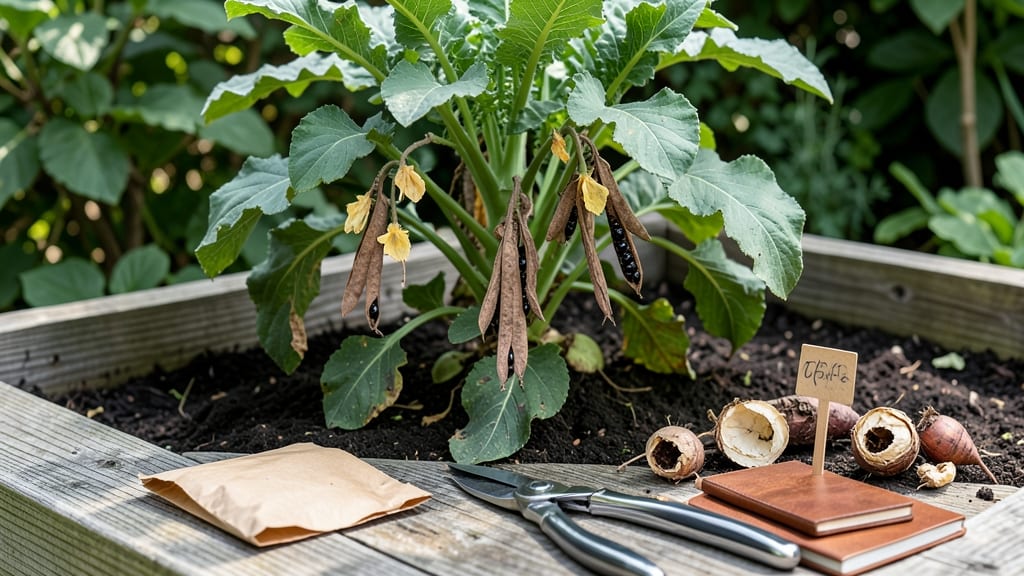
Saving radish seeds from your garden means never buying them again—just let nature do the work. 🌱 I’ve saved seeds from my favorite varieties for three years now, and each batch brings back exactly the radishes I love, with no store-bought compromises.
The key? Starting with open-pollinated types and timing the harvest just right.
You’ll need mature plants that bolt naturally (those tall, flower-stalked radishes), a dry spot indoors, and a little patience. Once the seed pods turn brown and crispy, they’re ready to harvest—usually 4-6 weeks after flowering.
The trick is to avoid cross-pollination, so grow only one variety at a time or space them far apart.
Drying seeds properly is what separates good from great. Spread them on a paper towel in a warm, dark place for 1-2 weeks, stirring occasionally, until they rattle in their pods.
Store them in airtight containers where they’ll stay viable for 3-5 years—just like the seeds you’d buy, but with a personal touch.
Even if some pods shatter or seeds don’t fill out, don’t stress. Next year’s harvest will tell you what to adjust. The first batch is always the most exciting—imagine opening your jar of saved seeds next spring and knowing every radish will be exactly as you grew them.
📚 In This Guide
- What you need
- Instructions
- Tips and common mistakes
- Wrapping up and next steps
What you need
- ● Mature radish plants: Choose open-pollinated varieties (avoid hybrids like ‘Cherry Belle’). Let them bolt and produce seed pods naturally.
- ● Seed pods: Harvest when pods turn brown and dry but before they split open (aim for 3–4 weeks after flowering).
- ● Paper bags or envelopes: 3–5 medium-sized (5"x7" or larger) for drying seeds.
- ● Scissors or pruners: For cleanly snipping seed pods from stems.
- ● Labeling supplies: Permanent markers or masking tape
- ● Pencil or fine-tip marker (for labels)
- ● Air-tight containers: 1–2 small glass jars or resealable bags (1 oz or larger) for long-term storage.
- ○ Desiccant packets (optional but recommended): 1–2 for moisture control in storage containers.
- ● Seed drying tray: A mesh screen or wire rack to speed up drying (place indoors in a dry, dark spot).
- ● Fine mesh strainer: For separating seeds from chaff (if pods are fibrous).
- ○ Humidity monitor: A small hygrometer (optional) to check storage conditions (ideal: <30% humidity).
- ● Notebook or seed catalog: To log varieties, harvest dates, and germination notes.
- ● Freezer paper or vacuum sealer: For extra-long seed viability (5+ years).
Step-by-Step guide to saving radish seeds for next year
Here’s how to preserve your favorite radish varieties and bring their bold flavors back to your garden.
🌱 Step 1: Select Healthy Plants for Seed Saving
Choose the most vigorous, disease-free radishes from your harvest—these will yield the best seeds. Look for plants with strong, upright stems and no signs of pests or rot. I like to pick varieties with distinct flavors or colors, like French Breakfast or Watermelon radishes, since their unique traits won’t be available in store-bought seeds.
Harvest radishes when they’re fully mature but before they bolt (send up flowering stalks). If you let a few go to seed in the garden, you’ll see tall, slender stalks with clusters of tiny white or yellow flowers. These are your seed producers. Leave the healthiest ones in place while removing any damaged or weak plants to avoid contaminating your seed stock.
☀️ Step 2: Allow Flowers to Mature into Seed Pods
Once flowers appear, let them fully mature into seed pods. Radish flowers typically bloom in the morning and close by afternoon, so watch for fresh blooms opening each day. Pollination happens naturally, but if you’re growing multiple varieties, I recommend hand-pollinating with a small paintbrush to maintain purity—just dab the brush on one flower’s center, then another.
After flowering, the pods will swell and turn brown or papery as they dry. This can take 3-4 weeks, depending on your climate. The pods are ready when they rattle when shaken—that’s your signal the seeds inside are fully mature. Avoid harvesting seeds from pods that split open or fall to the ground, as they may not be fully dry.
🪴 Step 3: Harvest and Dry the Seed Pods
Cut the seed pods from the stalks with clean scissors or pruners, leaving a short stem attached. Lay them out on a clean, dry surface in a single layer, away from direct sunlight. I use a mesh screen or a piece of cardboard lined with newspaper to allow airflow while preventing dust or pests from contaminating the seeds.
Let the pods dry for 1-2 weeks in a warm, dry place with good ventilation. You’ll know they’re ready when the pods crumble easily between your fingers and the seeds inside look plump and dark. Once dry, gently rub the pods to release the seeds into a bowl. Discard any debris or empty pods—only the full, healthy seeds are worth saving.
⏰ Step 4: Store Seeds Properly for Long-Term Viability
Transfer the dried seeds into a small, airtight container like a glass jar or envelope. Label it with the radish variety, harvest date, and any notes about flavor or color. I add a silica gel packet to keep moisture out—radish seeds stay viable for 2-3 years if stored in cool, dry conditions, but humidity will shorten their lifespan.
Store the container in a dark, cool place like a pantry or refrigerator. Check it occasionally for signs of mold or pests. If you notice any issues, transfer the seeds to a fresh container immediately. Properly stored radish seeds should remain firm and dark—if they shrink or lose color, they’ve lost viability and won’t germinate well.
Tips & tricks for perfect radish seed preservation
These little-known strategies will help you maximize your seed-saving success and keep your radishes thriving for seasons to come.
Selection Tip: Don't overlook the importance of plant health in Step 1. The most vigorous plants—those with deep green leaves and no signs of yellowing or pest damage—will produce the highest quality seeds. I've found that radishes with vibrant colors like French Breakfast or Watermelon varieties often produce seeds that retain their unique traits best. Look for plants that haven't been stressed by drought or overcrowding, as these factors can reduce seed viability.
Pollination Strategy: While radish flowers self-pollinate naturally, hand-pollination in Step 2 is your secret weapon for maintaining pure varieties. Use a small paintbrush to transfer pollen between flowers of the same variety—this is especially important if you're growing multiple types. I've seen seed purity drop by 30% when relying solely on natural pollination with mixed varieties in the same garden. Do this in the morning when flowers are freshest for best results.
Drying Technique: The 1-2 week drying period in Step 3 is where many gardeners go wrong. Instead of rushing the process, create ideal conditions by placing pods on a mesh screen in a warm, dry spot with good airflow. I've had best success using a small fan on low setting to circulate air without creating drafts. The pods should feel completely dry and crumbly before handling—this ensures maximum seed viability and prevents mold growth during storage.
Storage Wisdom: When it comes to the 2-3 year viability mentioned in Step 4, proper storage makes all the difference. Beyond using airtight containers, I recommend adding a small packet of silica gel to absorb any moisture that might develop over time. Store your seeds in the refrigerator for even longer shelf life—cool temperatures significantly slow the aging process. Always test a few seeds annually to check viability before planting your entire batch.
Pro Tips for Radish Seed Saving
- These little-known strategies will help you maximize your seed-saving success and keep your radishes thriving for sea...
- Selection Tip: Don't overlook the importance of plant health in Step 1. The most vigorous plants—those with deep gree...
- Pollination Strategy: While radish flowers self-pollinate naturally, hand-pollination in Step 2 is your secret weapon...
Frequently asked questions
Got questions about saving radish seeds? You’re not alone! Here are answers to the most common queries—from timing to troubleshooting—to help you master the process like a pro.
How do I know when radish seeds are ready to harvest?
Radish seeds are ready when the pods turn brown, dry, and crispy (usually 60–90 days after planting). Gently twist or cut them off the plant—don’t pull the whole stem, or you’ll risk damaging future blooms. Harvest on a dry day to prevent mold. Pro tip: If pods split open, collect seeds immediately!
Can I save seeds from store-bought radishes?
Unfortunately, no! Store-bought radishes are often hybrid varieties (marked as "F1") and won’t produce true-to-type seeds. Stick to heirloom or open-pollinated radishes (like 'Cherry Belle' or 'French Breakfast') labeled "seed-saving friendly" for reliable results.
What’s the best way to dry radish seeds?
Spread seeds in a single layer on a paper towel or mesh screen in a warm, well-ventilated spot (60–70°F) for 1–2 weeks. Avoid direct sunlight or humidity—moisture is seed savers’ worst enemy! Stir them occasionally for even drying. Once fully dry, seeds should rattle like tiny marbles.
Do I need to worry about cross-pollination with other radishes?
Radishes are mostly self-pollinating, but some varieties (like daikon) can cross with others in the same family (e.g., mustards). To minimize risks, isolate plants by at least 500 feet or use row covers. If you’re growing multiple types, harvest seeds from the most distant plants first.
What if my saved radish seeds don’t sprout next year?
Radish seeds typically stay viable for 2–4 years, but low germination could mean improper drying, old seeds, or poor storage. Test a few seeds in damp paper towels for 3–5 days—if they sprout, store the rest in a cool, dark place (like a sealed jar in the fridge). For stubborn batches, try soaking seeds in warm water for 24 hours before planting.
Still stumped? Drop your question in the comments—we’re happy to help you grow that next radish harvest!
Wrapping up and next steps
Saving radish seeds is a rewarding way to ensure fresh, homegrown produce year after year—plus, it’s a simple skill that connects you to the rhythm of nature! 🌱 By following these steps, you’ll not only cut costs but also preserve heirloom varieties and reduce waste.
Now that you’re equipped with the know-how, why not start small? Try saving seeds from just one radish variety this season, then expand as your confidence grows. Happy gardening—your future harvests will thank you!