
Lawn
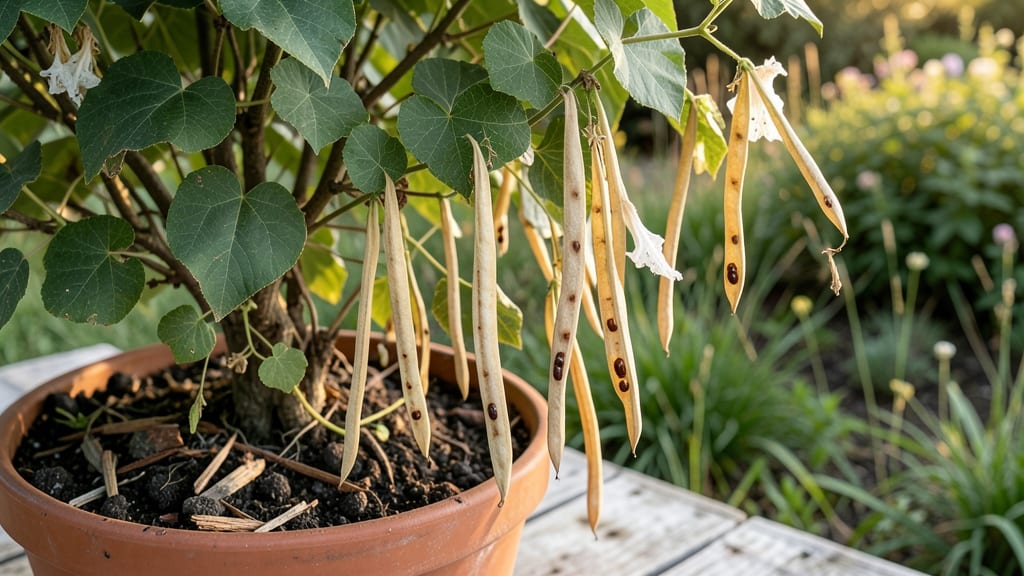
Harvesting moonflower seed pods at the right moment means a garden full of those enchanting white blooms by next summer. 🌙 The twist-free method I’ve perfected saves you from struggling with stubborn pods—just a few simple steps separate you from germination-ready seeds that’ll sprout reliably.
Start by spotting pods that’ve turned brown and dried completely, usually 6-8 weeks after the last flower fades. Gently twist them off the vine (no tools needed!) and lay them in a paper bag for a week to finish drying.
The key is patience—rushing leads to seeds that won’t germinate, and you don’t want that after all your hard work.
Once dry, split the pods open to reveal flat, dark seeds. Store them in an airtight container with a silica packet to keep moisture out—these seeds stay viable for 3-4 years if stored properly.
Plant them just below the soil surface in warm weather, and within 10-14 days, you’ll see those first tiny sprouts pushing through.
Moonflowers reward you with night-blooming beauty that hummingbirds and moths adore, but only if you start with fresh seeds. Avoid overwatering after planting, and soon you’ll have a vine-covered trellis that transforms your garden into a nocturnal paradise.
📚 In This Guide
- What you need
- Instructions
- Tips and common mistakes
- Wrapping up and next steps
What you need
- ● Mature moonflower seed pods – Harvest only fully dried, brown pods (no green or soft ones!). Aim for 10–20 pods for a good yield.
- ● Sharp pruning shears or scissors – For cleanly snipping pods from the vine (sterilize blades with rubbing alcohol).
- ● Paper towels or newspaper – 2–3 sheets to line your workspace and catch debris.
- ● Small bowl or container – A shallow, wide dish (like a 9-inch ceramic bowl) to hold pods while extracting seeds.
- ● Wooden spoon or popsicle stick – For gently tapping pods to release seeds.
- ● Glove – Protects hands from sticky seed pods (latex or nitrile works best).
- ● Fine-mesh strainer – Helps sift out chaff if seeds are mixed with debris.
- ● Labeling tags & pencil – To mark seed containers with the harvest date.
- ● Air-tight container or paper envelope – For storing seeds (choose breathable paper bags for long-term storage).
- ● Patience – Wait until pods are completely dry and brown (usually 4–6 weeks after flowering).
- ● Dry workspace – Humidity can cause mold; work indoors on a clean, flat surface.
- ● Sunny day – Harvest pods on a dry, sunny morning for easiest extraction.
Step-by-step guide to extracting moonflower seeds without twisting
Here’s how to gently open moonflower seed pods for fresh, viable seeds—no frustration required.
🌱 Step 1: Harvest Mature Seed Pods at the Right Time
Moonflower pods turn from green to tan or brown when fully mature—this is your cue to harvest. Wait until they feel dry to the touch and split open easily when gently squeezed. Harvest on a dry, sunny morning when humidity is low, as damp pods stick together and resist opening.
Use clean, sharp pruning shears to snip pods directly from the vine. Avoid pulling, which can damage the delicate stems. Place pods in a paper bag (not plastic) to allow airflow and prevent mold. Store them in a cool, dry place for up to a week if they’re not ready to process immediately.
💧 Step 2: Soften Pods for Easier Seed Release
Moonflower pods are tough when dry, but a quick soak softens them enough to split open without twisting. Fill a large bowl with lukewarm water (not hot) and submerge the pods for 10-15 minutes. You’ll see them plump slightly and the seams begin to separate—this is the signal they’re ready.
Drain the water and pat the pods dry with a clean towel. Work quickly now, as they’ll continue to soften. If pods still feel resistant, return them to the bowl for 5 more minutes. Over-soaking can cause the seeds to swell too much, making them sticky and harder to handle.
✂️ Step 3: Split Pods Open Without Damaging Seeds
Lay a pod flat on a cutting board and use a small, sharp knife (like a paring knife) to carefully slice along the seam where the pod naturally splits. Apply light, even pressure—don’t force it. The pod should open like a book, revealing rows of flat, black seeds inside.
Gently pry the halves apart with your fingers, then tap the knife against the board to release any seeds stuck to the inner walls. Avoid shaking or rubbing the seeds, as their outer coating is delicate. Place the seeds in a small bowl and set aside the empty pod halves for compost.
☀️ Step 4: Dry and Store Seeds for Long-Term Viability
Spread the extracted seeds in a single layer on a paper towel or screen in a warm, dry place (like a sunny windowsill) for 24-48 hours. They’re ready when they feel light and crisp to the touch—this ensures they won’t mold in storage. Avoid direct sunlight, which can overheat and dry them too quickly.
Once dry, transfer seeds to a small envelope or glass jar labeled with the date. Store in a cool, dark place (like a pantry) where temperatures stay 50-60°F. Moonflower seeds remain viable for 2-3 years under these conditions, though germination rates drop after the first year.
🌿 Step 5: Test Germination Before Planting
Before committing to a full planting, test a few seeds to confirm viability. Moisten a paper towel and place 5-10 seeds between two towels in a ziplock bag. Seal it loosely (to allow airflow) and store in a warm spot (around 70°F). Check daily—you should see sprouts in 7-14 days. If fewer than half sprout, store the remaining seeds in the fridge for another month before retrying.
This step saves time and heartache. Moonflower seeds can be finicky, and a quick germination test tells you whether to plant now or wait for fresher seeds. Once confirmed viable, plant seeds ½ inch deep in well-draining soil and keep them moist until sprouts appear.
Tips & tricks for perfect moonflower seed extraction
Here's what nobody tells you about working with these delicate pods—tricks that'll save you from frustration and ruined seeds.
Harvest Timing Secret: The tan or brown color is your first clue, but the real test is the pod's texture. It should feel dry and papery—almost like crumpling paper—when you gently squeeze it. I learned this the hard way after trying to open pods that were still slightly green; they resisted every cut and left me with broken seeds. Harvest on dry mornings only, as humidity makes pods sticky and difficult to handle.
Soaking Technique That Changed Everything: That 10-15 minute soak in lukewarm water isn't just about softening—it's about creating the perfect separation along the natural seams. The water should be warm enough to feel comfortable to your wrist, not hot enough to cook the seeds. If your pods still feel resistant after the full 15 minutes, give them just 5 more minutes—no longer, or you'll risk swelling the seeds too much. I use a timer so I don't accidentally over-soak.
Knife Work Precision: In Step 3, when you're using that small, sharp knife, think of yourself as a surgeon. The seam where the pod naturally splits will have a slightly lighter color—follow that line precisely. I press down with my thumb on one side of the pod while making the cut to stabilize it, which gives me better control. Never force the knife; if it feels like you're fighting the pod, you're doing it wrong. The pod should yield like butter when you apply just the right pressure.
Storage Wisdom: That 50-60°F temperature range for storage isn't arbitrary—it's the sweet spot for maintaining seed viability. Too warm and the seeds start to degrade; too cold and they can develop condensation inside the storage container. I store mine in a glass jar with a silica gel packet to absorb any moisture that might develop. Labeling the jar with the date is crucial too, since germination rates drop significantly after the first year even under perfect conditions.
Pro Tips for Moonflower Seed Pods
- Here's what nobody tells you about working with these delicate pods—tricks that'll save you from frustration and ruined seeds.
- Harvest Timing Secret: The tan or brown color is your first clue, but the real test is the pod's texture.
- Soaking Technique That Changed Everything: That 10-15 minute soak in lukewarm water isn't just about softening—it's about creating the perfect separation along the natural seams.
Frequently asked questions
Got questions about moonflower seed pods? You’re not alone—these delicate pods can be tricky to handle! Here are some of the most common queries (and answers) to help you master the twist-free extraction process.
How do I know when moonflower seed pods are ready for harvesting?
Moonflower seed pods are ready when they turn light brown and start splitting open naturally. If you harvest too early (green pods), the seeds won’t be fully mature. Wait until the pods are dry and crispy—usually 8–10 weeks after flowering. Pro tip: Tap a pod gently; if seeds rattle inside, it’s harvest time!
Why do moonflower seed pods stick together when I try to open them?
Moonflower pods have a fibrous, glue-like interior that binds seeds together—this is natural! To avoid frustration, don’t twist (it damages seeds). Instead, gently pry open the pod with your fingers or a butter knife, then let the seeds fall out naturally. If stuck, soak pods in warm water for 10–15 minutes to soften the fibers.
Can I save moonflower seeds from store-bought flowers?
Unfortunately, no—store-bought moonflowers are almost always sterile (no viable seeds). For germination-ready seeds, you’ll need to grow your own plants or source seeds from a reputable supplier. Look for pods from healthy, homegrown vines for the best results!
What’s the best way to store moonflower seeds after extraction?
Store seeds in a cool, dry place (like a paper envelope or airtight container) in a dark closet. They’ll stay viable for 2–3 years if kept dry. Never refrigerate—moonflower seeds hate humidity, which causes mold. Label your container with the harvest date!
What if my moonflower seeds won’t germinate after extraction?
Try these fixes:
- Soak seeds overnight in warm water to soften hard coatings.
- Plant in well-draining soil (moonflowers hate soggy roots).
- Use a heat mat (70–75°F) to speed up germination.
- Check for pests—fungus gnats or mold can kill seeds.
Wrapping up and next steps
Growing moonflower seeds from their twist-free pods is a rewarding experience that connects you to nature’s beauty—without the fuss! 🌙 With the right tools and a little patience, you’ll unlock seeds ready for vibrant, climbing vines that thrive in warm climates.
Now that you’re equipped with tips and answers, why not try it this weekend? Grab those pods, follow the steps, and let your green thumb shine!
Need more inspiration? Explore creative ways to use moonflowers in your garden or share your progress with fellow plant lovers online. Happy gardening! 🌱