
Planting
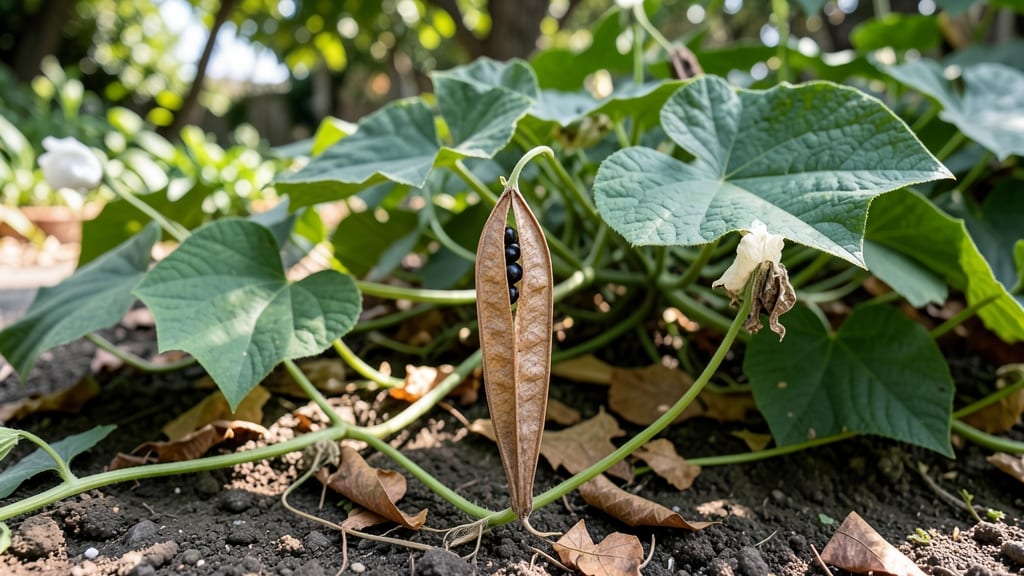
Harvesting the moonflower plant seed pod turns your garden into a nighttime spectacle of white blooms that open only after sunset. 🌙 The secret lies in timing—wait until the pods turn brown and papery before collecting them, or you’ll miss the chance to grow these enchanting vines.
I’ve learned the hard way that rushing the harvest means lower germination rates, so patience pays off when you’re ready to replant.
Once you’ve gathered the pods, crack them open to reveal flat, black seeds that look almost like tiny beans. These seeds need a warm, dark period to break dormancy, so I soak them in water for 24 hours before planting.
A simple paper towel sandwich in a sealed bag mimics natural conditions, and within a week, you’ll see tiny roots peeking out—proof that your seeds are ready for soil.
Planting them in well-draining soil with plenty of sunlight ensures strong vines that climb and bloom within 80-100 days. The magic happens at night, when the flowers unfurl in full bloom, filling your garden with a sweet, intoxicating fragrance that lasts until morning.
Just be prepared for morning dew to close them up by midday—it’s all part of the moonflower’s nocturnal charm.
Common challenges like uneven germination or weak seedlings can be avoided with consistent moisture and a little shade during the hottest part of the day. If you’re in a cooler climate, start seeds indoors 6-8 weeks before the last frost for a head start.
The payoff? A garden that feels like a secret midnight party, just for you and the pollinators.
📚 In This Guide
- What you need
- Instructions
- Tips and common mistakes
- Wrapping up and next steps
What you need
- ● Moonflower seed pods – 3–5 pods (ensure they’re dry and intact for best germination).
- ● Well-draining potting mix – 5–10 lbs (2.3–4.5 kg), preferably a blend of peat moss, perlite, and compost (1:1:1 ratio).
- ● Seed-starting trays or small pots – 4–6 inches deep, with drainage holes.
- ● Watering can or spray bottle – For gentle hydration (avoid oversaturating!).
- ● Clear plastic wrap or humidity dome – To retain moisture during germination.
- ○ Gloves (optional) – To protect hands from seed pod fibers.
- ● Plant labels & markers – For tracking growth stages.
- ● Sunlight access – A sunny windowsill or grow light (10–12 hours/day).
- ● Patience (3–4 weeks for germination!) – Moonflowers take time to sprout.
- ● Fertilizer – A balanced 10-10-10 or organic compost tea for faster growth.
- ● Trellis or stakes – Moonflowers climb! Install early to support vines.
- ● Moonlight or blacklight (fun!) – Enhances those magical nighttime blooms.
Step-by-step instructions for growing moonflower from seed pods
Here's how I transform those mysterious seed pods into blooming nighttime stars—simple, rewarding, and perfect for beginners.
🌱 Step 1: Extract and Prepare the Seeds
Moonflower seed pods are like nature's treasure chests—wait until they turn brown and dry on the vine before harvesting. Gently open the pod to reveal the large, flat seeds inside. I like to soak these seeds for 12-24 hours in lukewarm water to soften the tough outer coating. This step speeds up germination and prevents stubborn seeds from taking forever to sprout.
After soaking, spread the seeds on a paper towel to dry slightly. You'll know they're ready when they feel slightly tacky but aren't dripping wet. Handle them gently—they're delicate and can crack easily. This is also a great time to count them out if you're planting in small containers, since each seed will grow into its own vine.
🪴 Step 2: Plant in Well-Draining Soil
Fill your planting containers with light, well-draining potting mix—moonflowers hate soggy roots. I press the soil down lightly to create a firm base, then make small indentations about ½ inch deep for each seed. Planting too deep slows germination, while shallow planting ensures quick sprouts.
Place one seed in each indentation and cover it with a thin layer of soil, just enough to hide the seed completely. Water gently until the soil feels evenly moist but not saturated. The key here is consistency—moonflower seeds need steady moisture to germinate, but they'll rot if they're waterlogged. I like to use a spray bottle for this step to avoid disturbing the seeds.
☀️ Step 3: Provide Warmth and Light for Germination
Moonflower seeds germinate fastest in 70-80°F soil, so I place my seed trays on a seedling heat mat or in a warm spot near my kitchen window. You'll see tiny sprouts emerge in about 7-14 days, though some seeds can take up to three weeks—patience is key here.
Once the seedlings appear, move them to a location with full sun (6+ hours daily). Moonflowers are heavy feeders, so I add a balanced liquid fertilizer when the first true leaves appear. Watch for leggy growth—a sign they need more light. If stems stretch too tall, I adjust the grow light to hover just a few inches above the plants.
🌿 Step 4: Transplant and Train the Vines
After the seedlings develop 3-4 sets of true leaves (about 4-6 weeks), it's time to transplant them into their permanent spots. Moonflowers need room to spread, so I plant them 10-12 inches apart in well-draining garden soil. I bury the stems slightly deeper than they were in the seed tray—this encourages stronger root growth.
The magic happens when you start training the vines. Moonflowers are fast growers and need support to climb. I use sturdy trellises or fences, gently tying the vines with soft twine as they grow. This not only keeps the plants organized but also prevents the heavy blooms from snapping the stems. Water at the base regularly, keeping the soil consistently moist but never waterlogged.
⏰ Step 5: Enjoy the Nighttime Blooms
With proper care, your moonflowers will reward you with stunning 5-inch-wide blooms that open at dusk and close by dawn. The first flowers typically appear about 2-3 months after planting, though some varieties may take longer. I always cut back the vines after the first frost to encourage new growth the following season.
Here's the thing—moonflowers are annuals, but they self-seed prolifically. If you let a few pods dry on the vine, you'll have a whole new crop of seedlings next year. Just be prepared for them to pop up wherever they land—they're eager to spread their nighttime magic across your garden.
Tips & tricks for growing moonflowers from seed pods
Transforming those mysterious seed pods into nighttime blooms takes patience—and these tricks will help you skip the common pitfalls along the way.
Seed Prep Secret: For the 12-24 hour soak in Step 1, I add a drop of mild dish soap to the lukewarm water. This helps break down the seed coating more effectively without damaging the delicate seeds. The soap creates gentle surface tension that mimics natural rain, which moonflower seeds respond to in their native habitats. Just be sure to rinse the seeds thoroughly before planting—they should feel tacky but not slippery.
Soil Temperature Matters: While the instructions mention 70-80°F soil, I've found that placing seed trays on a heating pad set to "low" (around 75°F) creates the ideal environment. You can monitor the soil temperature with a small thermometer—moonflower seeds are fussy about warmth, and cooler soil can delay germination by weeks. A simple seedling heat mat works too, but avoid anything above 85°F, which can cook the seeds.
Germination Watch: In Step 3, when you're waiting for those 7-14 days of germination, place your seed trays under a grow light on a timer set for 12 hours of light per day. This consistent light cycle prevents leggy seedlings, which happen when plants stretch toward any available light source. The grow light should hover just 2-3 inches above the seedlings—closer than you might think for this fast-growing vine.
Transplanting Hack: When you're ready to transplant in Step 4, I like to water the seedlings thoroughly the day before moving them. This gives the roots a head start in their new location. After transplanting, I create a small mound of soil around each plant's base to help direct water straight to the roots—moonflowers hate wet feet but love consistent moisture. This simple technique prevents the common issue of transplant shock.
Pro Tips for Moonflower Plant Seed Pod
- Transforming those mysterious seed pods into nighttime blooms takes patience—and these tricks will help you skip the ...
- Seed Prep Secret: For the 12-24 hour soak in Step 1, I add a drop of mild dish soap to the lukewarm water. This helps...
- Soil Temperature Matters: While the instructions mention 70-80°F soil, I've found that placing seed trays on a heatin...
Frequently asked questions
Got questions about moonflower seed pods?
You’re not alone! Here’s a quick guide to answer the most common ones—so you can grow those enchanting night-blooming beauties with confidence.
How do I know when moonflower seed pods are ready to harvest?
Moonflower seed pods mature in 60–90 days after planting. Look for pods that turn dry, papery-brown, and split open slightly—this signals they’re ready! Harvest them before they fully burst to avoid scattering seeds. Store in a cool, dry place until planting season.
Can I plant moonflower seed pods directly in the ground, or do they need to start indoors?
Moonflower seeds thrive when planted directly outdoors after the last frost (they dislike transplanting!). Sow them ½ inch deep in well-draining soil, spacing them 12–18 inches apart. They germinate best in warm soil (70°F+), so wait until nighttime temps stay above 50°F.
Why aren’t my moonflower seed pods producing flowers?
Common culprits include:
- Insufficient sunlight: Moonflowers need full sun (6+ hours daily)—they won’t bloom in shade.
- Poor soil: Amend soil with compost for nutrients; they prefer loamy, well-draining mixes.
- Overcrowding: Thin seedlings to 12–18 inches apart for better airflow and growth.
- Cold nights: Blooms wilt below 50°F—protect with row covers if needed.
Are there alternatives to moonflowers for night-blooming gardens?
Yes! Try these low-maintenance, moon-loving plants:
- Evening Primrose (Oenothera spp.) – Fragrant, drought-tolerant blooms.
- Night-Blooming Jasmine (Cestrum nocturnum) – Intense, sweet scent (toxic if ingested).
- Four O’Clock Flowers (Mirabilis jalapa) – Vibrant colors; thrives in heat.
- Angel’s Trumpet (Brugmansia spp.) – Dramatic, tropical blooms (needs winter protection).
How often should I water moonflower seed pods after planting?
Keep soil consistently moist but not soggy during germination (first 2–3 weeks). Once established, water deeply 1–2 times per week, letting the top inch of soil dry between waterings. Overwatering can cause root rot—ensure pots/containers have drainage holes!
Wrapping up and next steps
Growing moonflower seed pods is like unlocking a secret nighttime garden—magical and rewarding! 🌙 With the right soil, patience, and care, you’ll soon enjoy those enchanting blooms that open only under the stars.
Whether you’re a beginner or a seasoned gardener, every step brings you closer to that dreamy, fragrant display.
Ready to take the next step? Start by gathering your supplies and plant those seed pods this weekend—your garden’s nocturnal transformation awaits! 🌱