
Lawn
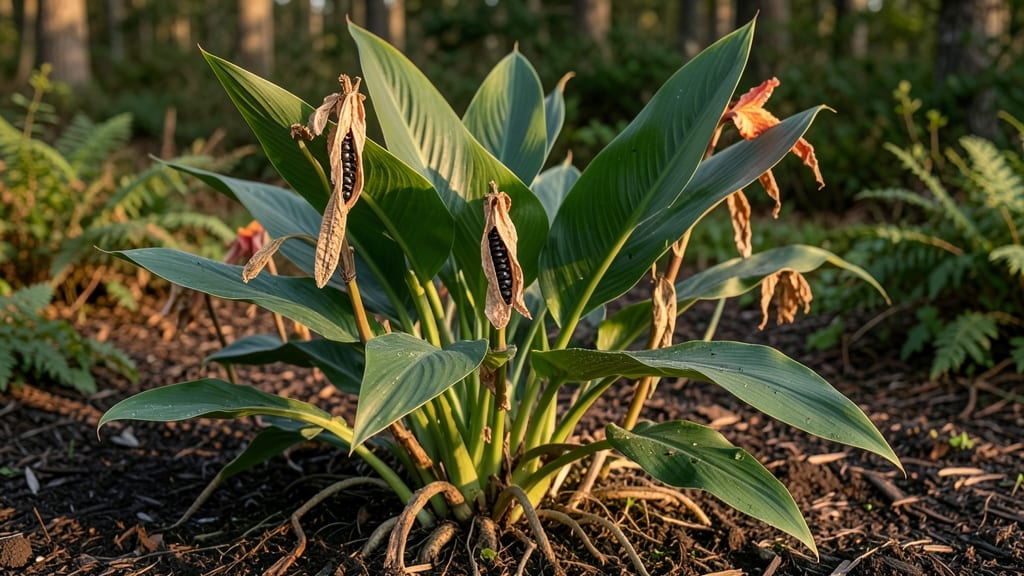
Those plump, papery canna seed pods are nature's way of saying "grow more of this!" 🌿 I've spent years watching them swell at the end of summer, and I'm sharing exactly how to turn them into thriving plants for next season's bold foliage and dramatic blooms.
The moment they turn from green to tan and start splitting open is your cue to harvest. Gently twist them off the stalks before they burst open—seeds inside need to dry completely to prevent mold.
Store them in a cool, dry place until spring, and you'll be ready to plant when soil temperatures hit 65°F.
Germination takes patience but pays off with 6-foot-tall plants that thrive in heat and humidity. Soak seeds overnight first, then plant them shallowly in pots with well-draining soil. Keep them consistently moist, and you'll see sprouts within 2-4 weeks—no fancy equipment needed.
Even if some seeds don't sprout, you'll likely get enough plants to fill a whole garden bed. The key is timing—plant too early and they'll rot; too late and they won't establish before summer.
With these simple steps, you'll have a whole new generation of cannas ready to steal the show next season.
📚 In This Guide
- What you need
- Instructions
- Tips and common mistakes
- Wrapping up and next steps
What you need
- ● Canna seed pods: 5–10 pods (ensure they’re fresh and firm—avoid soft or shriveled ones!)
- ● Well-draining potting soil: 1–2 bags (sterilized, peat-based or coco coir blend works best)
- ● Seed-starting trays or small pots: 6–12 (4–6 inches deep, with drainage holes)
- ● Plastic wrap or humidity dome: 1 (to retain moisture during germination)
- ● Spray bottle: 1 (for gentle watering)
- ● Grow lights or sunny windowsill: 1 (LED grow lights are ideal for indoor starts)
- ● Fertilizer (balanced, water-soluble): 1 small bottle (5-10-5 or 10-10-10 ratio)
- ○ Gloves (optional but recommended): 1 pair (canna seeds can be sticky!)
- ● Heat mat: 1 (keeps soil warm, speeds up germination—ideal for cooler climates)
- ● Perlite or vermiculite: Small bag (improves drainage and aeration)
- ● Transplanting trowel: 1 (for moving seedlings to larger pots or garden beds)
- ● Mulch (straw or shredded leaves): Small quantity (protects young plants outdoors)
- ● pH testing kit: 1 (cannas prefer slightly acidic soil, pH 6.0–6.5)
How to grow cannas from seed pods to full-bloom lawn plants
Here’s how I turn canna seed pods into bold, tropical-looking lawn plants—no fancy equipment needed.
🌱 Step 1: Extract and Prepare the Seeds
Open the seed pods carefully with a small knife or your fingers—they’re tough but split easily when dry. Inside, you’ll find flat, dark seeds about the size of a pea. Soak them in lukewarm water for 12-24 hours to soften the outer coating. This step speeds up germination by breaking dormancy.
After soaking, drain the water and let the seeds air-dry for 30 minutes on a paper towel. This prevents mold while keeping them moist enough to plant. I like to wrap them in a damp paper towel and place them in a sealed bag for 2-3 days—this mimics the humid conditions they’d get in their native tropical environment.
💧 Step 2: Sow Seeds in a Warm, Moist Growing Medium
Fill small pots (3-4 inches deep) with a mix of 50% potting soil and 50% perlite—this ensures drainage while holding moisture. Cannas hate soggy roots, so avoid garden soil, which compacts easily. Plant the seeds ½ inch deep, spacing them 2 inches apart in the pot.
Water gently until the soil feels damp 1 inch down, but not saturated. Place the pots in a warm spot (75-85°F)—a seedling heat mat helps if your home runs cooler. Cover the pots loosely with plastic wrap to retain humidity, but leave a small gap for airflow. Germination takes 2-4 weeks, so be patient.
☀️ Step 3: Provide Bright, Indirect Light for Seedlings
Once sprouts appear, remove the plastic wrap immediately to prevent fungal growth. Place the seedlings near a south-facing window or under grow lights for 12-14 hours of light daily. Cannas need bright light to avoid becoming leggy—you’ll know they’re getting enough when the leaves are deep green and compact, not stretched out.
After 4-6 weeks, when seedlings have 3-4 true leaves, transplant them into 5-gallon pots or directly into the garden (after the last frost). Harden them off by moving them outdoors for 1-2 hours daily over 7-10 days, gradually increasing their time outside. This prepares them for full sun once planted.
🌿 Step 4: Transition to Outdoor Conditions
Choose a sunny spot with 6+ hours of direct sunlight—cannas thrive in full sun but tolerate partial shade in hot climates. Dig a hole twice as wide as the root ball but no deeper. Amend the soil with compost to improve drainage, as cannas dislike waterlogged roots. Space plants 2-3 feet apart for mature size.
Water deeply once a week (or more in extreme heat) until the soil is 6 inches down. You’ll know they’re established when the leaves look plump and vibrant, not wilted. Mulch around the base with 2-3 inches of organic mulch to retain moisture and regulate soil temperature—this keeps roots cool in summer and insulated in winter.
✂️ Step 5: Maintain and Encourage Blooms
Cut back dead or yellowing leaves in early spring to redirect energy to new growth. Fertilize lightly with a balanced, water-soluble fertilizer every 4-6 weeks during the growing season. Cannas are heavy feeders but don’t overdo it—too much nitrogen leads to lush foliage but fewer blooms.
In fall, before the first frost, cut back the foliage to 6 inches tall and cover the crown with 4-6 inches of mulch. This protects the rhizomes (underground stems) from freezing. In warmer climates, cannas can stay in the ground year-round, but in colder areas, dig up the rhizomes, store them in dry peat moss, and replant in spring.
Tips & tricks for perfect canna seed germination
Here's what I wish I'd known when I first tried growing cannas from seed pods—these tricks cut down on guesswork and boost success rates.
Seed Prep Precision: When soaking your canna seeds for the 12-24 hours in Step 1, use a clear container so you can monitor water levels. Change the water every 12 hours to prevent bacterial growth—stale water turns cloudy and can actually inhibit germination. I also like to add a drop of hydrogen peroxide to the soaking water (1 part peroxide to 10 parts water) to create a natural sterilizing environment while keeping the seeds moist. This extra step has helped me avoid mold issues completely.
Temperature Matters: The 75-85°F range mentioned in Step 2 is crucial, but here's the secret: if your home runs cooler, place your seedling pots on top of a refrigerator or in a sunny window with a heat lamp. I've found that consistent warmth at the root level is more important than ambient air temperature. You can also create a mini greenhouse effect by placing pots inside a larger plastic container with a loose lid—this traps heat while allowing airflow. Just check daily for condensation buildup, which can lead to fungal issues.
Lighting Strategy: For the 12-14 hours of light in Step 3, I recommend using a combination of natural and artificial light. Place seedlings near a south-facing window first, then supplement with a basic LED grow light if you notice leaves stretching toward the light (a sign of legginess). The key is to keep the light source 6-12 inches above the seedlings—closer than that can scorch tender leaves, while farther away won't provide enough intensity. Rotate your pots daily so all sides get even light exposure, which prevents lopsided growth.
Transplanting Timing: When moving seedlings to 5-gallon pots in Step 3, wait until you see 3-4 true leaves AND the second set of leaves has fully unfurled. This usually happens around the 4-6 week mark, but don't rush it—seedlings need that root system to develop. I've made the mistake of transplanting too early, which leads to shock and stunted growth. When repotting, handle the seedlings by their leaves (not the stems) and bury them slightly deeper than they were in the starter pots—this gives them stability and encourages stronger root growth.
Pro Tips for Canna Seed Pods
- Here's what I wish I'd known when I first tried growing cannas from seed pods—these tricks cut down on guesswork and ...
- Seed Prep Precision: When soaking your canna seeds for the 12-24 hours in Step 1, use a clear container so you can mo...
- Temperature Matters: The 75-85°F range mentioned in Step 2 is crucial, but here's the secret: if your home runs coole...
Frequently asked questions
Got questions about canna seed pods?
You’re not alone! Here are some of the most common queries—plus quick, actionable answers to help you grow stunning canna blooms from seed.
How long does it take for canna seed pods to germinate?
Germination can take anywhere from 2 to 6 weeks, depending on temperature, moisture, and seed freshness. Keep the soil warm (around 70–80°F) and consistently damp—patience is key! If you don’t see sprouts in 4–6 weeks, the seeds may need a cold treatment or could be non-viable.
Can I plant canna seed pods directly outdoors?
Yes, but timing matters! Wait until after the last frost when soil temps are above 60°F. Direct sowing works best in warm climates (zones 8–11). In cooler areas, start seeds indoors 8–10 weeks before the last frost, then transplant seedlings outdoors once they’re 3–4 inches tall and hardened off.
What do I do if my canna seed pods won’t open?
Canna seed pods often won’t open naturally—they need help! Once dry and brown, gently squeeze the pod or use a small knife to pry it open (wear gloves—seeds can stain!). If the pod is still green, wait 1–2 more weeks for full maturity. Store unopened pods in a dry, cool place if harvesting later.
Are there alternatives to growing from seed pods?
If seed pods are tricky, try:
- Tubers: The easiest method—plant pre-sprouted canna tubers in spring for faster, more reliable blooms.
- Dividing clumps: Split mature canna plants in early spring to propagate new plants.
- Cutting slips: Snip healthy stems in water or soil to root new plants (great for rare varieties!).
Why are my canna seed pods moldy or rotting?
Mold or rot usually means too much moisture or poor airflow. To fix it:
- Ensure pods are in a dry, shaded spot after harvesting.
- Space plants 12–18 inches apart for better air circulation.
- Use well-draining soil (sandy loam works best) to prevent waterlogging.
- If mold appears, remove affected pods and treat with a fungicide if needed.
Wrapping up and next steps
Growing canna seed pods into stunning lawn blooms is a rewarding journey that brings vibrant color and natural beauty to your outdoor space! 🌸 By following the right steps—from selecting healthy pods to nurturing seedlings and maintaining mature plants—you’ll enjoy lush, tropical foliage and eye-catching flowers year after year.
Ready to turn your lawn into a showstopper? Start small: Try growing a few canna plants in pots first to perfect your technique, then expand to your garden. With patience and care, you’ll be harvesting seeds and sharing your success with fellow gardening enthusiasts! 🌱✨