
Lawn
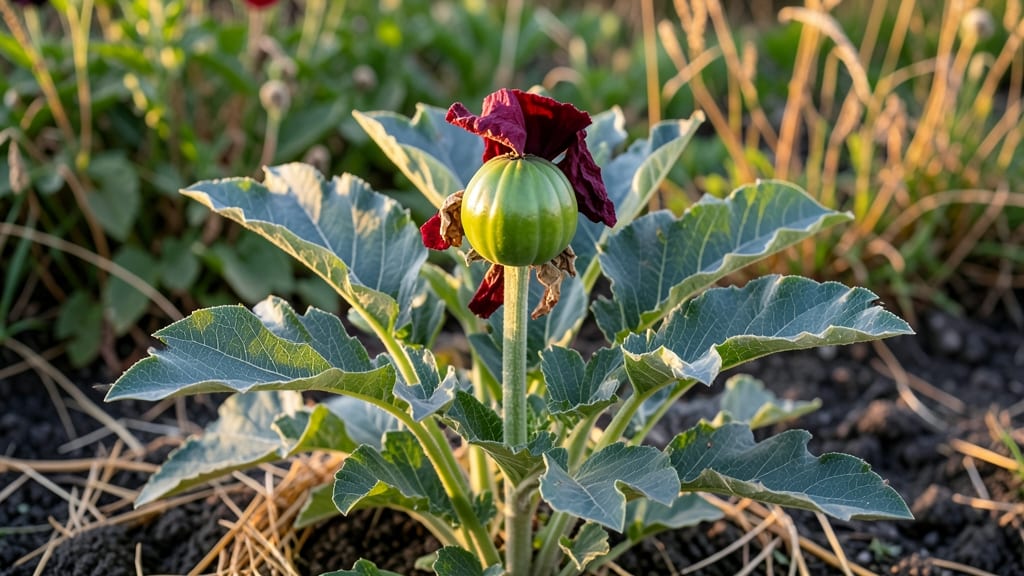
Identifying unripe poppy seed pods means spotting those green, bulbous shapes still clinging to the plant—far from the papery brown husks you want. 🌱 I’ve learned the hard way that harvesting too soon means dust instead of seeds, while waiting too long risks losing them to wind or pests.
The key is timing: pods should feel firm but slightly soft when gently squeezed, with a dull green hue (not glossy) and no visible cracks. Once you’ve picked the right moment, harvest on a dry morning when humidity is low.
Snip pods with clean shears, leaving a short stem to prevent bruising. Spread them in a single layer on a mesh screen or paper towels in a well-ventilated spot—no direct sun, just gentle airflow. This prevents mold while letting them dry naturally over 10-14 days.
What you’ll end up with are plump, dark seeds ready for saving or planting. The dried pods themselves make stunning dried arrangements, but only after seeds are fully extracted. Store seeds in a cool, dark place for up to 3 years—they’ll keep their viability better than store-bought packets.
For those who worry about premature drops, try lightly misting pods during dry spells or tying stems to stakes for support. And if pests like aphids attack, a neem oil spray keeps them at bay without harming the plant.
Patience pays off—wait for that perfect matte green stage, and you’ll never waste another harvest.
📚 In This Guide
- What you need
- Instructions
- Tips and common mistakes
- Wrapping up and next steps
What you need
- ● Unripe poppy seed pods: Fresh, green pods from healthy poppy plants (ensure they’re firm but not yet fully dried on the plant). Aim for 50–100 pods depending on your yield goals.
- ○ Pruning shears or sharp scissors: For cleanly snipping stems without damaging pods. Optional: A small hand pruner for bulk harvesting.
- ● Paper towels or newspaper: To line your drying surface and absorb excess moisture.
- ● Brown paper bags or breathable fabric sacks: For storing pods during drying (avoid plastic—it traps moisture!). 2–3 bags should suffice for small batches.
- ● Small mesh bags or cheesecloth: To contain pods while shaking out seeds later.
- ● Tweezers or fine-tipped tongs: For gently plucking seeds from pods once dried.
- ○ Fine-mesh strainer or sifter: To separate seeds from chaff (optional but helpful for purity).
- ○ Digital scale (optional): To track seed yield in grams/ounces for future reference.
- ● Spray bottle with water: For lightly misting pods if your climate is too dry during drying.
- ● Dry, well-ventilated space: A sunny windowsill, greenhouse, or indoor drying rack (avoid humidity!). Ideal temp: 60–75°F (15–24°C).
- ● Low-humidity conditions: Aim for 40–50% humidity or less to prevent mold. Use a hygrometer if needed.
- ● Indirect sunlight: Bright light speeds drying, but direct sun can scorch pods. A shade cloth is a great hack!
Step-by-step guide to harvesting and drying poppy seed pods
Here's how to collect, process, and store poppy seeds from unripe pods—without wasting a single one.
🌱 Step 1: Identify and Harvest Mature Pods
Poppy seed pods are ready when they turn from green to a deep, papery brown but haven’t split open yet. Run your thumb gently along the seam—if it feels soft and the pod makes a slight pop when pressed, it’s perfect. Harvest on a dry morning after the dew has evaporated; wet pods stick to your fingers and seeds may mold later.
Use clean, sharp scissors or pruning shears to snip the stem about 1 inch below the pod. Avoid crushing the pod, as this can damage seeds inside. Place harvested pods in a single layer on a clean, dry towel or paper towels. Never pile them—airflow is critical for even drying.
💧 Step 2: Dry Pods Properly to Preserve Viability
Spread the pods in a well-ventilated, dry location with indirect sunlight—direct sun can scorch them and reduce seed quality. A mesh drying rack or even a cardboard box with holes punched in the sides works well. Keep them out of humid areas like basements or kitchens where moisture lingers.
Drying takes 7–14 days, depending on humidity. Pods are ready when they’re completely dry and light enough to rattle seeds when shaken. If they still feel damp inside, extend drying time by another 2–3 days. Test by pressing a fingernail into the pod—it should dent easily without resistance.
✂️ Step 3: Extract Seeds and Store for Future Use
Once pods are bone-dry, place them in a clean paper bag and gently squeeze or roll them between your palms. The pods will split open, releasing seeds into the bag. Avoid shaking vigorously—this can damage seeds or blow them away. Sift the contents through a fine-mesh strainer to remove chaff and debris.
Store seeds in an airtight glass jar in a cool, dark place like a pantry. Label with the date—poppy seeds stay viable for 2–3 years if kept dry. For long-term storage, add a small packet of silica gel to absorb any lingering moisture. Never refrigerate unless you’re storing them for baking; seeds can absorb fridge odors.
🌿 Step 4: Troubleshooting Common Issues
If pods split open too soon, you missed the harvest window. Next time, check them daily—once they crack, seeds lose viability within hours. For moldy pods, discard them immediately; mold spreads quickly and ruins entire batches. If seeds feel sticky or clump together, they’ve absorbed moisture and may not germinate well.
Here’s the thing—if your pods stay green too long, they’re not getting enough light. Poppies need full sun (6+ hours daily) to mature properly. Move plants to a sunnier spot next season, or grow them in containers you can relocate easily. A little extra sunlight makes all the difference in seed quality.
Tips & tricks for perfect poppy seed pod harvesting
Mastering this process means paying attention to small details that make all the difference between viable seeds and wasted effort.
Harvest Timing: The 7–14 day drying window starts from the moment you harvest. I recommend checking pods daily after they turn papery brown—once they start splitting open, seeds lose viability within hours. Harvest in the morning when dew has evaporated; wet pods stick to fingers and can develop mold during drying. A quick visual trick: press a fingernail into the pod—it should dent easily when fully ripe.
Drying Environment: Humidity is your silent enemy here. Use a well-ventilated area with indirect sunlight—direct sun can scorch pods and reduce seed quality. I've had best success with a mesh drying rack placed near an open window but out of direct rays. If your kitchen feels humid, consider using a small fan on low setting to improve airflow. The goal is to mimic natural drying conditions without accelerating the process.
Storage Wisdom: For long-term storage beyond 2–3 years, add a small packet of silica gel to your airtight glass jar. This prevents moisture buildup that can cause seeds to clump or develop mold. I've found that labeling jars with both the harvest date and storage date helps track viability—poppy seeds stored properly can last up to 5 years, though flavor potency diminishes after 3 years.
Troubleshooting: If you notice seeds feeling sticky after extraction, they've absorbed moisture during storage. To fix this, spread them on a clean towel in a single layer and let them air-dry for another 24 hours before storing. This extra step prevents clumping and maintains seed quality. For moldy pods, discard immediately—mold spreads quickly and can ruin entire batches of seeds.
Pro Tips for Unripe Poppy Seed Pod
- Mastering this process means paying attention to small details that make all the difference between viable seeds and wasted effort.
- Harvest Timing: The 7–14 day drying window starts from the moment you harvest.
- Drying Environment: Humidity is your silent enemy here.
Frequently asked questions
Got questions about harvesting and drying unripe poppy seed pods? Here are some common ones—plus expert answers to keep your seeds thriving!
Why can’t I harvest poppy seeds from unripe pods?
Unripe poppy seed pods (green or firm) won’t yield viable seeds yet—they’re still developing! Wait until the pods turn brown and papery (usually 4–6 weeks after flowering) for plump, mature seeds. Harvesting too early risks low germination rates or empty pods. Patience pays off!
How do I know when poppy seed pods are ready to harvest?
Look for these signs:
- Color: Dull brown or tan (not green or glossy).
- Texture: Dry, brittle, and crinkly to the touch.
- Sound: A faint rattle when shaken (seeds inside!).
- Opening: Pods may split slightly—harvest before they burst open!
What’s the best way to dry poppy seed pods at home?
Spread pods in a single layer on a screen, paper towel, or mesh bag in a well-ventilated spot (avoid direct sunlight). Stir gently every 1–2 days to prevent dampness. A dehydrator (115°F/46°C for 4–6 hours) or oven (lowest setting, door ajar) also works. Test dryness: crush a pod—if it powders easily, it’s ready!
What if my poppy pods mold or rot before drying?
Mold (fuzzy spots) or rot (soft, discolored pods) happens from high humidity or overcrowding. Fix it fast:
- Move pods to a dry, shaded area immediately.
- Discard any moldy pods (don’t risk toxic spores).
- For salvageable pods, freeze them for 24 hours to kill mold, then dry.
Can I use unripe poppy pods for anything else if seeds aren’t ready?
While seeds are the star, unripe pods are edible (young and tender) and packed with nutrients. Slice them thinly for salads, blanch them like okra, or pickle them for a crunchy garnish. Just avoid the latex (milky sap)—it can irritate skin. Wear gloves if handling!
Wrapping up and next steps
Harvesting and drying unripe poppy seed pods is a rewarding way to ensure a bountiful yield of fresh, flavorful seeds for cooking, gardening, or sharing with loved ones.
By following the right timing—waiting until the pods are slightly wrinkled but still green—and using proper drying techniques, you can preserve their quality and maximize your harvest. Don’t let hesitation hold you back—grab those pods and turn them into a delicious or decorative treasure!
Ready to take the next step? Start small—try harvesting just a few pods to practice your technique, then scale up as you gain confidence. Happy harvesting! 🌱✨