
Lawn
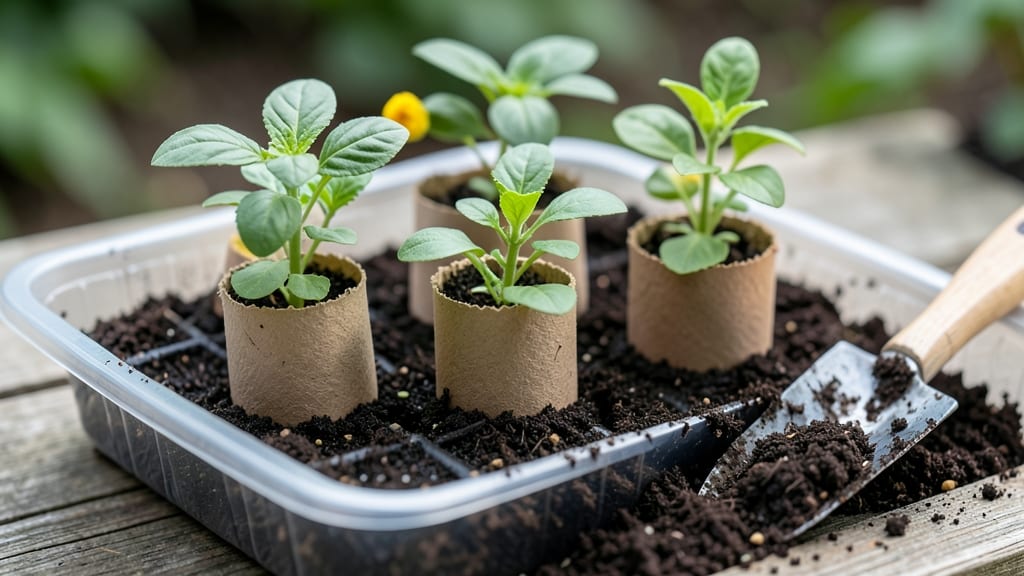
This toilet paper roll seed starter holds the secret to my most foolproof seed-starting system—eco-friendly, space-saving, and ready for transplant in just 60 days. 🌱 Last spring, I turned 50 rolls into 50 thriving seedlings without spending a dime on plastic pots.
The best part? They break down in the soil, leaving no trace behind.
You only need toilet paper rolls (or cardboard tubes), potting soil, seeds, and a spray bottle—no fancy equipment. Cut the rolls into 3-inch sections, fill with moist soil, plant your seeds, and pop them in a sunny windowsill.
Within 10-14 days, you’ll see those first green sprouts pushing through, and by 60 days, they’ll be ready to move outdoors or into larger pots.
The payoff is lush, healthy seedlings that outperform store-bought transplants. No more struggling with leggy, weak starts—just sturdy, compact plants that thrive from day one. Plus, you’ll cut waste by 80% compared to traditional plastic pots, and kids love getting hands-on with this simple, zero-cost method.
Works for almost any seed—herbs, flowers, or veggies—though larger varieties like tomatoes need a head start in bigger rolls. If mold appears, just add more airflow or reduce watering. Here’s how to make it work for your garden, no matter the size.
📚 In This Guide
- What you need
- Instructions
- Tips and common mistakes
- Wrapping up and next steps
What you need
- ● Empty toilet paper rolls – 10–20 rolls (clean, dry, and free of labels)
- ● Seed-starting mix – 1–2 bags (lightweight, sterile potting soil with perlite or vermiculite)
- ● Seeds – Choose fast-growing varieties like herbs (basil, parsley), flowers (marigolds, sunflowers), or veggies (lettuce, radishes)
- ● Spray bottle – 1 (for gentle watering)
- ● Scissors or craft knife – 1 (to cut rolls if needed)
- ● Plastic wrap or clear lid – 1 (to create a mini greenhouse effect)
- ● Tray or shallow container – 1 (to catch excess water; a baking sheet or plant tray works)
- ● Hole punch – To add drainage holes to the bottom of rolls
- ● Markers or labels – For tracking seed types
- ● Grow lights or sunny windowsill – If natural light is limited
- ● Compost or worm castings – To boost soil nutrients
Step-by-Step instructions for creating toilet paper roll seed starters
Here's how to transform empty toilet paper rolls into a thriving seed-starting system that's both budget-friendly and sustainable.
🌱 Step 1: Prepare the Toilet Paper Rolls and Planting Mix
Start by emptying and thoroughly cleaning your 4 toilet paper rolls—scrub them with soapy water to remove any residue, then rinse and let them dry completely. This ensures no contaminants interfere with germination. Cut off the bottom of each roll to create a drainage hole, about ½ inch wide, using a utility knife or scissors. Line the bottom of each roll with a ¼ inch layer of pebbles or perlite to improve drainage and prevent soggy roots.
Next, fill each roll about ¾ full with a lightweight seed-starting mix. I like to use a blend of 50% peat moss and 50% vermiculite for its excellent moisture retention and aeration. Moisten the mix until it feels like a damp sponge—squeeze it gently, and it should hold its shape but not drip water. This pre-moistened mix helps seeds germinate faster by providing consistent hydration right from the start.
🌱 Step 2: Plant the Seeds at the Correct Depth
Refer to your seed packet for planting depth, but as a general rule, most seeds should be planted at a depth equal to twice their diameter. For example, tiny lettuce seeds go in just ¼ inch deep, while larger seeds like beans need ½ inch of coverage. I tap the seed packet gently to release one seed at a time—planting too many in one roll leads to weak, crowded seedlings that compete for resources.
After planting, lightly cover the seeds with additional seed-starting mix, using your finger to press it down gently. This ensures good seed-to-soil contact, which is critical for consistent germination. Label each roll with the seed type and planting date using a permanent marker—after a few weeks, identical sprouts can look very different depending on the variety.
💧 Step 3: Water and Provide Ideal Germination Conditions
Water the rolls gently from the bottom by placing them in a tray filled with ½ inch of water for about 10 minutes. This method ensures the soil absorbs moisture evenly without disturbing the seeds. Avoid watering from above, as it can dislodge seeds or create uneven moisture levels. Once the rolls are saturated, remove them from the tray and let any excess water drain completely—you want the soil to be damp but not soggy.
To create the ideal germination environment, place the rolls in a clear plastic bag or under a humidity dome and position them in a warm, dark spot. Most seeds germinate best at 70-75°F, so a seedling heat mat or a sunny windowsill above a warm appliance (like a refrigerator) works well. Check the rolls daily and mist the soil lightly if it feels dry to the touch. Germination typically takes 5-14 days, depending on the plant type—watch for the first tiny green shoots breaking through the soil.
☀️ Step 4: Introduce Light and Monitor Growth
Once the seeds have sprouted and developed their first true leaves (the second set of leaves after the initial seed leaves), move the rolls to a bright, indirect light source. A south-facing window or a grow light positioned 4-6 inches above the plants works best. If using natural light, rotate the rolls a quarter turn daily to prevent seedlings from leaning toward one side—a telltale sign of uneven light exposure.
Water the rolls every 2-3 days, allowing the top ½ inch of soil to dry out slightly between waterings. Overwatering is the most common mistake here—it leads to weak stems and fungal diseases like damping-off. You'll know the moisture is right when the soil surface looks slightly damp but not glistening. Fertilize lightly with a diluted liquid fertilizer (½ strength) after the seedlings have 3-4 true leaves to encourage strong root and shoot growth.
🪴 Step 5: Transplant Seedlings into the Garden or Larger Pots
When seedlings have 4-6 true leaves and are about 3-4 inches tall, they're ready to transplant. Gently remove each seedling from its roll by sliding the roll away from the roots—this minimizes root disturbance. If the roots have filled the roll completely, it's a sign they're ready for a larger space. Plant them in their final location, burying the roll ½ inch deeper than it was in the starter to encourage stronger stem development.
Water the transplanted seedlings thoroughly to help them establish in their new home. Over the next 7-10 days, monitor them closely for signs of stress, such as wilting or yellowing leaves. If you notice any issues, adjust watering or light exposure accordingly. With proper care, your toilet paper roll seedlings will thrive and be ready for harvest or further growth in just 60 days—proving that sustainability and success go hand in hand.
Tips & tricks for perfect toilet paper roll seed starters
Here's what nobody tells you about maximizing your seedling success with this clever, zero-waste method.
Drainage is Non-Negotiable: That ½-inch drainage hole in Step 1 isn't just for show—it's critical for preventing root rot. If you're worried about mess, place each roll inside a small plastic cup with drainage holes punched in the bottom before adding your pebbles. This double drainage system creates a perfect balance between moisture retention and oxygen flow to the roots. I learned this the hard way after watching several seedlings succumb to soggy soil.
The Temperature Factor: While 70-75°F is ideal for germination, don't panic if your space runs cooler. Place your rolls on top of a refrigerator or near a sunny window above a warm appliance. You can also create a mini greenhouse effect by placing the rolls inside a clear plastic container with a lid (just prop it open slightly for airflow). The key is maintaining consistent warmth—fluctuations can delay or prevent germination entirely.
Light Transition Matters: When moving seedlings from dark germination to light in Step 4, do it gradually over 3-4 days. Start with just 1-2 hours of bright light per day, then increase by 1 hour daily. This gradual exposure prevents "etiolation"—those sad, leggy seedlings that stretch desperately toward any available light. Think of it like sunbathing after winter: slow and steady wins the race to strong, sturdy plants.
Transplanting Hack: When it's time to transplant in Step 5, cut the toilet paper rolls lengthwise before removing the seedlings. This creates a natural "slippery sleeve" that slides right off the roots with minimal disturbance. The rolls' fibrous texture actually helps guide roots downward, giving your seedlings a head start in their new home. It's one of those simple tricks that makes all the difference between stressed and thriving transplants.
Pro Tips for Toilet Paper Roll Seed Starter
- Here's what nobody tells you about maximizing your seedling success with this clever, zero-waste method.
- Drainage is Non-Negotiable: That ½-inch drainage hole in Step 1 isn't just for show—it's critical for preventing root...
- The Temperature Factor: While 70-75°F is ideal for germination, don't panic if your space runs cooler. Place your rol...
Frequently asked questions
Got questions about turning toilet paper rolls into seed starters?
You’re not alone! Here are answers to the most common queries to help you grow confidently—no green thumb required.
Can I use any toilet paper roll for seed starters?
Most standard toilet paper rolls work, but opt for unbleached or recycled rolls to avoid harsh chemicals that could harm seedlings. Avoid rolls with plastic tabs or excessive glue—simply cut them off or use scissors to trim. If your roll is too flimsy, reinforce it with a thin layer of newspaper or tape.
How long does it take for seeds to sprout in toilet paper rolls?
Sprouting time varies by plant, but most seeds (like herbs, lettuce, or flowers) emerge in 7–14 days under ideal conditions. Keep the rolls in a warm, sunny spot (or under grow lights) and mist daily. Fast growers like radishes may sprout in 3–5 days, while slower ones (like tomatoes) take 2–3 weeks.
What if my seeds don’t sprout? Troubleshooting tips!
Don’t panic—here’s how to fix common issues:
No sprouts after 2 weeks?
Check seed viability (test with a damp paper towel) or try replanting fresh seeds.
Mold or foul smell?
Your rolls are too wet! Unroll, let dry, and reduce watering. Add a pinch of cinnamon to deter fungus.
Leggy or weak seedlings?
They need more light. Move them closer to a sunny window or use a grow light for 12+ hours daily.
Can I reuse toilet paper rolls for multiple planting cycles?
Yes! After harvesting your first batch, rinse the rolls, let them dry, and reuse them for a new round of seeds. For long-term use, soak them in a 1:10 vinegar-water solution to sanitize. Just avoid over-saturating them—cardboard breaks down faster when wet.
Are there eco-friendly alternatives to toilet paper rolls?
Try these zero-waste options:
| Material | Pros | Cons |
|---|---|---|
| Egg cartons (cardboard) | Biodegradable, sturdy, and naturally holds moisture. | Smaller cells may limit root growth for larger plants. |
| Newspaper or junk mail | Free, recyclable, and easy to shape into pots. | Requires more moisture control to avoid mold. |
| Paper towel rolls | Thicker than TP rolls, holds more soil. | Heavier when wet—may need support. |
Pro tip: If using plastic containers (like yogurt cups), poke drainage holes first to prevent root rot!
Wrapping up and next steps
Transforming a simple toilet paper roll into a thriving seed starter is more than just an eco-friendly hack—it’s a fun, budget-friendly way to kickstart your gardening journey! 🌱 With just a few materials and a little patience, you’ll watch tiny seeds grow into lush plants ready for your lawn or garden in just 60 days.
Now that you’ve mastered the basics, why not take the next step? Try experimenting with different plants, share your progress with fellow green thumbs, or even turn this into a family project for some hands-on learning. Happy growing!