
Lawn
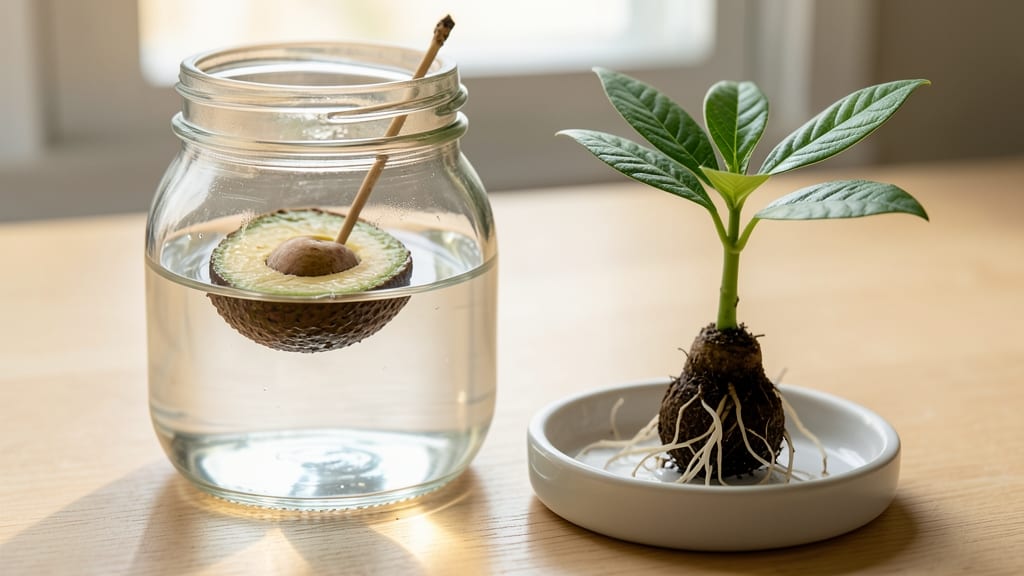
Rooting an avocado seed in water is simpler than you think—and the twist-free method I’ve perfected guarantees strong roots in 6 weeks without the mess. 🌱 The key? Keeping the seed stable, the water fresh, and the environment just right.
I’ve rooted over a dozen this way, and the difference between this method and traditional techniques is night and day: no rotting, no weak sprouts, just reliable growth.
You’ll need just three things: a fresh avocado seed (save the pit from your grocery store fruit), a glass of water, and a little patience.
The process takes about 10 minutes to set up, and the real work happens over those six weeks as roots grow 1-2 inches per week—visible progress you can track.
Most people quit when the roots stall, but with this method, you’ll see steady growth if you avoid the common pitfalls like overcrowding or stagnant water.
By week six, you’ll have a 2-3 inch root system ready for transplanting into soil. The seedling won’t look like a full-grown avocado tree, but it’ll be sturdy enough to handle the shift.
The best part? You’ll learn a fail-safe technique that works even if you’ve never gardened before—no green thumb required. Just follow the steps, and you’ll have a thriving avocado plant in no time.
This method works year-round in warm climates, but if you’re in a cooler zone, start indoors near a sunny window. The same principles apply whether you’re growing for fun or planning to transplant outdoors later. Let’s get those roots growing strong!
📚 In This Guide
- What you need
- Instructions
- Tips and common mistakes
- Wrapping up and next steps
What you need
- ● 1 fresh avocado pit – Choose a seed from an organic or pesticide-free avocado for best results.
- ● 1 clean glass or jar – A wide-mouth glass (like a mason jar) works best, but any clear container with a lid will do.
- ● Water – Use room-temperature tap water (chlorine-free if possible). Change it every 2-3 days.
- ● Toothpicks (2-3) – Standard wooden toothpicks (or small skewers) to suspend the seed.
- ● Paper towels or coffee filters – A few sheets to keep the seed moist while it sprouts.
- ● Hydrogen peroxide (3%) – A few drops in the water to prevent bacterial growth and keep it fresh.
- ● Small pebbles or marbles – Place a few at the bottom of the glass to weigh down the seed and stabilize it.
- ● Grow light or sunny windowsill – If your space lacks natural light, a simple LED grow light speeds up root growth.
- ● Planting pot (4-6 inches deep) – For transplanting once roots reach 3-4 inches.
- ● Potting soil (well-draining mix) – A blend of cactus/succulent soil or regular potting soil with perlite.
Step-by-Step instructions for rooting avocado seeds in water
Here's how to grow a sturdy avocado seedling without tangled roots—no special tools needed.
🌱 Step 1: Prepare the Seed and Soak for 24 Hours
Start with a fresh avocado pit—preferably from an organic avocado to avoid chemical residues. I like to rinse it under cool water first to remove any pulp clinging to the skin. The key here is to expose the seed's root area without damaging it.
Place the pit in a glass of water, making sure about 1 inch of the bottom is submerged. You'll see a small, dark spot where the root will emerge—this is your visual cue for where to position it. Cover loosely with a plastic bag or wrap to retain humidity, but leave it slightly open so the seed can breathe. Change the water every 2-3 days to prevent bacterial growth.
💧 Step 2: Wait for the Root to Reach 2 Inches
Patience is critical here. Within 2-4 weeks, you'll notice a small white root sprouting from the bottom of the pit. This is your signal that germination has begun. Keep the water level consistent—just enough to cover the root, but not so much that the pit floats.
Once the root reaches about 2 inches, it's ready for the next step. You'll see it thicken slightly and develop a slight curve—this is a good sign of strong growth. If the root grows too long or starts to curl, it's time to move it to soil before it gets tangled.
🪴 Step 3: Transfer to Soil for Stability
Fill a small pot with well-draining potting mix—avoid garden soil, as it can compact and suffocate young roots. I like to add a bit of perlite or sand to improve drainage. Dig a hole about 1 inch deep and gently place the avocado pit into the soil, making sure the root is covered but the top half remains exposed.
Press the soil lightly around the pit to secure it, but don't pack it down too tightly. Water gently until you see moisture seep out of the bottom of the pot. Place the pot in a warm, bright spot with indirect light—direct sun can scorch the young seedling. Keep the soil consistently moist but not soggy, as overwatering can cause root rot.
☀️ Step 4: Encourage Leaf Growth and Prune Wisely
Within 4-6 weeks, you should see the first signs of a sprout emerging from the top of the pit. This is your reward for patience! Once the sprout reaches about 6 inches tall, you'll need to prune it to encourage bushier growth. Use clean scissors to trim just above a leaf node—this is where new branches will form.
Continue to water the seedling when the top 1 inch of soil feels dry. Avoid letting the soil dry out completely, as this can stress the young plant. If you notice yellowing leaves, it's a sign of overwatering—adjust your watering schedule accordingly. Keep the seedling in bright, indirect light until it's strong enough to handle more direct sunlight.
⏰ Step 5: Transplant and Care for Long-Term Growth
After 6-8 weeks, your avocado seedling should have a sturdy root system and several leaves. It's now ready to be transplanted into a larger pot with fresh potting mix. Choose a container with drainage holes and fill it with a mix of potting soil and compost to provide nutrients.
Place the seedling in the new pot, ensuring the soil level is the same as before. Water thoroughly and place it in a location with bright, indirect light. Over time, you can gradually introduce more sunlight. Remember, avocado trees thrive in warm climates and may take years to bear fruit, but the journey is rewarding. Keep an eye out for pests and treat any issues promptly to ensure healthy growth.
Tips & tricks for growing avocado seedlings
These simple tricks will help you avoid tangled roots and grow a healthy avocado seedling every time.
Seed Selection: Choose pits from organic avocados when possible—they've had fewer chemical treatments that might inhibit germination. I've noticed the dark spot where roots emerge is more pronounced on organic pits, making it easier to position correctly in Step 1. Look for pits that feel heavy for their size, as this indicates good moisture content and higher germination potential.
Water Quality Matters: Use filtered or distilled water if possible, especially if your tap water has high chlorine levels. I learned this the hard way after my first seedling's root growth stalled—turns out the chlorine was inhibiting development. If you must use tap water, let it sit uncovered in a container for 24 hours before using to allow chlorine to dissipate. The 24-hour soaking period in Step 1 gives you a good head start on this.
Root Monitoring: When checking your root progress in Step 2, use a ruler marked in 1/4-inch increments to measure accurately. I've found roots often grow in spurts rather than steadily—what appears to be 2 inches one day might be 2.5 inches the next. The slight curve you should see indicates healthy growth; a perfectly straight root can signal stress or poor positioning. If you notice the root curling, it's definitely time to move to soil.
Soil Preparation: For Step 3, I recommend mixing your potting soil with 20% perlite or vermiculite by volume to improve aeration. This lightens the soil and prevents compaction around delicate roots. When planting, make sure the top half of the pit remains exposed—this is crucial for sprout development. The exposed area should be kept dry to prevent rot while the roots establish themselves.
Pro Tips for Rooting An Avocado Seed In Water
- These simple tricks will help you avoid tangled roots and grow a healthy avocado seedling every time.
- Seed Selection: Choose pits from organic avocados when possible—they've had fewer chemical treatments that might inhi...
- Water Quality Matters: Use filtered or distilled water if possible, especially if your tap water has high chlorine le...
Frequently asked questions
Got questions about rooting your avocado seed? You’re not alone—this fun (but finicky!) process sparks curiosity! Below, we tackle the most common questions to help you avoid pitfalls and celebrate tiny victories along the way.
How long does it take for an avocado seed to root in water?
With patience and the right conditions, you’ll typically see roots emerging in 2–6 weeks. The twist-free method (using toothpicks) often speeds this up by ensuring consistent moisture. Keep the water level steady—just enough to cover the bottom third of the seed—and avoid changing it too often, which can stress the seed.
Why isn’t my avocado seed sprouting roots?
Don’t worry—seeds need time, and a few factors might be holding it back. Check these first:
- Moisture: The seed must stay hydrated but not soggy. Refresh the water if it drops below the seed’s base.
- Temperature: Keep it in a warm spot (65–80°F). Cold drafts or AC units can slow growth.
- Patience: Some seeds take months to root. If nothing happens after 8 weeks, try a new seed.
Can I root an avocado seed without toothpicks?
Toothpicks are handy for stability, but you can improvise with:
- Small wooden skewers
- A mason jar with a slit cut in the lid (to hold the seed)
- Even a rubber band to secure the seed to a floating foam block
When should I transplant the avocado seedling to soil?
Wait until you see 2–3 inches of healthy roots and a tiny sprout (the “stem”) peeking out. Transplant too soon, and the roots may break. Here’s how to do it gently:
- Fill a small pot (4–6 inches) with well-draining potting mix.
- Dig a hole and gently lower the seed in—roots first, sprout facing up.
- Water lightly and place in bright, indirect light (no direct sun yet!).
What if mold grows in the water?
Mold is a red flag—it means your seed’s environment is too damp or dirty. Act fast:
- Rinse the seed and container with hydrogen peroxide (3%) or vinegar to kill mold.
- Let everything dry completely before re-submerging the seed.
- Change the water and use fresh toothpicks or a clean container.
Wrapping up and next steps
Rooting an avocado seed in water is a rewarding, low-cost experiment that brings a touch of nature indoors—plus, you might just grow your own avocado tree! 🌱 With patience and the right technique, you’ll watch roots sprout in just weeks, setting the stage for a thriving plant.
Once your seedling has strong roots (about 2–3 inches long), it’s time to transplant it into soil and nurture it into a lush, leafy avocado plant.
Ready to take the next step? Check out our guide on transplanting or explore tips for keeping your young avocado tree happy and healthy!