
Propagation
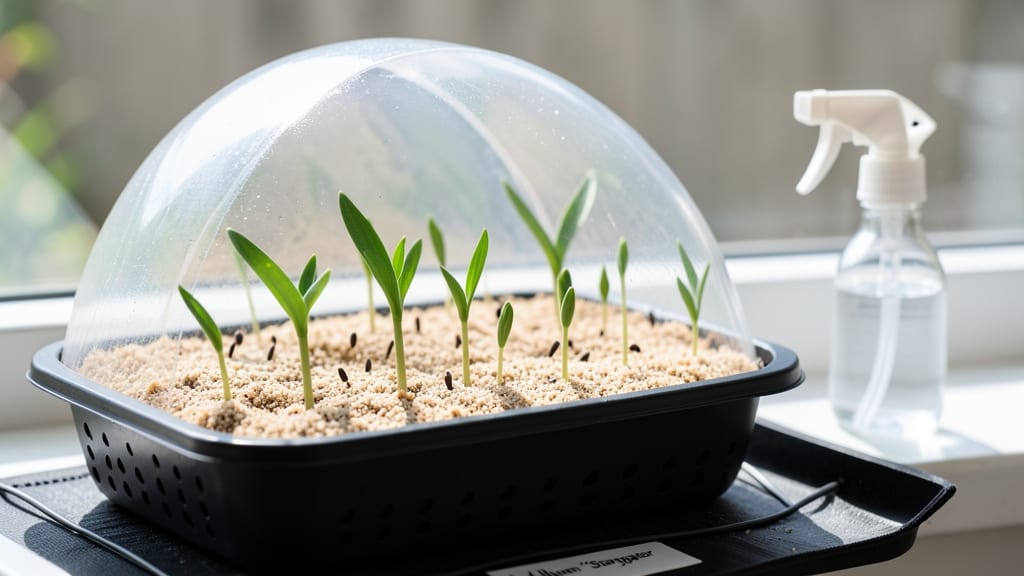
Lily seed germination means waiting two years for that first bloom—but controlling moisture turns that wait into a rewarding journey. 🌱 I’ve struggled with moldy trays and slow sprouts, but these simple adjustments cut the guesswork. The secret isn’t fancy equipment; it’s keeping soil damp (not soggy) and patiently watching for those first green teeth.
You’ll need a shallow tray, well-draining mix, and a humidity dome (or plastic wrap). Fresh seeds sprout faster, but stored ones still work—just expect a slightly longer wait.
The key is consistent moisture: check daily, mist lightly, and avoid letting the soil dry out. Too much water? Mold wins. Too little? Seeds stay stubbornly dormant.
Within 4-6 weeks, you’ll see tiny shoots breaking through. These delicate seedlings need bright, indirect light and 60-70°F temps to thrive. Thin them carefully—crowded sprouts compete for nutrients, slowing growth. By year two, you’ll have sturdy young plants ready for transplanting.
This method works for Asiatic, Oriental, and Martagon lilies. The payoff? Lilies grown from seed develop unique color patterns and stronger disease resistance than store-bought bulbs. Patience pays off—literally, in years of showstopping blooms. Let’s get those seeds sprouting!
📚 In This Guide
- What you need
- Instructions
- Tips and common mistakes
- Wrapping up and next steps
What you need
- ● Lily seeds: Fresh or stored seeds (preferably from a trusted source). Aim for at least 10 seeds for better success rates.
- ● Seed-starting mix: A lightweight, sterile peat-based or coconut coir blend (avoid garden soil—it’s too dense). Use 1–2 cups per container.
- ● Containers: Small pots (3–4 inches deep) or
- ● A seed tray with drainage holes (for batch germination).
- ● Spray bottle: With a fine mist nozzle (for gentle hydration).
- ● Clear plastic wrap or dome: To maintain humidity (e.g., a ziplock bag or propagator lid).
- ○ Heat mat (optional but recommended): Set to 70–75°F (21–24°C) to speed up germination.
- ● Grow lights or sunny windowsill: Lilies need bright, indirect light (12+ hours/day).
- ● Fungicide: A mild solution (like hydrogen peroxide 3%) to prevent mold.
- ● Growing medium additives: Perlite or vermiculite (10–20% mix) for aeration.
- ● pH test kit: Ideal soil pH for lilies is 6.0–7.0.
- ● Humidity tray: A shallow tray with pebbles and water to boost moisture levels.
Step-by-step guide to germinating lily seeds
Here’s how I’ve learned to coax lily seeds into sprouts—without the wait.
🌱 Step 1: Prepare Seeds for Maximum Moisture Uptake
Lily seeds have a tough outer shell that slows germination, so we need to soften it first. Place the seeds in a bowl of lukewarm water for 24-48 hours. You’ll see the water cloud slightly as the seed absorbs moisture and begins to swell. Change the water halfway through if it cools or becomes murky—this prevents bacterial growth while keeping the seeds hydrated.
After soaking, gently rub the seeds between your fingers to loosen the outer coating. You don’t need to scrub them clean, just enough to break the shell’s resistance. This step is critical—without it, germination can take 6-12 months instead of weeks. I like to do this under running water to avoid overhandling the delicate seeds.
💧 Step 2: Create a Controlled Germination Environment
Fill a small container with a mix of 50% peat moss and 50% perlite—this balance keeps moisture consistent while allowing airflow. The mix should feel like a damp sponge when squeezed, not dripping. Plant the seeds ½ inch deep, spacing them 1 inch apart to avoid crowding as they grow.
Cover the container with clear plastic wrap or a humidity dome to trap warmth and moisture. Place it in a spot with 65-75°F temperatures—like on top of a refrigerator or near a sunny window. Check daily for condensation on the plastic. If it’s dry inside, mist the soil lightly with room-temperature water and reseal. Germination should begin in 2-4 weeks, but be patient—some seeds take longer.
☀️ Step 3: Transition to Light and Airflow
The moment you see the first signs of sprouting—tiny green tips breaking through the soil—remove the plastic cover immediately. This prevents damping-off, a fungal disease that attacks tender seedlings. Place the container under bright, indirect light for the first week. Direct sunlight can scorch the delicate sprouts, so a north-facing window or grow light on low setting works best.
Once seedlings reach 2 inches tall and develop their first true leaves (not the initial seed leaves), gradually introduce them to more light. You’ll notice the stems straighten and leaves darken to a richer green. This is your cue to move them under 12-14 hours of light daily, either natural or artificial. Avoid cold drafts—they’ll stunt growth.
🌿 Step 4: Harden Off and Prepare for Transplanting
After 6-8 weeks of growth, when seedlings have 4-6 leaves and a sturdy stem, it’s time to harden them off. Start by moving them outside to a shaded, sheltered spot for 1 hour daily. Over 7-10 days, gradually increase their outdoor time, ending with full sun exposure. Watch for wilting—if it happens, they’re not ready yet.
Choose a transplant date when nighttime temperatures stay above 50°F. Dig a hole twice as wide as the seedling’s root ball and mix in a handful of compost. Water the hole before planting to settle the soil, then place the seedling in, firming the soil gently around the base. Mulch lightly with 1 inch of organic matter to retain moisture and protect roots.
⏰ Step 5: Maintain Moisture and Monitor Growth
Keep the soil consistently moist but not soggy for the first 2 weeks after transplanting. You’ll know it’s right when the top inch feels cool to the touch but doesn’t clump when squeezed. Avoid overhead watering—it spreads disease. Instead, water at the base early in the day so leaves dry quickly.
Lily seedlings grow slowly at first, but you’ll see a growth spurt once they establish roots. Fertilize lightly with a balanced 10-10-10 mix after 6 weeks to encourage strong bulb development. The first year is all about building a healthy root system—don’t rush blooms. With patience, you’ll see flower stalks emerge in 2-3 years, proving the wait was worth it.
Tips & tricks for perfect lily seed germination
Here's what nobody tells you about speeding up those stubborn lily seeds—without sacrificing quality.
Soaking Strategy: For the 24-48 hour soak, use a glass bowl so you can easily monitor water quality. If you notice any cloudiness or slimy residue after 12 hours, dump the water and start fresh—this prevents fungal contamination that could derail germination. The key is maintaining that lukewarm temperature consistently; if your tap water runs cold, place the bowl in a warm spot like near your fridge or on top of a warm (not hot) water heater.
Seedling Light Transition: When moving seedlings to 12-14 hours of light daily, I recommend using a timer for your grow lights. This automates the process and prevents over-lighting, which can stress delicate seedlings. Start with 8 hours of light the first week, then increase by 1 hour daily until reaching the full 12-14 hours. The gradual transition mimics natural daylight changes and prevents shock to the plants.
Harden Off Gradually: The 7-10 day hardening process is where most people fail—don't rush it! I've seen seedlings wilt dramatically when moved too quickly to full sun. Start with just 1 hour in partial shade, then increase by 15 minutes each day. Watch for leaves that perk up immediately after returning indoors—that's your sign they're ready for more sun exposure.
Transplant Timing: For the transplant step, I always check nighttime temperatures twice daily—once at dusk and again at midnight. Lily seedlings are particularly sensitive to cold snaps, which can cause rot. If temperatures dip below 50°F at night, wait another week before transplanting. The extra patience now means stronger plants that establish faster in their permanent home.
Pro Tips for Lily Seed Germination
- Here's what nobody tells you about speeding up those stubborn lily seeds—without sacrificing quality.
- Soaking Strategy: For the 24-48 hour soak, use a glass bowl so you can easily monitor water quality. If you notice an...
- Seedling Light Transition: When moving seedlings to 12-14 hours of light daily, I recommend using a timer for your gr...
Frequently asked questions
Got questions about getting those lily seeds to sprout like a pro? You’re in the right place! Here are answers to the most common queries—from patience levels to troubleshooting tricks.
How long does it take for lily seeds to germinate?
Germination time varies by species, but most lily seeds take 4 to 12 weeks to sprout. Some hybrids or wild types may take even longer—up to 6 months! Consistency in moisture and warmth (around 70–75°F) speeds things up. Don’t rush it: Seeds need patience, just like lilies need time to bloom.
What if my seeds aren’t sprouting after 8 weeks?
If your seeds are still dry or show no signs of life after 8 weeks, try these fixes:
- Check moisture: Overwatering can rot seeds; underwatering stalls growth. Aim for damp (not soggy) soil.
- Test viability: Soak a few seeds in water overnight—if they sink, they’re likely viable.
- Adjust temperature: Move your tray to a warmer spot (like near a sunny window or under a grow light).
- Scratch the seed coat: Some lily seeds have tough shells. Gently nick them with sandpaper to encourage water absorption.
Can I germinate lily seeds in water instead of soil?
Yes! Water germination is a great way to monitor progress and avoid soil-borne diseases. Here’s how:
- Place seeds in a jar of room-temperature water, covering them lightly (they’ll need air too!).
- Change the water every 2–3 days to prevent mold.
- Once roots reach 1–2 inches, transplant into moist soil or a seedling mix.
What’s the best way to store unplanted lily seeds?
Store seeds in a cool, dry place (like a sealed container in the fridge) to maintain viability. Most lily seeds stay good for 1–2 years if kept dry and dark. Label them with the date and species—some varieties lose vigor faster than others. Freezing isn’t recommended unless you’re prepping for long-term storage (thaw slowly!).
Why are my sprouted seeds turning yellow or mushy?
Yellowing or mushy seedlings usually mean overwatering, fungal infection, or poor drainage. Act fast:
- Reduce moisture: Let the soil dry slightly between waterings.
- Improve airflow: Thin crowded seedlings or move them to a bright, airy spot.
- Fungal fix: Spritz with a neem oil solution (1 tsp oil + 1 quart water) to combat mold.
- Replant if needed: If roots are rotting, snip off damaged parts and repot in fresh, sterile soil.
Wrapping up and next steps
Mastering lily seed germination is all about patience, precision, and the perfect balance of moisture—just like nurturing a tiny promise into a stunning bloom! 🌱 By following the right steps—from prepping your seeds to maintaining ideal humidity and warmth—you’re setting the stage for vibrant, healthy lilies that’ll reward you with breathtaking flowers.
Now that you’re armed with the know-how, give it a try and watch your green thumb shine!
Ready to take the next step? Start small with a few seeds, experiment with your setup, and document your progress. Before you know it, you’ll be sharing your lily-growing success with fellow plant enthusiasts—or even expanding your garden with confidence! 🌸