
Propagation
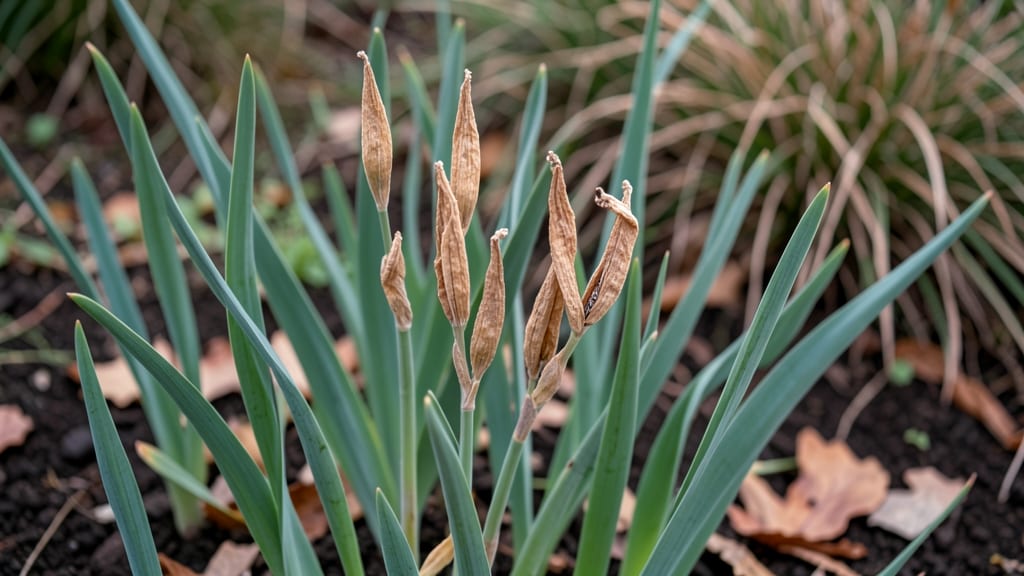
Those strange, spiky seed pods on your irises hold the key to growing new varieties you won't find anywhere else. 🌱 I've collected and germinated hundreds of iris seeds, and the process is simpler than most gardeners realize—once you know the right timing and handling tricks.
The pods need to fully mature and dry on the plant before harvesting, usually by late summer. Snip them carefully, then let them dry completely before opening. Inside, you'll find tiny, flat seeds that look more like dust than the seeds we're used to handling.
With the right moisture, warmth, and patience, you'll see those first green shoots in just 3-4 weeks. The seedlings grow slowly at first, but they develop into sturdy plants that outperform store-bought irises in both beauty and hardiness.
This method works best for bearded irises, though it can be adapted for other types. Here's how to do it right the first time—no failed germination attempts required.
📚 In This Guide
- What you need
- Instructions
- Tips and common mistakes
- Wrapping up and next steps
What you need
- ● Fresh iris seed pods: 3–5 mature pods (harvested when they’re dry and brown but haven’t split open).
- ● Sharp pruning shears or scissors: For carefully snipping open pods without damaging seeds.
- ● Small bowls or paper plates: 2–3 shallow containers to catch seeds and debris.
- ○ Fine-mesh strainer (optional but helpful): To sift seeds from chaff.
- ● Seed-starting mix: 2–3 cups of sterile, well-draining potting soil (avoid garden soil—it may harbor pests!).
- ● Small pots or seed trays: 4–6 (3–4 inches deep) with drainage holes.
- ● Plastic wrap or humidity dome: To create a mini greenhouse effect.
- ● Spray bottle: For gentle watering (avoid soaking the soil!).
- ● Grow lights or sunny windowsill: A spot with 6–8 hours of indirect light daily.
- ● Patience (and a magnifying glass!): Iris seeds are tiny—think poppy seeds but even smaller!
- ● Labeling tags: To track seed varieties if mixing types.
- ● Heating mat (70–75°F): Speeds up germination for cold-sensitive varieties.
- ● Fungicide (like hydrogen peroxide or cinnamon): 1 tsp per cup of water to prevent mold.
- ● Tweezers: For delicate seed placement in pots.
- ● Journal or app: To log planting dates and growth progress!
Step-by-Step guide to harvesting and germinating iris seed pods
Watch those tall, dramatic pods transform into new irises—here's how to do it right.
🌱 Step 1: Harvest Mature Seed Pods at the Right Time
Wait until the pods turn a papery brown color and begin splitting open naturally—this usually happens in late summer to early fall. If you harvest too early, the seeds won't be fully developed. I always check pods weekly after they form, gently squeezing them to test for readiness. When they feel dry and brittle, that's your cue.
Use clean pruning shears to snip the stems just above the base. Place the pods in a paper bag and store them in a dry, shaded spot for 2-3 weeks. This drying period ensures maximum seed viability. If you rush this step, the seeds may not germinate properly—or at all.
🪴 Step 2: Extract Seeds and Prepare for Stratification
Once the pods are fully dried, open them carefully with your fingers or a small knife. You'll find flat, dark seeds inside—each one a potential new iris plant. I like to spread them on a clean sheet of paper to sort out any debris or empty pods. Count them out if you're curious; a single pod can yield 20-50 seeds depending on the variety.
Place the seeds in a paper towel-lined container and moisten them lightly with water. Seal the container loosely (like a sandwich bag with a tiny opening) and refrigerate for 8-12 weeks. This cold stratification mimics winter conditions, breaking seed dormancy and significantly improving germination rates. Don't skip this—it's the secret to success.
☀️ Step 3: Sow Seeds in a Controlled Environment
After stratification, sow the seeds in sterile seed-starting mix in small pots or trays. Press each seed lightly into the soil—about ¼ inch deep—since iris seeds need light to germinate. I use 3-inch pots for each seed to avoid overcrowding, which can lead to weak seedlings. Label your pots immediately; iris seedlings take 1-2 years to mature, and you'll forget which variety is which.
Keep the soil consistently moist but never soggy. A spray bottle works best to avoid disturbing the seeds. Place the pots in a bright, indirect light area (like a north-facing window) until germination. You'll see tiny green shoots in 4-8 weeks, though some varieties can take longer. Patience is key here—don't give up if nothing appears right away.
🌿 Step 4: Transplant and Care for Young Seedlings
Once the seedlings develop 2-3 true leaves (not just the initial seed leaves), they're ready to move into individual 4-inch pots. Use a well-draining potting mix to prevent root rot, and water gently after transplanting. Place them in partial shade for the first few weeks to help them adjust. Iris seedlings are delicate, so avoid direct sunlight or strong winds.
After 6-8 weeks, gradually introduce them to full sun over a week or two. By this time, they should have grown a bit taller and developed stronger stems. Keep the soil moist but well-drained—iris roots hate sitting in water. You'll know you're doing it right when the seedlings start producing small, grass-like foliage. This is their way of telling you they're thriving.
⏰ Step 5: Overwinter and Prepare for Bloom
In their first year, focus on establishing strong roots. Reduce watering slightly in late fall and move the pots to a cool, protected spot (like a garage or unheated shed). This mimics their natural dormancy period. In early spring, bring them back into bright light and resume regular watering. You won't see flowers for 2-3 years, but the foliage will grow lush and healthy.
By year three, your seedlings should be ready to transplant into the garden. Choose a spot with full sun and well-draining soil. Space them 12-18 inches apart to give them room to grow. With proper care, you'll finally see those iconic iris blooms—worth every step of the wait!
Tips & tricks for perfect iris seed pod germination
Here's what I've learned through trial and error to make sure your iris seeds grow strong and healthy.
Pod Readiness Test: When checking for mature pods in Step 1, look for a papery brown color and a slight split at the top. Gently squeeze the pod—if it feels dry and brittle, it's ready. If it's still firm, wait another week. I've learned this the hard way: harvesting too early means underdeveloped seeds that won't germinate. The 2-3 week drying period is crucial for seed viability, so don't rush it!
Stratification Success: For the 8-12 week cold treatment in Step 2, I recommend using a small plastic container with a loose lid to allow for minimal airflow. Place a damp paper towel in the bottom, then spread seeds on top. This mimics natural winter conditions perfectly. If your fridge is very humid, add a small fan for 10 minutes daily to prevent mold. The key is consistent moisture without sogginess.
Light Requirements: In Step 3, iris seeds need light to germinate, so don't bury them deeply. A quarter-inch depth is perfect. I use clear plastic seed trays that allow light penetration while maintaining moisture. If you notice condensation forming on the plastic, that's a sign your seeds are getting too much moisture—open the lid for better airflow.
Seedling Care: When your seedlings develop 2-3 true leaves in Step 4, they're ready for their first transplant. Use a well-draining mix to prevent rot—iris roots are particularly sensitive to soggy conditions. I've found that gradually introducing full sun over 1-2 weeks prevents shock. Watch for the grass-like foliage as your sign of healthy growth—this is when they're ready for their next phase.
Pro Tips for Iris Seed Pods
- Here's what I've learned through trial and error to make sure your iris seeds grow strong and healthy.
- Pod Readiness Test: When checking for mature pods in Step 1, look for a papery brown color and a slight split at the top.
- Stratification Success: For the 8-12 week cold treatment in Step 2, I recommend using a small plastic container with a loose lid to allow for minimal airflow.
Frequently asked questions
Got questions about iris seed pods?
You’re not alone! Here are answers to the most common queries to help you navigate from pod to thriving plant with confidence.
When do iris seed pods appear after flowering?
Iris seed pods typically form 4–8 weeks after the flowers bloom, depending on the variety and climate. In warmer regions, they may appear sooner, while cooler areas could take longer. Keep an eye on the spent blooms—pods start as small, green bulges and swell over time. Pro tip: Mark your calendar after flowering to track their development!
How long does it take for iris seeds to germinate?
Patience is key! Iris seeds often require stratification (a cold period) to break dormancy. Under ideal conditions, germination can take 3–12 months. Some seeds sprout faster with a warm-cold-warm cycle, while others need a full winter outdoors. Check moisture levels—seeds should stay consistently damp (not soggy) during this process.
Can I use iris seeds from store-bought flowers?
Yes, but with a caveat! Seeds from hybrid or named varieties (like those in grocery-store bouquets) may not grow true to type—meaning the resulting plants might look different from the parent. For consistent results, source seeds from reputable iris growers or collect pods from heirloom or species irises in your garden.
What do I do if my iris seed pods turn black or rot?
Blackened or mushy pods usually signal fungal infection or overwatering. To prevent this:
- Ensure pods have good airflow (avoid dense foliage or mulch piled against them).
- Water at the base of the plant, not overhead.
- Remove affected pods immediately to stop spread.
Are there faster alternatives to growing irises from seed?
If you’re eager for blooms, consider:
- Division: Split established iris rhizomes in early fall for instant plants.
- Rhizome cuttings: Use healthy, mature rhizomes (with fan leaves) to root in perlite.
- Tissue culture: For rare varieties, labs can propagate clones quickly.
Wrapping up and next steps
From selecting the right iris seed pods to mastering germination techniques, you now have all the tools to cultivate thriving iris plants with confidence! 🌱 Remember, patience and care are key—each tiny seed holds the potential for stunning blooms.
Ready to put your new knowledge into action? Grab those pods, prep your growing space, and watch your garden transform! Happy planting!
Pro tip: Share your iris-growing journey with fellow gardeners—inspiration spreads like wildflowers! 🌸