
Lawn
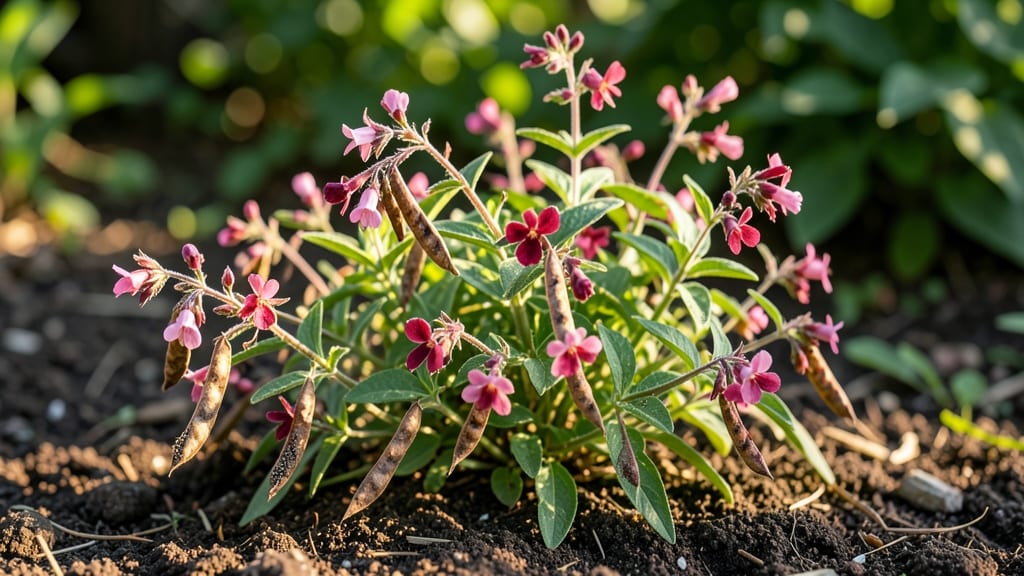
Those papery hummingbird vine seed pods hold the key to next summer’s showstopper blooms—if you break their dormancy first. 🌿 I’ve learned the hard way that skipping the cold treatment means waiting months for germination, if it happens at all.
The secret? A simple fridge trick that mimics winter’s natural cycle, turning stubborn seeds into lush vines in just 30 days. You’ll need nothing fancy: damp paper towels, a sealed bag, and your fridge’s crisper drawer.
The process takes about 4-6 weeks, but that’s time well spent for a vine that’ll climb, bloom, and attract hummingbirds all season. Most gardeners overlook this step—don’t be one of them.
Once the seeds sprout, they’re eager to grow, but they need the right soil mix (light, well-draining) and warmth to thrive. By mid-spring, you’ll be transplanting sturdy seedlings ready to take over trellises or fences.
The blooms arrive faster than store-bought plants, and the hummingbirds will thank you with daily visits. Just watch for leggy seedlings—it’s a sign they need more light, not more water. Works in zones 5-10, though southern gardeners may need to repeat the cold treatment.
Here’s exactly how to do it right—no guesswork, no wasted seeds.
📚 In This Guide
- What you need
- Instructions
- Tips and common mistakes
- Wrapping up and next steps
What you need
- ● Hummingbird vine seed pods – 5–10 mature pods (ensure they’re dry and slightly papery to the touch). Pro tip: Collect pods from healthy vines after they’ve turned brown and dried naturally.
- ● Scissors or pruning shears – For carefully opening seed pods (sterilize with rubbing alcohol if reusing).
- ● Small bowls or paper plates – 2–3 shallow containers to catch seeds after pod dissection.
- ● Paper towels or coffee filters – 2–3 sheets for drying seeds (avoid plastic—it traps moisture!).
- ● Spray bottle with water – For lightly misting seeds during stratification.
- ● Plastic zip-top bags – 2–3 quart-sized bags (for cold stratification).
- ● Potting mix – 1–2 gallons of well-draining, seed-starting mix (or a 50/50 blend of peat moss and perlite).
- ● Small seed trays or biodegradable pots – 6–12 cell packs (2–3 inches deep).
- ● Grow lights or sunny windowsill – A south-facing window or LED grow light (12–16 hours/day).
- ● Misting spray bottle – For keeping soil moist (not soggy!).
- ● Seedling heat mat – Speeds up germination in cooler climates.
- ● Humidity dome or plastic wrap – Creates a mini greenhouse effect for faster sprouting.
- ● Plant labels & marker – To track seed pod sources and planting dates.
- ● Fertilizer (balanced 10-10-10 or fish emulsion) – Dilute to half-strength for young seedlings.
- ● Tweezers – For delicate seed handling if pods are stubborn.
How to grow hummingbird vine from seed pods in 30 days
Cold prep is the secret to fast germination—here's how to get those vibrant blooms in just a month.
🌱 Step 1: Extract and Prepare the Seeds
Open the seed pods carefully—hummingbird vine seeds are nestled inside the fibrous casing. I like to soak the entire pod in warm water for 10 minutes first to soften it, then gently squeeze to release the seeds. You'll need about 4-6 seeds to fill a 4-inch pot with 4 plants as instructed.
Remove any seeds that appear shriveled or discolored—those won't germinate. The good ones will be plump and dark brown. Here's the thing—hummingbird vine seeds have a hard outer shell, so we need to break it down before planting. Place the seeds between two layers of damp paper towels, then fold and seal them in a plastic bag. This keeps them moist while mimicking winter conditions.
🧊 Step 2: Cold Stratify for 2 Weeks
Put the sealed bag of seeds in the refrigerator for 14 days. The cold treatment tricks the seeds into thinking winter has passed, breaking their dormancy. I place mine on a shelf in a 35-40°F zone—any colder and germination slows dramatically.
Check the towels every 3-4 days to ensure they stay damp but not soggy. If they dry out, the seeds won't germinate. After 14 days, remove the bag and let it sit at room temperature for 24 hours to warm up. This gradual shift prevents shock to the seeds.
🪴 Step 4: Plant in Warm, Well-Draining Soil
Use the 4-inch pots filled with seed-starting mix (never garden soil—it's too dense). Press the mix down lightly to create a firm planting surface, then make ¼-inch deep holes 1 inch apart. Hummingbird vine seeds are tiny, so I use a toothpick to place them precisely.
Cover the seeds with a thin layer of soil, just enough to hide them. Mist the surface with water until it feels evenly damp—like a wrung-out sponge. Place the pots in a warm spot (70-75°F) where they'll get bright, indirect light. A sunny windowsill works, but avoid direct midday sun, which can overheat the soil.
☀️ Step 5: Provide Humidity and Light for Germination
Cover the pots with clear plastic wrap to create a greenhouse effect. This traps moisture and warmth, which hummingbird vine seeds love. Check daily for condensation—if you see water droplets, remove the wrap for 30 minutes to prevent mold. Germination typically happens in 7-14 days, but don't be surprised if it takes up to 21 days in cooler homes.
Once the first true leaves (not the initial seed leaves) appear, remove the plastic wrap immediately. You'll see them as tiny, rounded leaves with a glossy finish. At this stage, move the pots to a south-facing window or under grow lights for 12-14 hours of light daily. Leggy seedlings mean your light isn't strong enough—adjust within 3 inches of the plants.
⏰ Step 6: Transplant and Encourage Blooms
After 30 days, when seedlings have 3-4 sets of true leaves, transplant them into individual 6-inch pots or your garden bed. Hummingbird vine thrives in full sun (6+ hours daily), so choose a spot with morning light and afternoon shade if you're in a hot climate. The key to fast blooms is consistent care—water when the top inch of soil feels dry, and feed with a balanced fertilizer every 2 weeks once flowers appear.
Pinch back the tips of new growth when plants are 6 inches tall to encourage bushier, flower-heavy vines. This is where most gardeners skip a step—don't! Pruning now means more blooms in half the time. Watch for the first flowers to emerge in 4-6 weeks after transplanting, and you'll have hummingbirds visiting by summer.
Tips & tricks for perfect hummingbird vine germination
A few simple tricks can make all the difference when growing these delicate seeds—here's how to avoid common pitfalls.
Seed Selection Matters: In Step 1, when choosing your seeds, look for ones that are plump and dark brown—these are your best bet for successful germination. I've found that seeds with any visible cracks or shriveled appearance won't sprout, no matter how carefully you follow the rest of the process. The 10-minute soak in warm water is crucial because it helps soften the fibrous casing while ensuring you can gently extract the seeds without damage. Here's what nobody tells you—sometimes the best seeds are the ones you find nestled furthest inside the pod, where they've been protected from drying out.
Cold Stratification Precision: During the 14-day cold stratification in Step 2, maintaining the 35-40°F temperature is absolutely critical. I learned this the hard way after ruining three batches by placing them in the crisper drawer (which was too cold). Use the vegetable drawer of your fridge if you don't have a temperature-controlled shelf—just monitor it with a small thermometer. The 3-4 day checks for moisture are non-negotiable; if the paper towels dry out even slightly, the seeds will enter a dormant state and refuse to germinate. That 24-hour warm-up period after cold stratification prevents shock and gives you the best possible start.
Planting Technique: When it comes to planting in Step 4, precision is key with those tiny seeds. I use a toothpick to create the ¼-inch deep holes—this gives you perfect spacing without disturbing the soil structure. The secret to even moisture distribution is misting until the soil feels like a wrung-out sponge. Too little water and the seeds won't activate; too much and you'll risk fungal growth. Place your pots in a warm spot (70-75°F) that gets bright, indirect light—this is where most germination failures happen. Direct sunlight at this stage can actually cook the seeds before they've had a chance to sprout.
Germination Timing: The 7-14 day germination window in Step 5 can be nerve-wracking, but patience is key. I've seen seeds sprout in just 5 days when conditions are perfect, while others take the full 21 days—especially in cooler homes. The moment you see those first true leaves (not the initial seed leaves), remove the plastic wrap immediately. This prevents the seedlings from becoming too dependent on the humidity and encourages them to develop stronger stems. Those glossy, rounded leaves are your signal that they're ready for more direct light—don't rush this transition or you'll risk sunburn on delicate new growth.
Pro Tips for Hummingbird Vine Seed Pods
- A few simple tricks can make all the difference when growing these delicate seeds—here's how to avoid common pitfalls.
- Seed Selection Matters: In Step 1, when choosing your seeds, look for ones that are plump and dark brown—these are yo...
- Cold Stratification Precision: During the 14-day cold stratification in Step 2, maintaining the 35-40°F temperature i...
Frequently asked questions
Got questions about growing hummingbird vine seed pods? You’re not alone! Here are some of the most common queries—and their answers—to help you get started on the right foot.
How long does it take for hummingbird vine seed pods to germinate?
With proper cold stratification (4–6 weeks in the fridge), hummingbird vine seeds typically sprout within 10–30 days after planting. Keep soil moist (not soggy) and warm (70–75°F) to speed up germination. Patience is key—some seeds may take up to 60 days!
Do I really need to cold-stratify the seeds?
Yes! Hummingbird vine seeds have a hard coat that requires cold treatment to break dormancy. Skip stratification, and you’ll likely see little to no germination. Mix seeds with damp peat moss, seal in a bag, and refrigerate for 4–6 weeks before planting for best results.
Can I grow hummingbird vine from seed pods I find outside?
Wild seed pods are perfect for propagation. Just ensure they’re fully dry and brown (not green or moist). Crack open the pods, extract the seeds, and follow the cold-stratification process. Pro tip: Label your seeds if collecting from multiple sources!
Will hummingbird vine attract hummingbirds immediately?
Not quite! Young plants may take 3–6 months to produce flowers, but once they do, hummingbirds will flock to them. Choose a sunny spot (6+ hours of light) and provide support (like a trellis) to encourage faster growth and blooms.
What do I do if my seeds won’t germinate?
First, check your stratification—were seeds kept consistently moist? If yes, try soaking seeds in warm water for 24 hours before replanting. Poor soil drainage or extreme temps (below 50°F or above 85°F) can also stall germination. Adjust conditions and try again!
Still stumped? Drop your question in the comments—we’re happy to help your hummingbird vine thrive!
Wrapping up and next steps
Growing hummingbird vine seed pods is a rewarding way to attract pollinators and add vibrant color to your garden—especially when you see those first blooms in just 30 days! With the right cold prep and a little patience, you’ll enjoy lush, fragrant vines that hummingbirds can’t resist. 🌿✨
Ready to take the next step? Start by gathering your supplies, follow the cold-stratification method, and plant your seeds before the growing season kicks off. Soon, your garden will buzz with life—and beautiful blooms!