
Lawn
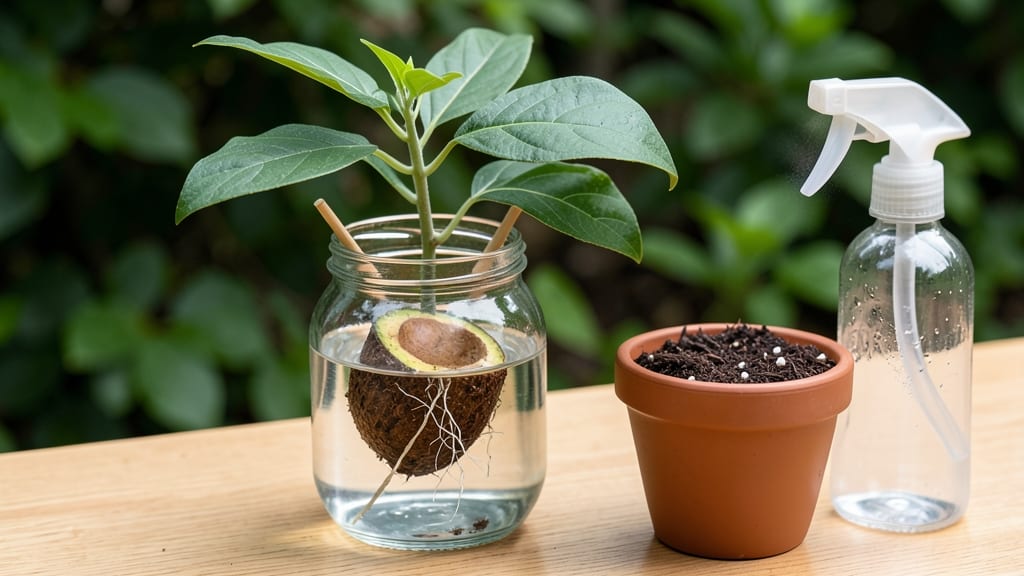
To make an avocado seed sprout in just 2-3 weeks, all you need is patience and a glass of water. 🌱 I’ve sprouted dozens of avocado seeds this way—some thrived, others taught me valuable lessons about humidity and root care.
Start by piercing the seed with three toothpicks, suspending it over a glass so the lower half sits in water. Keep the water level steady (never submerged) and place it in bright, indirect light. Within a week, you’ll spot tiny white roots—proof your seed is waking up!
The real magic happens in the next two weeks as those roots grow 2-3 inches. Monitor for mold (drain excess water) or rot (rinse roots gently). A clear glass lets you watch the transformation up close—it’s like nature’s own time-lapse.
Once roots hit 2-3 inches, you can transplant into soil or keep it as a decorative plant. Either way, you’ve just grown something from a kitchen scrap—now that’s rewarding!
📚 In This Guide
- What you need
- Instructions
- Tips and common mistakes
- Wrapping up and next steps
What you need
- ● 1 ripe avocado (choose one with a firm, intact seed)
- ● 1 sharp knife or avocado slicer (for seed extraction)
- ● Toothpicks (3-4) (or small skewers/chopsticks, ~3 inches long)
- ● 1 glass or jar (wide-mouth, ~12-16 oz, with a lid or plastic wrap)
- ● Water (room temperature, filtered or tap water that’s been sitting out for 24 hours)
- ● Paper towels or coffee filters (1-2 sheets, for moisture control)
- ○ Spray bottle (optional but helpful) (for misting without over-saturating)
- ● Hydroponic growing kit (for advanced sprouting)
- ● Pebbles or small stones (to stabilize the seed in water)
- ● Grow lights or sunny windowsill (if transitioning to soil later)
- ● Potting soil and small pot (for transplanting after roots form)
- ● Food coloring (non-toxic) (to track water changes in the jar)
Step-by-step guide to sprouting avocado seeds
Here’s how to coax roots from your avocado pit in just 2-3 weeks—no soil required.
🌱 Step 1: Prep the Seed for Sprouting
Start with a fresh avocado pit—you’ll want one that’s still firm but not dried out. Rinse it under cool water to remove any remaining fruit residue, then let it air-dry completely. This keeps mold at bay and ensures clean growth.
Next, insert 3-4 toothpicks around the pit’s middle, spacing them evenly. These will suspend it over water without letting it sink. I like to angle the toothpicks slightly so the pit balances—this prevents it from tipping over once roots start forming.
💧 Step 2: Submerge and Monitor Water Levels
Fill a shallow container (like a small bowl or glass) with enough water to cover about 1 inch of the pit’s bottom. The toothpicks should hold it steady, with the flat side facing down. Change the water every 2-3 days to prevent bacteria buildup—stagnant water turns murky fast.
Place the container in a warm spot (around 70-75°F) with bright, indirect light. A kitchen windowsill or under a grow light works best. You’ll see tiny white roots poking out in 2-3 weeks, but don’t rush—patience here means stronger roots later.
☀️ Step 3: Encourage Root Growth and Watch for Milestones
Once roots reach about 2-3 inches long, they’ll start branching out. This is your cue to keep the water level consistent—never let the roots dry out, but avoid submerging them completely. Roots need oxygen too!
Here’s the thing—roots grow fastest when the water stays lukewarm. If your kitchen runs cold, place the container near a sunny window but avoid direct heat (like a stove or heater). You’ll notice new roots forming every few days, and within 4-6 weeks, they’ll be thick enough to transplant.
🌿 Step 4: Transplant (When Roots Are Ready)
When roots hit 4-6 inches and the pit shows signs of a tiny sprout on top, it’s time to move it to soil. Fill a small pot (at least 6 inches deep) with well-draining potting mix. Dig a hole deep enough to bury half the pit—this mimics its natural growth position.
Gently place the pit in the hole, roots facing down, then pat the soil around it lightly. Water thoroughly but avoid soggy soil. Keep the pot in bright, indirect light for the first week—this helps the plant adjust without shock. You’ll see new leaves emerge in 2-4 weeks, signaling successful growth.
⏰ Step 5: Maintain and Care for Your Sprout
After transplanting, water when the top 1 inch of soil feels dry. Avocado plants hate soggy roots, so always check before watering. A moisture meter helps if you’re unsure—aim for slightly damp, not wet.
Rotate the pot weekly so the plant grows straight toward the light. You’ll know it’s thriving when it develops 3-4 true leaves and a sturdy stem. This is the moment that matters: now you’ve got a living avocado plant from a seed!
Tips & tricks for perfect avocado seed sprouting
Here's what nobody tells you about growing avocado plants from seeds—these little details make all the difference.
Pit Selection Matters: Choose a pit that's firm but not rock-hard—it should feel slightly soft when squeezed gently. I've tried dried-out pits that never sprouted, and they always came from avocados that sat too long before cleaning. A fresh, moist pit is your best bet for fast roots in 2-3 weeks. The moisture content is what kickstarts the growth process.
Toothpick Placement Technique: When inserting your 3-4 toothpicks, space them evenly around the pit's equator—not too close to the top or bottom. I angle them slightly upward so the pit sits at a 45-degree angle in the water. This prevents the pit from tipping over as roots develop and creates better airflow around the base where roots will emerge.
Water Temperature Secret: While the instructions mention lukewarm water, I've found that using water warmed to about 80°F (just slightly warmer than room temperature) speeds up root growth. You can warm the water by placing the container in a sunny spot for 10-15 minutes before adding the pit. Just don't let it get hot—avocado seeds are sensitive to extreme temperatures.
Transplant Timing: Wait until roots reach exactly 4-6 inches before transplanting, even if it takes longer than 6 weeks. I've seen impatient gardeners move their sprouts too early, and the roots often break off during transplantation. The 4-6 inch mark means the roots are strong enough to handle the soil transition without damage, giving your plant the best chance to thrive after transplanting.
Pro Tips for Make An Avocado Seed Sprout
- Here's what nobody tells you about growing avocado plants from seeds—these little details make all the difference.
- Pit Selection Matters: Choose a pit that's firm but not rock-hard—it should feel slightly soft when squeezed gently.
- Toothpick Placement Technique: When inserting your 3-4 toothpicks, space them evenly around the pit's equator—not too close to the top or bottom.
Frequently asked questions
Got questions about sprouting avocado seeds?
You’re not alone! Here are answers to the most common queries to help you grow your own avocado plant with confidence.
How long does it take for an avocado seed to sprout roots?
With the right method (like the toothpick technique), you’ll typically see roots emerge in 2–3 weeks. Patience is key—keep the seed in warm water, change it every 2–3 days, and avoid direct sunlight until roots form. If nothing happens after 4 weeks, check for rot or dryness and adjust your care.
Can I speed up the sprouting process?
While you can’t rush nature, you can optimize conditions! Use warm water (70–80°F), keep the seed in indirect light, and ensure the toothpicks stay submerged. Some gardeners swear by adding a tiny bit of cinnamon (natural antifungal) to the water. Avoid overcrowding—give your seed space to breathe!
Do I need soil to grow an avocado seed?
Nope! You can start roots in water alone, but transplanting to soil later is ideal. Once roots reach 2–3 inches, transfer the seed to a pot with well-draining soil. Use a mix of potting soil and perlite for best results. Just be gentle—avocado seeds are delicate!
Why is my avocado seed turning black or mushy?
This is a sign of rot, usually caused by too much moisture or bacteria. If you notice foul smells or slimy texture, rinse the seed and trim any blackened areas with sterile scissors. Let it dry for a day before re-submerging. If the damage is severe, start fresh with a new seed!
Can I grow an avocado tree indoors?
Avocado trees thrive indoors with bright, indirect light (near a south or west window). Keep the soil moist but not soggy, and rotate the pot occasionally for even growth. With proper care, your seedling could grow into a 6-foot-tall tree over time—just don’t expect fruit for years!
Pro Tip:
Label your seedling! Avocado trees take 3–5 years to bear fruit, so tracking its progress makes the wait more rewarding. Plus, it’s fun to watch it grow from a tiny sprout to a lush houseplant!
Wrapping up and next steps
Growing an avocado seed into a thriving sprout is easier than you think—and it’s a rewarding way to bring a little green life into your home! 🌱 With just a few simple steps, patience, and a little water, you’ve unlocked a fun, low-cost gardening project that even beginners can master.
Now that your seed is sprouting roots, why not take the next step and plant it in soil to watch it grow into a full avocado tree?
Ready to nurture your plant further? Check out our guide on transplanting avocado seedlings to keep the adventure going!