
Propagation
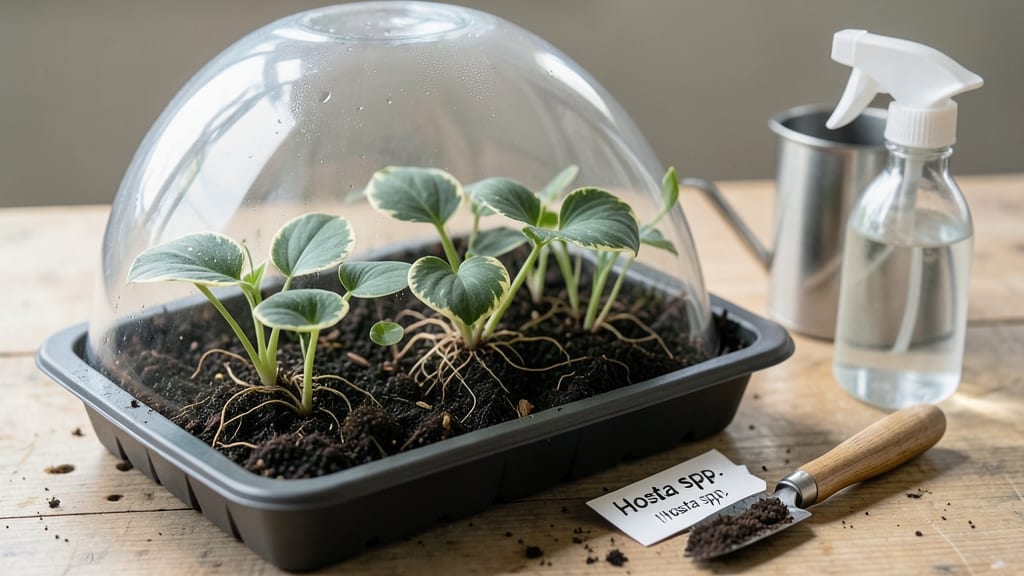
Hosta seeds need consistent moisture—not too much, not too little—to break dormancy in those first critical weeks. 🌱 I’ve struggled with hosta germination for years, but I finally cracked the code by treating the soil like a damp sponge, not a swamp.
The key isn’t just patience—it’s precision in how you manage that moisture without drowning the tiny seeds.
You’ll need a shallow tray, sterile seed-starting mix, and a spray bottle for gentle watering—no soaking, no flooding. Hostas hate soggy soil, but they will rot if left dry. I’ve found that keeping the tray covered with plastic wrap (just slightly lifted for airflow) creates the perfect humid microclimate.
The goal? Mimic the forest floor where hostas thrive naturally.
Within 60 days, you’ll see those first pale green leaves push through the soil, signaling success. The seedlings start slow—don’t panic if nothing happens in the first three weeks.
But once they break through, they grow surprisingly fast with proper care. The payoff? A tray full of hosta babies ready to outcompete weeds in your garden next spring.
This method works best in spring or early summer when daytime temps hover between 65-75°F. If you’re in a hotter climate, shade cloth becomes your new best friend.
The biggest mistake? Skipping the sterilization step—fungal issues can wipe out an entire tray before you even see sprouts. Let’s get those seeds started right.
📚 In This Guide
- What you need
- Instructions
- Tips and common mistakes
- Wrapping up and next steps
What you need
- ● Hosta seeds: Fresh, viable seeds (10–50, depending on desired plant count). Pro tip: 💡 Store seeds in a cool, dry place if not planting immediately.
- ● Seed-starting mix: 1–2 quarts of sterile, well-draining potting mix (e.g., Pro-Mix or coco coir blend). Avoid garden soil—it’s too dense!
- ● Containers: Small seed trays (4–6" deep) with drainage holes, OR
- ● Individual pots (2–3" diameter) for direct sowing.
- ● Humidity dome or plastic wrap: To maintain moisture without overwatering.
- ● Misting bottle or spray nozzle: For gentle, even watering (avoid soaking!).
- ○ Heat mat (optional but recommended): 70–80°F (21–27°C) to speed germination. Pro tip: 🌡️ Skip this if your home stays warm (65°F/18°C+).
- ● Fine tweezers: For delicate seed placement.
- ● Grow lights or sunny windowsill: 12–16 hours of indirect light daily after germination.
- ○ pH test kit (optional): Ideal mix pH: 6.0–7.0.
- ● Fertilizer (post-germination): Diluted fish emulsion or seaweed extract (1:10 ratio) after 4–6 weeks.
Step-by-step instructions for hostas from seed
Here's how to coax those stubborn hosta seeds into sprouts—no more waiting years for division.
🌱 Step 1: Prepare Seeds for Maximum Germination
Hosta seeds need a cold, moist treatment to break dormancy. Place them in a sealed plastic bag with a damp paper towel for 4-6 weeks in your refrigerator. Check weekly—the towel should stay damp but not dripping. This mimics winter stratification and tricks seeds into thinking spring has arrived.
After the cold treatment, remove the seeds and let them sit at room temperature for 24 hours before planting. You'll see them plump up slightly—that's your signal they're ready. I like to label the bag with the date so I don't forget when to plant.
🪴 Step 2: Create the Ideal Germination Environment
Fill a shallow tray or small pots with sterile seed-starting mix (never garden soil—it's too dense). Moisten it until it feels like a wrung-out sponge, then spread your treated seeds ¼ inch deep on the surface. Press lightly so they make contact with the soil but don't bury them too deep.
Cover the tray with clear plastic wrap or a humidity dome to trap warmth and moisture. Place it in a warm, dark spot (like on top of your fridge) where the temperature stays between 65-75°F. This warmth encourages consistent germination without the risk of mold that comes with heat lamps.
⏰ Step 3: Monitor Moisture Without Overwatering
Check the tray daily but only mist the soil when the surface feels dry to touch. Too much water causes seeds to rot before they sprout, while too little prevents germination. I use a spray bottle to add just enough moisture to keep the soil evenly damp—not soggy, not bone-dry.
Germination takes 4-8 weeks, so patience is key. You'll see tiny green shoots push through the soil first—these are the cotyledons, not true leaves. Once they appear, remove the plastic cover immediately to prevent fungal growth. Keep the tray in bright, indirect light from this point forward.
☀️ Step 4: Transition to Growing Conditions
After the first true leaves appear (they'll look different from the cotyledons), move seedlings to a south-facing window or under grow lights for 12-14 hours daily. Hostas are shade-loving, but seedlings need strong light to develop sturdy stems. You'll know they're getting enough light when the leaves stay dark green and compact.
Thin seedlings to 3 inches apart if they're crowded. Use small scissors to snip unwanted sprouts at soil level—this prevents disturbing the roots of the plants you're keeping. Water gently from the bottom to encourage deep root growth, and avoid wetting the leaves to prevent disease.
🌿 Step 5: Harden Off and Transplant
When seedlings have 4-5 true leaves (about 8-10 weeks from sowing), start hardening them off. Place them outdoors in a sheltered spot for 1 hour the first day, gradually increasing time over 10-14 days. This slow transition prevents shock when they move to permanent homes.
Transplant to the garden after the last frost when soil temperatures reach 50°F. Choose a shady spot with well-draining soil—hostas hate soggy roots. Space mature plants 2-3 feet apart to give them room to spread. Mulch with 2-3 inches of organic matter to retain moisture and suppress weeds.
Tips & tricks for perfect hosta seed germination
These little tricks will help you turn those stubborn hosta seeds into thriving plants without the years-long wait.
Cold Treatment Precision: The 4-6 week cold treatment is non-negotiable for breaking dormancy, but here's the secret: use a small plastic bag with a zip-top closure to create a mini greenhouse effect. Place a damp paper towel inside, then add your seeds and seal tightly. This maintains consistent moisture without the risk of mold that comes with larger containers. I also add a tiny drop of water to the bag before sealing—just enough to create humidity without excess.
Seedling Light Transition: When moving seedlings to bright indirect light in Step 4, start with just 6-8 hours of light the first day, then gradually increase to the full 12-14 hours over 3-4 days. This slow transition prevents shock that can cause seedlings to stretch or become leggy. I use a simple LED grow light on a timer for consistent results—it's worth the small investment for hostas that need proper light to develop.
Hardening Off Strategy: For the 10-14 day hardening off period, I recommend increasing outdoor time by 30 minutes each day rather than the full hour increments. This gives your seedlings more time to adjust without overwhelming them. Also, always harden off in the morning when temperatures are cooler—this prevents stress from afternoon heat. Watch for leaves that start to wilt slightly; this is normal and means they need more time to acclimate.
Pro Tips for Hosta Seed Germination
- These little tricks will help you turn those stubborn hosta seeds into thriving plants without the years-long wait.
- Cold Treatment Precision: The 4-6 week cold treatment is non-negotiable for breaking dormancy, but here's the secret:...
- Seedling Light Transition: When moving seedlings to bright indirect light in Step 4, start with just 6-8 hours of lig...
Frequently asked questions
Got questions about growing hosta from seed? You’re not alone—germination can feel like a puzzle! Here are answers to the most common concerns, so you can skip the guesswork and focus on those lush, emerging seedlings.
How long does it really take for hosta seeds to germinate?
Patience is key! Under ideal conditions (consistent moisture, warmth, and indirect light), hosta seeds typically germinate in 4–8 weeks. Some varieties may take up to 10–12 weeks, especially if they’re fresh or cold-stratified. Pro tip: Label your seeds with the planting date to track progress without stress!
What’s the best way to keep seeds moist without drowning them?
Overwatering is a sneaky germination killer! Use a spray bottle or fine mist setting to dampen the soil lightly, then cover the tray with clear plastic wrap or a humidity dome. Check daily—seeds need moisture like a sponge, not a swamp. Pro tip: Bottom-watering (placing the tray in a shallow tray of water) keeps humidity high without soggy soil.
Do hosta seeds need cold stratification? Should I refrigerate them?
Most hosta seeds don’t require stratification—unlike their bulbous cousins. However, if you’re dealing with fresh, unripe seeds or stubborn varieties, a 4–6 week cold treatment (33–40°F) can boost germination. Skip this step for store-bought or dried seeds unless the packet says otherwise!
Why aren’t my hosta seeds sprouting? Troubleshooting tips!
No seedlings? Don’t panic! Common culprits:
- Old seeds: Hosta seeds lose viability after 1–2 years. Test freshness with a float test—sinkers are viable!
- Poor light: Seeds need bright, indirect light (a south-facing window or grow light works). Avoid direct sun.
- Temperature swings: Keep soil 65–75°F. A heat mat can help if your home runs cold.
- Fungal issues: Fuzzy mold? Reduce moisture and add 1 part perlite to 3 parts soil for airflow.
Pro tip: If seeds sprout but flop over, thin seedlings to 2 inches apart—they’re sun-worshippers!
Can I grow hosta from seed indoors and transplant later?
Start seeds 8–10 weeks before your last frost date in 4–6 inch pots or a seed tray. Harden off seedlings (acclimate to outdoor temps) for 7–10 days before transplanting. Choose a shady, moist spot—hostas hate dry roots! Pro tip: Mulch heavily after transplanting to retain moisture and mimic their woodland habitat.
What’s a faster alternative to growing hosta from seed?
If you’re craving instant gratification, consider:
- Division: Split mature hosta clumps in early spring or fall—easiest and fastest!
- Tissue culture plants: Nurseries sell pre-germinated hostas in plugs (pricier but foolproof).
- Leaf cuttings: Propagate from healthy leaves in water or soil (slower than division but fun!).
Seeds are rewarding but slow—perfect for patient gardeners or collectors!
Wrapping up and next steps
Mastering hosta seed germination is all about patience, precision, and the right conditions—just like nurturing a tiny promise into a lush, thriving plant! 🌱 By following these moisture-controlled steps, you’ve set yourself up for success in just 60 days (or less!).
Whether you’re a seasoned gardener or a curious beginner, every seed you plant is a step toward expanding your garden’s beauty.
Now that you’re armed with the know-how, it’s time to take action! Start with a small batch of seeds, track your progress, and soon you’ll be sharing your hosta germination wins with fellow plant enthusiasts. Happy growing—your future garden awaits! 🌿