
Lawn
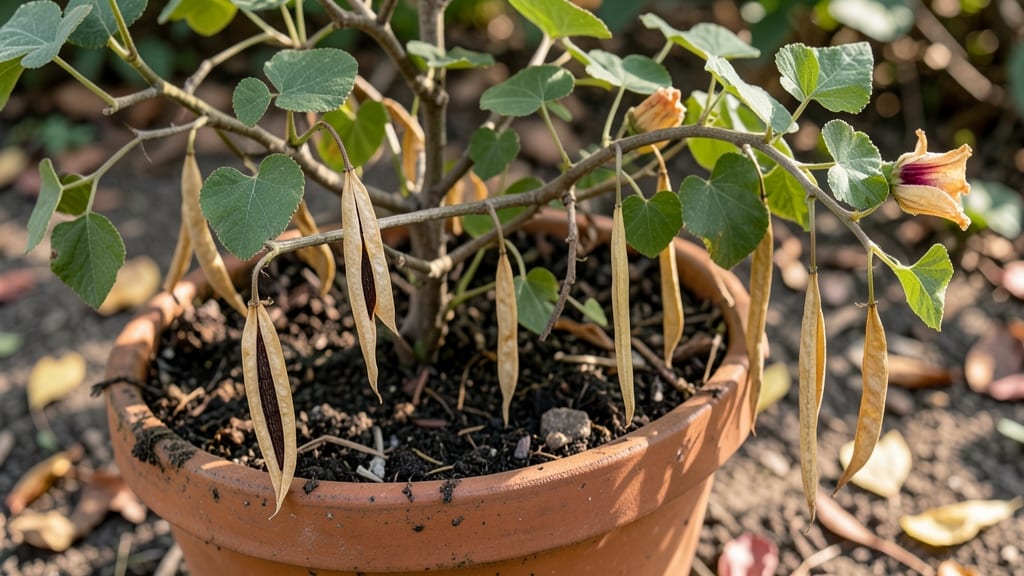
Black-eyed Susan vine seed pods hold the secret to free, sun-loving vines that burst with golden blooms every summer. 🌻 I’ve learned the hard way that timing and patience make all the difference—harvesting too early or planting too soon can waste months of potential growth.
The key is knowing exactly when those pods are ready to crack open for fresh seeds, and how to store them until spring planting. The process starts with dry, mature pods—wait until they turn brown and papery, then collect them in paper bags for natural drying.
Once fully dry, the seeds inside stay viable for 1-2 years, giving you flexibility to plant when conditions are perfect. Just avoid moisture, or those seeds will sprout too early and lose their vigor.
You’ll end up with bold, heat-tolerant vines that thrive in full sun and spread quickly, creating a golden cascade perfect for trellises or sunny borders. The first blooms arrive in late summer, and with proper care, these vines return year after year, spreading like wildfire (but the good kind).
For best results, pair them with purple salvia or blue lobelia—the color contrast makes them pop. And if you’re in a hot climate, mulch heavily to keep roots cool. Now, let’s get those seeds ready for planting!
📚 In This Guide
- What you need
- Instructions
- Tips and common mistakes
- Wrapping up and next steps
What you need
- ● Black Eyed Susan Vine Seed Pods: 5–10 mature, dried seed pods (harvested from healthy plants or purchased from a reputable supplier).
- ● Seed Starting Mix: 1–2 gallons of sterile, well-draining potting soil (look for a mix labeled for seeds or seedlings).
- ● Containers: Small pots (3–4 inches deep) or seed trays with drainage holes (1–2 per seed pod).
- ● Spray Bottle: For gentle watering (avoid over-saturating the soil).
- ○ Plastic Wrap or Clear Lid: To create a mini greenhouse effect (optional but highly recommended for humidity).
- ● Grow Lights or Sunny Windowsill: A south-facing window or LED grow lights (12–16 hours of light daily).
- ● Fertilizer: Balanced, water-soluble fertilizer (5-10-5 or 10-10-10, diluted to half-strength).
- ● Scissors or Pruners: For opening seed pods (if not pre-opened).
- ● Labels & Markers: To track planting dates and varieties.
- ● Heat Mat: Speeds up germination (ideal for cooler climates).
- ● Humidity Dome: Keeps moisture levels consistent.
- ● pH Test Kit: Ensures soil pH is between 6.0–7.0 (slightly acidic to neutral).
- ● Compost or Worm Castings: Boosts soil fertility for stronger seedlings.
- ● Transplant Tray: For moving seedlings outdoors once they’ve sprouted.
Step-by-step instructions for growing black-eyed Susan vine from seed pods
Here's how to coax those vibrant blooms from seed pods with confidence—no guesswork, just bold results.
🌱 Step 1: Harvest and Dry the Seed Pods
Collect mature seed pods when they turn papery brown and begin splitting open. I like to harvest them in late fall or early winter when the vine has died back naturally—this ensures maximum seed viability. Place pods in a paper bag and let them dry in a warm, dry spot for 2-3 weeks. Shake the bag occasionally to release any seeds that are ready.
If you're impatient, you can speed up the process by spreading pods on a wire rack in a sunny spot. Just avoid direct sunlight, which can overheat and damage the seeds. Once the pods are completely dry and crumbly, gently crush them with your fingers to release the black seeds. These seeds are surprisingly tough—they'll last for years if stored in a cool, dry place.
💧 Step 2: Stratify Seeds for Better Germination
Black-eyed Susan vine seeds benefit from a cold stratification period to break dormancy. Mix the seeds with a damp sand and peat moss blend (about 1 part seeds to 3 parts mix) in a sealed plastic bag. Place the bag in your refrigerator for 6-8 weeks. Check occasionally to ensure the mix stays moist but not soggy—you want it to feel like a wrung-out sponge.
This cold treatment mimics winter conditions and tricks the seeds into thinking spring has arrived. After the stratification period, you'll see a noticeable difference in germination rates. If you forget to stratify, don't worry—some seeds may still sprout, but they'll be slower and less uniform. I always stratify mine because it's worth the extra effort for stronger, healthier starts.
☀️ Step 3: Sow Seeds Indoors for Early Starts
Fill 2-3 inch deep seed trays with a well-draining seed-starting mix and sow the seeds ¼ inch deep, spacing them about 1 inch apart. Press them lightly into the soil—don't bury them too deep, or they'll struggle to emerge. Mist the surface with water until evenly moist, then cover the tray with plastic wrap or a humidity dome to retain warmth and moisture.
Place the tray in a warm spot (70-75°F) with bright, indirect light. A seedling heat mat can give you an extra boost if your home runs cooler. Germination typically takes 10-20 days, but some seeds may take longer—don't give up if you don't see sprouts right away. Once the seedlings emerge, remove the plastic wrap and move them to a south-facing window or under grow lights for 14-16 hours of light daily.
🌿 Step 4: Transplant Seedlings Outdoors After Frost
Wait until after the last frost date in your area and when nighttime temperatures stay consistently above 50°F. Harden off seedlings by placing them outdoors in a sheltered spot for 1-2 hours the first day, gradually increasing their time outside over 7-10 days. This process helps them adjust to wind, sun, and temperature fluctuations without shock.
Choose a sunny location with full sun exposure (at least 6-8 hours daily) and well-draining soil. Space seedlings 12-18 inches apart—they'll spread quickly, so give them room to grow. Water deeply at the base after transplanting, and mulch around the plants to retain moisture and suppress weeds. You'll know they're thriving when new leaves appear within 2-3 weeks and the vines start to climb or spread vigorously.
✂️ Step 5: Prune and Maintain for Long-Lasting Blooms
Pinch back the tips of young plants to encourage bushier growth. Once the vines reach 6-12 inches tall, trim them back by one-third to promote branching. Deadhead spent blooms regularly to encourage more flowers and prevent the plant from putting energy into seed production. I like to do this in the early morning when the blooms are still fresh—it's easier to spot what needs removing.
Black-eyed Susan vine is drought-tolerant once established, but it still needs 1 inch of water per week during dry spells. If you notice the leaves wilting or the vine looking limp, it's time to water. Fertilize lightly with a balanced, water-soluble fertilizer every 4-6 weeks during the growing season. With proper care, your vine will reward you with bold, sun-loving blooms from early summer through fall.
Tips & tricks for growing black-eyed Susan vine from seed pods
These little-known tricks will help you transform those humble seed pods into thriving, vibrant vines with stunning blooms.
Pod Maturity Matters: Don't rush to harvest those seed pods! The pods need to be completely dry and papery brown—almost ready to split open on their own. I've learned this the hard way by harvesting too early, which resulted in seeds that refused to germinate. If you're unsure, wait until most pods are naturally splitting open before collecting. This ensures maximum seed viability and saves you from wasted effort.
Stratification Shortcuts: While the instructions call for a full 6-8 weeks of cold stratification, you can speed things up slightly by using a seed stratification mat set to 40°F for 4-6 weeks. This mimics the natural winter conditions without requiring fridge space. Just be consistent with moisture checks—those seeds need to stay damp like a wrung-out sponge the entire time. The key is patience, but this method gives you a head start on spring planting.
Lighting Hacks for Seedlings: Those 14-16 hours of daily light are critical, but don't stress if your south-facing window isn't ideal. A simple LED grow light bulb placed 6-12 inches above your seedlings works wonders. I've had great success with 10-watt bulbs that produce full-spectrum light—affordable and energy-efficient. Position it so the seedlings aren't touching the bulb (they'll get too hot), and you'll get strong, healthy starts without expensive grow lights.
Pro Tips for Black Eyed Susan Vine Seed Pods
- These little-known tricks will help you transform those humble seed pods into thriving, vibrant vines with stunning b...
- Pod Maturity Matters: Don't rush to harvest those seed pods! The pods need to be completely dry and papery brown—almo...
- Stratification Shortcuts: While the instructions call for a full 6-8 weeks of cold stratification, you can speed thin...
Frequently asked questions
Got questions about growing Black Eyed Susan Vine from seed pods? You’re not alone! Here are answers to the most common queries—from timing to troubleshooting—to help you cultivate vibrant blooms with confidence.
How long do Black Eyed Susan vine seed pods take to germinate?
Germination typically takes 14–21 days in warm, moist soil (65–75°F). For faster results, soak pods in warm water for 24 hours before planting. Keep soil consistently damp but not soggy—patience pays off!
Can I plant Black Eyed Susan vine seed pods directly outside, or should I start indoors?
Direct sowing is easiest! These hardy seeds thrive outdoors after the last frost (spring or early summer). If your climate is chilly, start seeds 4–6 weeks indoors under grow lights. Just avoid transplant shock by hardening off seedlings.
Why aren’t my seed pods sprouting? Troubleshooting tips?
Check these fixes:
Cold soil? Wait for warmer temps (below 50°F slows germination).
Too dry/wet? Keep soil consistently moist—not drenched.
Old seeds? Store-bought pods last 1–2 years; fresh pods germinate best.
Depth issue? Plant seeds ¼ inch deep—too deep = rot.
If still stuck, try a bottom-heat mat (70°F) to mimic tropical conditions.What’s the best way to harvest Black Eyed Susan vine seed pods?
Harvest pods when they turn brown and dry (late summer/fall). Gently twist or cut them off the vine—don’t pull, or you’ll damage stems. Store pods in a paper bag in a cool, dry place for up to 2 years. Pro tip: Wear gloves—some folks are sensitive to the vine’s sap!
Are there alternatives to Black Eyed Susan vine for fast-growing vines?
Yes! Try these sun-loving vines with similar ease:
- Morning Glory – Fast germination (5–10 days), great for trellises.
- Sweet Pea – Fragrant blooms, but needs cooler temps.
- Honeysuckle – Drought-tolerant, attracts pollinators.
Wrapping up and next steps
Growing Black Eyed Susan vine seed pods is a rewarding way to bring vibrant, sun-loving blooms to your garden! With the right soil, patience, and care, you’ll soon enjoy clusters of cheerful yellow flowers that attract pollinators and add a pop of color.
Whether you’re a seasoned gardener or just starting out, these seeds offer a simple yet stunning way to enhance your outdoor space.
Ready to take the next step? Start by gathering your supplies, following the germination tips, and watch your garden transform! 🌱🌸